[T101 4기] 테라폼 기본 사용법 2/3
들어가며
테라폼 기초 입문 실습 스터디 2주차 입니다. 1주차에 이어 테라폼의 기본 사용법에 대해 실습해보려 합니다. 이번 주에도 “테라폼으로 시작하는 IaC” 책을 기준으로 정리하였습니다.

HCL (계속)
지난주에 이어서 HCL(HashiCorp Configuration Language) 의 문법에 대해 알아보겠습니다.
테라폼 블록
data 블록
- 데이터 소스는 테라폼으로 정의되지 않은 외부 리소스와 저장된 정보를 참조할때 사용합니다.
-
data블록 선언 방법data "<프로바이더이름_리소스유형>" "<이름>" { <인수> = <값> }이때 인수는 데이터 소스를 참조할때 사용할 인수이며 아래의 “데이터 소스 참조 방법”에서의 속성과는 다른 값입니다. 이 인수로 참조된 데이터의 속성 값을 아래의 방법으로 가져올 수 있습니다.
-
데이터 소스 참조 방법
# 데이터 소스 참조 data.<프로바이더이름_리소스유형>.<이름>.<속성> -
data블록 사용 예시- 현재 region에서 사용가능한 availability zone 정보를 가져오기
- main.tf
# main.tf data "aws_availability_zones" "available_zones" { state = "available" # 현재 region에서 사용가능한 availability zone 정보를 가져오기 }- 실행 결과 확인
# main.tf 적용 $ terraform init && terraform plan && terraform apply -auto-approve # state 확인 $ terraform state list # => data.aws_availability_zones.available_zones # 테라폼 콘솔에서 확인 $ terraform console > # <확인하고 싶은 속성> > data.aws_availability_zones.available_zones # => ... > data.aws_availability_zones.available_zones.id # => "ap-northeast-2" > data.aws_availability_zones.available_zones.names # => AZ 이름 목록... > data.aws_availability_zones.available_zones.zone_ids # => AZ ID 목록... # tip. echo <확인하고 싶은 속성> || terraform console 로 값 확인 $ echo "data.aws_availability_zones.available_zones" | terraform console # => ... $ echo "data.aws_availability_zones.available_zones.id" | terraform console # => "ap-northeast-2" $ echo "data.aws_availability_zones.available_zones.names" | terraform console # => AZ 이름 목록... $ echo "data.aws_availability_zones.available_zones.zone_ids" | terraform console # => AZ ID 목록... $ echo "data.aws_availability_zones.available_zones.zone_ids[0]" | terraform console # => "apne2-az1" - 로컬 파일의 내용 읽기
- main.tf
# main.tf resource "local_file" "abc" { content = "Hello world!!" filename = "${path.module}/abc.txt" } data "local_file" "abc" { filename = local_file.abc.filename } resource "local_file" "def" { content = data.local_file.abc.content filename = "${path.module}/def.txt" }-
실행 결과 확인
 # main.tf 적용
 $ terraform init && terraform plan && terraform apply -auto-approve

 # state 확인
 $ terraform state list
 # => data.local_file.abc
 #    local_file.abc
 #    local_file.def

 # graph 확인
 $ terraform graph > graph.dot

 # 데이터 소스 참조 확인
 $ echo "data.local_file.abc.content" | terraform console
- 현재 region에서 사용가능한 availability zone 정보를 가져오기
variable 블록
- 변수(variable)블록은 인프라를 구성하는데 필요한 속성 값을 정의해 코드의 변경 없이 여러 인프라를 생성하는데 사용합니다.
- 테라폼에서의 variable 블록을 입력 변수, 즉 input variable라 합니다.
-
variable블록 선언 방법variable "<이름>" { <인수> = <값> <메타변수> = <메타변수 값> }-
source,version,providers등의 예약어는 변수이름으로 사용할 수 없습니다.
-
-
변수 참조 방법
  # 변수 참조
  var.<이름>

  # 배열인 경우 [<인덱스>] 로 참조
  var.<이름>[<인덱스>]

  # 배열의 10번째 항목 참조 예시
  var.<이름>[9]
variable 블록에서 사용 가능한 메타변수
-
variable블록에서는 다음의 메타변수를 사용 가능합니다.
| 메타변수 | 설명 |
|---|---|
| default | 기본값을 지정합니다. 기본값도 없고, 다른 방법들로 지정되지 않으면 대화식으로 사용자에게 묻습니다. |
| type | 변수 유형을 지정합니다. |
| description | 입력변수의 설명을 기입합니다. |
| validation | 변수의 제약 조건을 부여하고 유효성 검사 규칙을 정의합니다. 참고 |
| sensitive | 비밀번호 등의 민감한 변수임을 표시하고 출력문에서 값 노출을 제한합니다. 참고 |
| nullable | 변수에 값이 없어도 됨을 지정합니다. |
입력 변수 유형
| 유형 | 설명 |
|---|---|
| string | 문자열을 나타냅니다. |
| number | 숫자를 나타냅니다. |
| bool | true, false의 불리언 값을 나타냅니다. |
| list(<유형>)유형> | 리스트를 나타냅니다. |
| map(<유형>)유형> | 맵을 나타냅니다. |
| set(<유형>)유형> | 집합을 나타냅니다. |
| object({<인수 이름="">=<유형>, ...})유형>인수> | 객체를 나타냅니다. |
| tuple([<유형>, ...])유형> | 튜플을 나타냅니다. |
- 입력 변수 사용 예시
-
number변수 예시variable "number" { type = number default = 10 } -
list변수 예시variable "list" { type = list default = [1, "two", 3] } -
list의 값으로 number로 받는 조건 결합 예시variable "list" { type = list(number) default = [1, 2, 3] # default = [1, "two", 3] 과 같이 지정된 number 타입이 아닌 경우 오류 발생 } - 모든 값이 string 인 map 예시
variable "map" { type = map(string) default = { key1 = "value1" key2 = "value2" } } -
object변수를 사용하여 복잡한 구조적 유형 (structural type) 작성 예시variable "object_example" { type = object({ name = string age = number tags = list(string) enabled = bool }) default = { name = "value1" age = 42 tags = ["a", "b", "c"] enabled = true } }
-
유효성 검사
-
variable선언시 변수 타입 이외에도 사용자 지정 유효성 검사를 추가할 수 있습니다. -
유효성 검사 작성 방법
variable "image_id" { type = string description = "The id of the machine image (AMI) to use for the server." validation { condition = length(var.image_id) > 4 # true 또는 false를 반환하는 규칙 error_message = "The image_id value must exceed 4." # false일 때 출력할 오류 메시지 } validation { condition = can(regex("^ami-", var.image_id)) # 정규 표현식을 사용한 예시 error_message = "The image_id value must starting with \"ami-\"." } }-
variable블록 내부에validation블록을 넣고, 그 안에condition과error_message를 지정합니다. -
condition: 유효성 검사 조건을 지정합니다. -
error_message: 조건이 만족하지 않을 때 출력할 오류 메시지를 지정합니다. - 확인
- 아래와 같이 조건에 맞지 않는 ami 입력시 유효성 검사를 만족하지 못하여 오류 메시지가 출력되는것을 확인할 수 있습니다.
$ terraform plan # => var.image_id # The id of the machine image (AMI) to use for the server. # # Enter a value: ami # ... # # The image_id value must exceed 4. # # This was checked by the validation rule at main.tf:5,7-17. # # ... # # The image_id value must starting with "ami-". # # This was checked by the validation rule at main.tf:10,7-17. - 유효성 검사 조건을 만족하는 ami-1234 입력시 정상적으로 실행됩니다.
  $ terraform plan
  # => var.image_id
  #    The id of the machine image (AMI) to use for the server.
  #
  #    Enter a value: ami-1234
  #
  #    local_file.abc: Refreshing state... [id=3ee66cf7a43f216ff7060c2bd85758424f7f18b3]
  #
  #    No changes. Your infrastructure matches the configuration.
  #
  #    Terraform has compared your real infrastructure against your configuration and found no differences, so no changes are needed.
- 아래와 같이 조건에 맞지 않는 ami 입력시 유효성 검사를 만족하지 못하여 오류 메시지가 출력되는것을 확인할 수 있습니다.
-
sensitive 메타변수를 사용한 민감한 변수값 처리
-
sensitive = true를variable블록에 넣어서 해당 변수가 민감한 값을 갖고 있음을 지정할 수 있습니다. -
민감한 변수값은 출력문에서 노출되지 않고
(sensitive value)라는 내용으로 감춰집니다.# main.tf variable "my_password" { default = "supersecret" sensitive = true } resource "local_file" "abc" { content = var.my_password filename = "${path.module}/abc.txt" }- 확인
# 1. terraform apply 실행시 my_password 변수값이 민감한 값으로 처리되어 출력됩니다. $ terraform apply --auto-approve # => ... # + content = (sensitive value) # ... # 2. terraform console로 확인시에도 민감한 값으로 필터링 되어 출력됩니다. $ echo "local_file.abc.content" | terraform console # => (sensitive value) # 3. 파일 내용은 실제 값으로 들어갑니다. $ cat abc.txt # => supersecret # 4. terraform.tfstate 파일은 실제값이 들어가 있습니다. .tfstate 파일을 안전하게 관리해야 할 필요가 있습니다. $ cat terraform.tfstate| grep "content" # => "content": "supersecret",-
terraform.tfstate에서는 sensitive 값이 노출되므로 주의해야 합니다.terraform.tfstate파일을 안전하게 관리하는 방법은 다음의 방법 등이 있습니다.- AWS S3 등의 외부 스토리지에 저장하고, 권한을 제한
- 민감한 정보를
variable를 사용하지 않고 다른 방법으로 (예) 파일 등) 넘기거나, 일시적으로 사용하고 즉시 변경할 수 있는 경우 사용 - 민감한 정보는 Terraform에 넘길때 암호화 하여 사용하고, provisioning시 복호화하여 사용
-
- 확인
변수 입력 방식과 우선 순위
- 변수 입력 방식은 다음과 같습니다. 아래로 갈 수록 우선순위가 높아집니다.
- 실행 후 대화식 입력
$ terraform apply -auto-approve # => var.my_var # Enter a value: abcd $ echo "local_file.abc.content" | terraform console # => "abcd" -
variable블록에default로 지정된 값-
main.tf작성# main.tf variable "my_var" { default = "default value" } - 실행
  $ terraform apply -auto-approve
  # => ...
  # => Apply complete! Resources: 1 added, 0 changed, 1 destroyed.

  $ echo "local_file.abc.content" | terraform console
  # => "default value"
-
- 환경 변수로 입력
$ export TF_VAR_my_var="환경변수" $ terraform apply -auto-approve $ echo "local_file.abc.content" | terraform console # => "환경변수" -
terraform.tfvars파일을 통해 변수 파일로 입력$ echo 'my_var = "terraform.tfvars 값"' > terraform.tfvars $ terraform apply -auto-approve $ echo "local_file.abc.content" | terraform console # => "terraform.tfvars 값" -
terraform.tfvars.json파일을 통해 변수 파일로 입력$ echo '{ "my_var": "terraform.tfvars.json 값" }' > terraform.tfvars.json $ terraform apply -auto-approve $ echo "local_file.abc.content" | terraform console # => "terraform.tfvars.json 값" -
*.auto.tfvars또는*.auto.tfvars.json을 통해 변수 파일로 입력- 단, 파일명의 정렬 순서에 따라
*.auto.tfvars파일간의 우선순위기 적용됩니다.
$ echo 'my_var = "eeee.auto.tfvars 값"' > eeee.auto.tfvars $ terraform apply -auto-approve $ echo "local_file.abc.content" | terraform console # => "eeee.auto.tfvars 값" $ echo 'my_var = "zzzz.auto.tfvars 값"' > zzzz.auto.tfvars $ terraform apply -auto-approve $ echo "local_file.abc.content" | terraform console # => "zzzz.auto.tfvars 값" $ echo 'my_var = "aaaa.auto.tfvars 값"' > aaaa.auto.tfvars $ terraform apply -auto-approve $ echo "local_file.abc.content" | terraform console # => "zzzz.auto.tfvars 값"- 위의 예제에서 보는것과 같이 정렬 순서에서 뒤로 갈 수록 우선순위가 높아집니다. z가 a나 e 보다 뒤이기 때문에 zzzz.auto.tfvars 값이 우선하게 적용됩니다.
- 단, 파일명의 정렬 순서에 따라
-
terraform apply시-var또는-var-file로 파일 지정 명령행 인수 사용$ terraform apply -auto-approve -var='my_var=명령행 인수 값' -var="addtional_var=추가 변수 값" $ echo "local_file.abc.content" | terraform console # => "명령행 인수 값" $ echo 'my_var="-var-file 값"' > varfiletest.txt $ terraform apply -auto-approve -var-file=varfiletest.txt $ echo "local_file.abc.content" | terraform console # => "-var-file 값"
- 실행 후 대화식 입력
locals 지역 값 블록
-
locals블록은 테라폼 코드 내에서 재사용 가능한 지역 변수를 정의할 때 사용합니다. -
variable과는 달리 선언된 모듈 내에서만 사용 가능하며, 실행시에 입력받을 수 없습니다. - 단점으로는 실제 값에 대한 추적이 어려워 질 수 있다는 점입니다.
-
locals블록 선언 방법locals { <인수> = <값> }-
source,version,providers등의 예약어는 변수이름으로 사용할 수 없습니다.
-
-
참조 방법
# 변수 참조 local.<이름> # 배열인 경우 [<인덱스>] 로 참조 local.<이름>[<인덱스>] # 배열의 10번째 항목 참조 예시 local.<이름>[9] -
locals블록 사용 예시-
main.tf작성# main.tf variable "prefix" { type = string default = "hello" } locals { name = "terraform" content = "${var.prefix} ${local.name}" my_info = { age = 20 region = "KR" } my_nums = [1,2,3,4,5] } locals { my_string = "string ${local.content}" # content = "content2" # 위의 locals에 등록되어서 로컬변수명이 중복되어 오류가 발생합니다. } resource "local_file" "abc" { content = local.content filename = "${path.module}/abc.txt" } - 실행 결과 확인
  $ terraform apply -auto-approve

  $ echo "local_file.abc.content" | terraform console
  # => "hello terraform"

  $ echo "local.my_string" | terraform console
  # => "string hello terraform"
-
output 출력 값 블록
-
output블록은 테라폼 코드 프로비저닝 수행 후 결과 속성 값을 확인하는 용도로 사용합니다. - 출력 값은 다음의 용도로 사용할 수 있습니다.
- 루트 모듈에서 사용자가 확인하고자 하는 특정 속성 출력
- 자식 모듈의 특정값을 정의하고 루트 모듈에서 결과를 참조
- 루트 모듈 간의 결과를 원격으로 읽기 위한 접근 요소
- output 블록 선언 방법
  output "<이름>" {
      value = <값>
      <메타변수> = <메타변수 값>
  }
output 블록에서 사용 가능한 메타변수
-
output블록에서는 다음의 메타변수를 사용 가능합니다.메타변수 설명 description 출력값의 설명을 기입합니다. sensitive 비밀번호 등의 민감한 값임을 표시하고 출력문에서 값 노출을 제한합니다. depends_on value에 담길 값이 종속성이 있는 경우 지정하면 생성 순서가 조정됩니다. precondition 출력전에 지정된 조건을 검증합니다. -
출력 값 사용 예시
# main.tf locals { content = "local content" } resource "local_file" "abc" { content = "${local.content}" filename = "${path.module}/abc.txt" } output "file_id" { value = local_file.abc.id depends_on = [ local_file.abc ] } output "file_abspath" { value = abspath(local_file.abc.filename) description = "파일의 절대 경로" } output "local_content" { value = local.content sensitive = true }- 실행 결과
  $ terraform apply -auto-approve
  # => ...
  #    Outputs:
  #
  #    file_abspath = ".../week-2/mytest7-output/abc.txt"
  #    file_id = "094f587b52451d1d5f3ef42a921fc877d8b18c1b"
  #    local_content = <sensitive>
반복문 (1/2)
- list 형태의 값 목록이나 Key-Value 형태의 맵을 항목 만큼 반복하여 인프라 구성 정의를 항목 개수만큼 반복적으로 작성하지 않고, 반복문을 사용하여 간단하게 작성할 수 있습니다.
- 테라폼의 HCL에는
count와for_each두 가지 반복문이 있습니다. - 이번 주차에는
count반복문에 대해 알아보았습니다.
count 반복문
-
count는 프로그래밍 언어의for문 처럼 정수값만큼 반복합니다. - 기본 적인 사용법은 아래와 같습니다.
resource "<프로바이더이름_리소스유형>" "<이름>" {
    count = <반복횟수>
    content = "Index = ${count.index}" # count.index 로 현재 반복 인덱스를 참조
}
- 위의 코드에서
count횟수 만큼 반복해서 resource나 모듈을 생성합니다. -
count의 반복횟수 참고값은count.index를 통해 확인할 수 있으며, 0부터 시작해서 1씩 증가합니다. - 사용 예제
# main.tf variable "fruits" { type = list default = ["apple", "banana", "kiwi"] } resource "local_file" "fruit_files" { count = length(var.fruits) filename = "${path.module}/i_love_${var.fruits[count.index]}.txt" content = "I love ${var.fruits[count.index]}!" }- 실행 결과
$ terraform apply -auto-approve

$ ls -1
# => i_love_apple.txt
#    i_love_banana.txt
#    i_love_kiwi.txt

$ cat i_love_apple.txt
# => I love apple!
- 실행 결과
도전과제
도전과제 1. 리전 내에서 사용 가능한 가용영역 목록 가져오기를 사용한 VPC 리소스 생성 실습 진행
- 가용영역 목록을 가져와서 VPC를 만들고, 사용 가능한 첫번째 가용영역에 subnet을 만드는 실습을 진행하였습니다.
- 소스
# main.tf data "aws_availability_zones" "available" { state = "available" } resource "aws_vpc" "peter_vpc" { cidr_block = "10.0.0.0/16" tags = { Name = "challenge1 vpc" } } resource "aws_subnet" "peter_subnet" { vpc_id = aws_vpc.peter_vpc.id availability_zone = data.aws_availability_zones.available.names[0] cidr_block = "10.0.1.0/24" tags = { Name = "challenge1 subnet" } } - 실행 결과
$ terraform apply -auto-approve # => ... # aws_vpc.peter_vpc: Creating... # aws_vpc.peter_vpc: Creation complete after 1s [id=vpc-0e6762235c588581b] # aws_subnet.peter_subnet: Creating... # aws_subnet.peter_subnet: Creation complete after 0s [id=subnet-06888df37bc01ab4c] # 결과 확인 $ echo "aws_vpc.peter_vpc.id" | terraform console # => "vpc-0e6762235c588581b" $ echo "aws_subnet.peter_subnet.id" | terraform console # => "subnet-06888df37bc01ab4c"- AWS 콘솔에서 VPC 생성 확인

- AWS 콘솔에서 Subnet 생성 확인

- AWS 콘솔에서 VPC 생성 확인
-
그래프
도전과제 2. 위 3개 코드 파일 내용에 리소스의 이름(myvpc, mysubnet1 등)을 반드시! 꼭! 자신의 닉네임으로 변경해서 배포 실습해보세요!
- vpc.tf 생성
# vpc.tf provider "aws" { region = "ap-northeast-2" } resource "aws_vpc" "peter_vpc" { cidr_block = "10.10.0.0/16" tags = { name = "t101-study" } }- 실행
$ terraform init && terraform plan && terraform apply -auto-approve
# => ...
#    Plan: 1 to add, 0 to change, 0 to destroy.
#    aws_vpc.peter_vpc: Creating...
#    aws_vpc.peter_vpc: Creation complete after 2s [id=vpc-0e1ad43009a8fe8fa]
#
#    Apply complete! Resources: 1 added, 0 changed, 0 destroyed.

$ echo "aws_vpc.peter_vpc.id" | terraform console
# => "vpc-0e1ad43009a8fe8fa"

$ aws ec2 describe-vpcs --filter 'Name=isDefault,Values=false' | jq
# => {
#      "Vpcs": [
#        {
#          "CidrBlock": "10.10.0.0/16",
#          "DhcpOptionsId": "dopt-0c264ef627294fd1f",
#          "State": "available",
#          "VpcId": "vpc-0e1ad43009a8fe8fa",
#          "OwnerId": "123456789012",
#          "InstanceTenancy": "default",
#          "CidrBlockAssociationSet": [
#            {
#              "AssociationId": "vpc-cidr-assoc-0e9adafb317c75f4f",
#              "CidrBlock": "10.10.0.0/16",
#              "CidrBlockState": {
#                "State": "associated"
#              }
#            }
#          ],
#          "IsDefault": false,
#          "Tags": [
#            {
#              "Key": "name",
#              "Value": "t101-study"
#            }
#          ]
#        }
#      ]
#    }
- 실행
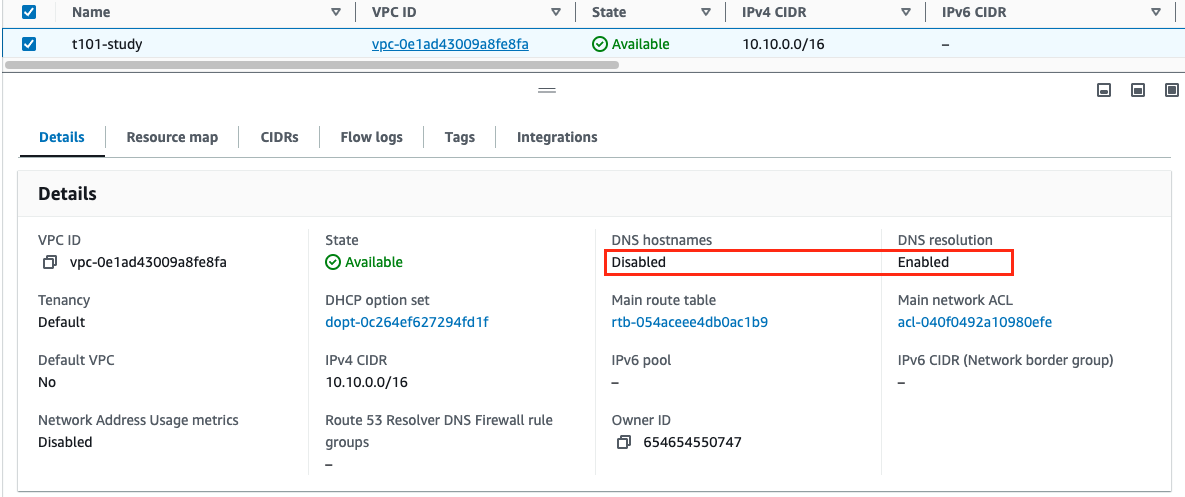
- AWS 콘솔에서 VPC 생성정보 확인 : DNS 옵션값 확인
- 아래의 캡쳐와 같이 DNS hostnames는 Disabled, DNS resolution은 Enabled 된 것을 확인하였습니다.
- 아래의 캡쳐와 같이 DNS hostnames는 Disabled, DNS resolution은 Enabled 된 것을 확인하였습니다.
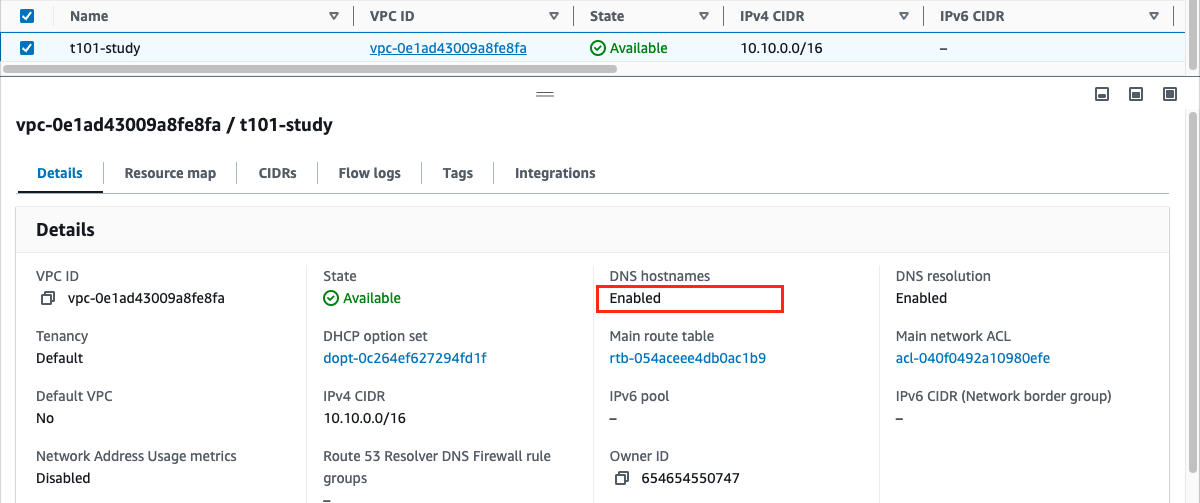
- vpc.tf의 DNS 옵션을 수정하여 두 DNS 옵션값을 enabled 로 변경
# vpc.tf provider "aws" { region = "ap-northeast-2" } resource "aws_vpc" "peter_vpc" { cidr_block = "10.10.0.0/16" enable_dns_support = true # 추가 enable_dns_hostnames = true # 추가 tags = { Name = "t101-study" } } - 수정된 vpc.tf 적용
$ terraform apply -auto-approve - AWS 콘솔에서 VPC 생성정보 확인 : DNS 옵션값 확인
- 아래와 같이 DNS hostnames 도 Enabled 되었습니다.
- 아래와 같이 DNS hostnames 도 Enabled 되었습니다.
- vpc.tf 코드 내용 수정 : 서브넷 2개 생성 추가
provider "aws" { region = "ap-northeast-2" } resource "aws_vpc" "peter_vpc" { cidr_block = "10.10.0.0/16" enable_dns_support = true enable_dns_hostnames = true tags = { Name = "t101-study" } } resource "aws_subnet" "peter_subnet1" { vpc_id = aws_vpc.peter_vpc.id cidr_block = "10.10.1.0/24" availability_zone = "ap-northeast-2a" tags = { Name = "t101-subnet1" } } resource "aws_subnet" "peter_subnet2" { vpc_id = aws_vpc.peter_vpc.id cidr_block = "10.10.2.0/24" availability_zone = "ap-northeast-2c" tags = { Name = "t101-subnet2" } } output "aws_vpc_id" { value = aws_vpc.peter_vpc.id }- 실행 결과 확인
$ terraform apply -auto-approve

$ terraform state list
# => aws_subnet.peter_subnet1
#    aws_subnet.peter_subnet2
#    aws_vpc.peter_vpc

$ terraform output
# => aws_vpc_id = "vpc-0e1ad43009a8fe8fa"

$ terraform output aws_vpc_id
# => "vpc-0e1ad43009a8fe8fa"

$ terraform output -raw aws_vpc_id
# => vpc-0e1ad43009a8fe8fa

$ VPCID=$(terraform output -raw aws_vpc_id)

$ aws ec2 describe-subnets --filters "Name=vpc-id,Values=$VPCID" --output table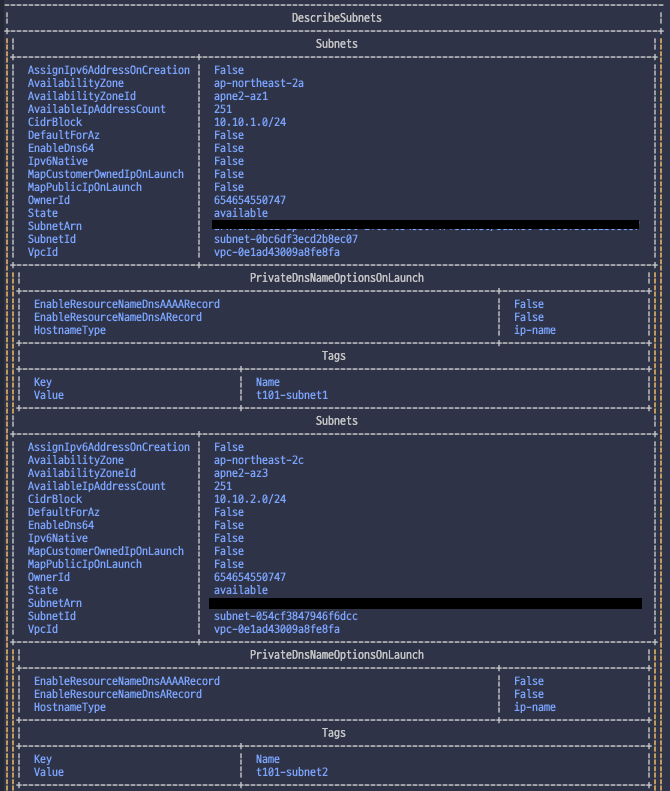
terraform output시-raw옵션을 사용하면 “(따옴표) 없이 출력값만을 확인할 수 있습니다. 스크립트 작성시 유용할듯합니다. -
그래프
- 실행 결과 확인
- 이후 다음의 작업을 추가 적용 하였습니다.
- IGW 인터넷 게이트웨이 추가
- IGW 인터넷 게이트웨이로 전달하는 디폴트 라우팅 정보 추가
- 보안그룹/EC2 배포
- 최종 결과는 아래와 같습니다.
- vpc.tf
# vpc.tf provider "aws" { region = "ap-northeast-2" } resource "aws_vpc" "peter_vpc" { cidr_block = "10.10.0.0/16" enable_dns_support = true enable_dns_hostnames = true tags = { Name = "t101-study" } } resource "aws_subnet" "peter_subnet1" { vpc_id = aws_vpc.peter_vpc.id cidr_block = "10.10.1.0/24" availability_zone = "ap-northeast-2a" tags = { Name = "t101-subnet1" } } resource "aws_subnet" "peter_subnet2" { vpc_id = aws_vpc.peter_vpc.id cidr_block = "10.10.2.0/24" availability_zone = "ap-northeast-2c" tags = { Name = "t101-subnet2" } } resource "aws_internet_gateway" "peter_igw" { vpc_id = aws_vpc.peter_vpc.id tags = { Name = "t101-igw" } } resource "aws_route_table" "peter_rt" { vpc_id = aws_vpc.peter_vpc.id tags = { Name = "t101-rt" } } resource "aws_route_table_association" "peter_rtassociation1" { subnet_id = aws_subnet.peter_subnet1.id route_table_id = aws_route_table.peter_rt.id } resource "aws_route_table_association" "peter_rtassociation2" { subnet_id = aws_subnet.peter_subnet2.id route_table_id = aws_route_table.peter_rt.id } resource "aws_route" "peter_defaultroute" { route_table_id = aws_route_table.peter_rt.id destination_cidr_block = "0.0.0.0/0" gateway_id = aws_internet_gateway.peter_igw.id } output "aws_vpc_id" { value = aws_vpc.peter_vpc.id } - sg.tf
# sg.tf resource "aws_security_group" "peter_sg" { vpc_id = aws_vpc.peter_vpc.id name = "T101 SG" description = "T101 Study SG" } resource "aws_security_group_rule" "peter_sginbound" { type = "ingress" from_port = 80 to_port = 80 protocol = "tcp" cidr_blocks = ["0.0.0.0/0"] security_group_id = aws_security_group.peter_sg.id } resource "aws_security_group_rule" "peter_sgoutbound" { type = "egress" from_port = 0 to_port = 0 protocol = "-1" cidr_blocks = ["0.0.0.0/0"] security_group_id = aws_security_group.peter_sg.id } output "aws_security_group_id" { value = aws_security_group.peter_sg.id } - ec2.tf
# ec2.tf
data "aws_ami" "peter_amazonlinux2" {
  most_recent = true
  filter {
    name   = "owner-alias"
    values = ["amazon"]
  }

  filter {
    name   = "name"
    values = ["amzn2-ami-hvm-*-x86_64-ebs"]
  }

  owners = ["amazon"]
}

resource "aws_instance" "peter_ec2" {

  depends_on = [
    aws_internet_gateway.peter_igw
  ]

  ami                         = data.aws_ami.peter_amazonlinux2.id
  associate_public_ip_address = true
  instance_type               = "t2.micro"
  vpc_security_group_ids      = ["${aws_security_group.peter_sg.id}"]
  subnet_id                   = aws_subnet.peter_subnet1.id

  user_data = <<-EOF
              #!/bin/bash
              wget https://busybox.net/downloads/binaries/1.31.0-defconfig-multiarch-musl/busybox-x86_64
              mv busybox-x86_64 busybox
              chmod +x busybox
              RZAZ=$(curl http://169.254.169.254/latest/meta-data/placement/availability-zone-id)
              IID=$(curl 169.254.169.254/latest/meta-data/instance-id)
              LIP=$(curl 169.254.169.254/latest/meta-data/local-ipv4)
              echo "< h1>RegionAz($RZAZ) : Instance ID($IID) : Private IP($LIP) : Web Server</h1><br/>Greetings commander" > index.html
              nohup ./busybox httpd -f -p 80 &
              EOF

  user_data_replace_on_change = true

  tags = {
    Name = "t101-peter_ec2"
  }
}

output "peter_ec2_public_ip" {
  value       = aws_instance.peter_ec2.public_ip
  description = "The public IP of the Instance"
}
- vpc.tf
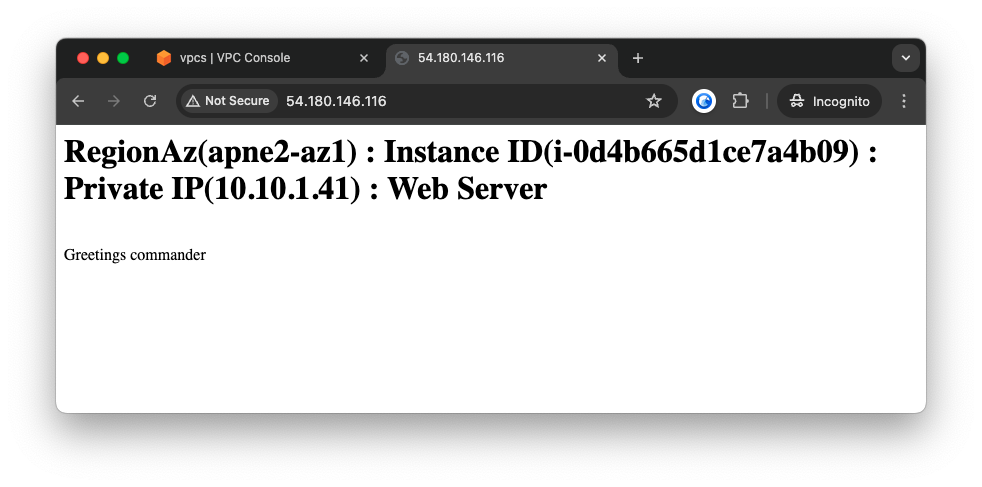
- 배포 후 EC2 확인
$ terraform apply -auto-approve # => ... # Outputs: # aws_security_group_id = "sg-07761e7b1e39b5af6" # aws_vpc_id = "vpc-0e1ad43009a8fe8fa" # peter_ec2_public_ip = "54.180.146.116" # ami 데이터 확인 $ terraform state show data.aws_ami.my_amazonlinux2 # EC2 인스턴스 정보 확인 $ terraform state show aws_instance.myec2 # EC2 인스턴스 IP 확인 $ echo "aws_instance.peter_ec2.public_ip" | terraform console # => "54.180.146.116" $ terraform output -raw peter_ec2_public_ip # => 54.180.146.116 # curl 로 접속 확인 $ PETER_EC2_IP=$(terraform output -raw peter_ec2_public_ip) $ curl $PETER_EC2_IP # => < h1>RegionAz(apne2-az1) : Instance ID(i-0d4b665d1ce7a4b09) : Private IP(10.10.1.41) : Web Server</h1><br/>Greetings commander - 브라우저로 접속 확인
- 그래프 확인
마치며
- 실습을 통해 리소스 유형과 리소스 이름의 사용법, 리소스 속성 등에 대해 이해를 높일 수 있었습니다. 새삼스럽지만 이렇게 쉽게 각종 리소스들이 생성되고, 서비스가 운영된다는게 신기합니다.
- 악분님 실습도 해보고 싶었지만 생각보다 여기까지 시간이 많이 소요되어 다음번으로 미루어야겠습니다.

- 따라가기 버거운 만큼 남는것이 많은 스터디가 될것 같습니다. 끝까지 생존해서 완주 할 수 있길 바라며 오늘의 포스팅을 마칩니다.