[T101 4기] Runner
들어가며
이번 주에는 Module과 Runner에 대해
테라폼으로 시작하는 IaC를 통해 알아 보는 중입니다.
계속해서 Terraform Runner에 대해 알아보겠습니다.

Terraform Runner
- Terraform Runner는 Terraform을 사용하여 인프라를 관리하는 방법 중 하나로 인프라스트럭처 코드의 배포를 간소화하기 위해 사용됩니다.
- 특히 GitOps 등을 통한 CI/CD 파이프라인 내에서 자주 사용되며, 코드 변경 사항을 자동으로 감지하고 적용하여 인프라의 상태를 최신 상태로 유지하는 데 도움을 줍니다. 이를 통해 개발자와 운영팀은 인프라 관리를 더 효율적이고 안정적으로 수행할 수 있습니다.
- 참고 링크
- 국내
- 해외
- Terraform Runner는 다수의 종류가 있는데 그 중에서 Atlantis를 사용해 보겠습니다.
Atlantis 란?
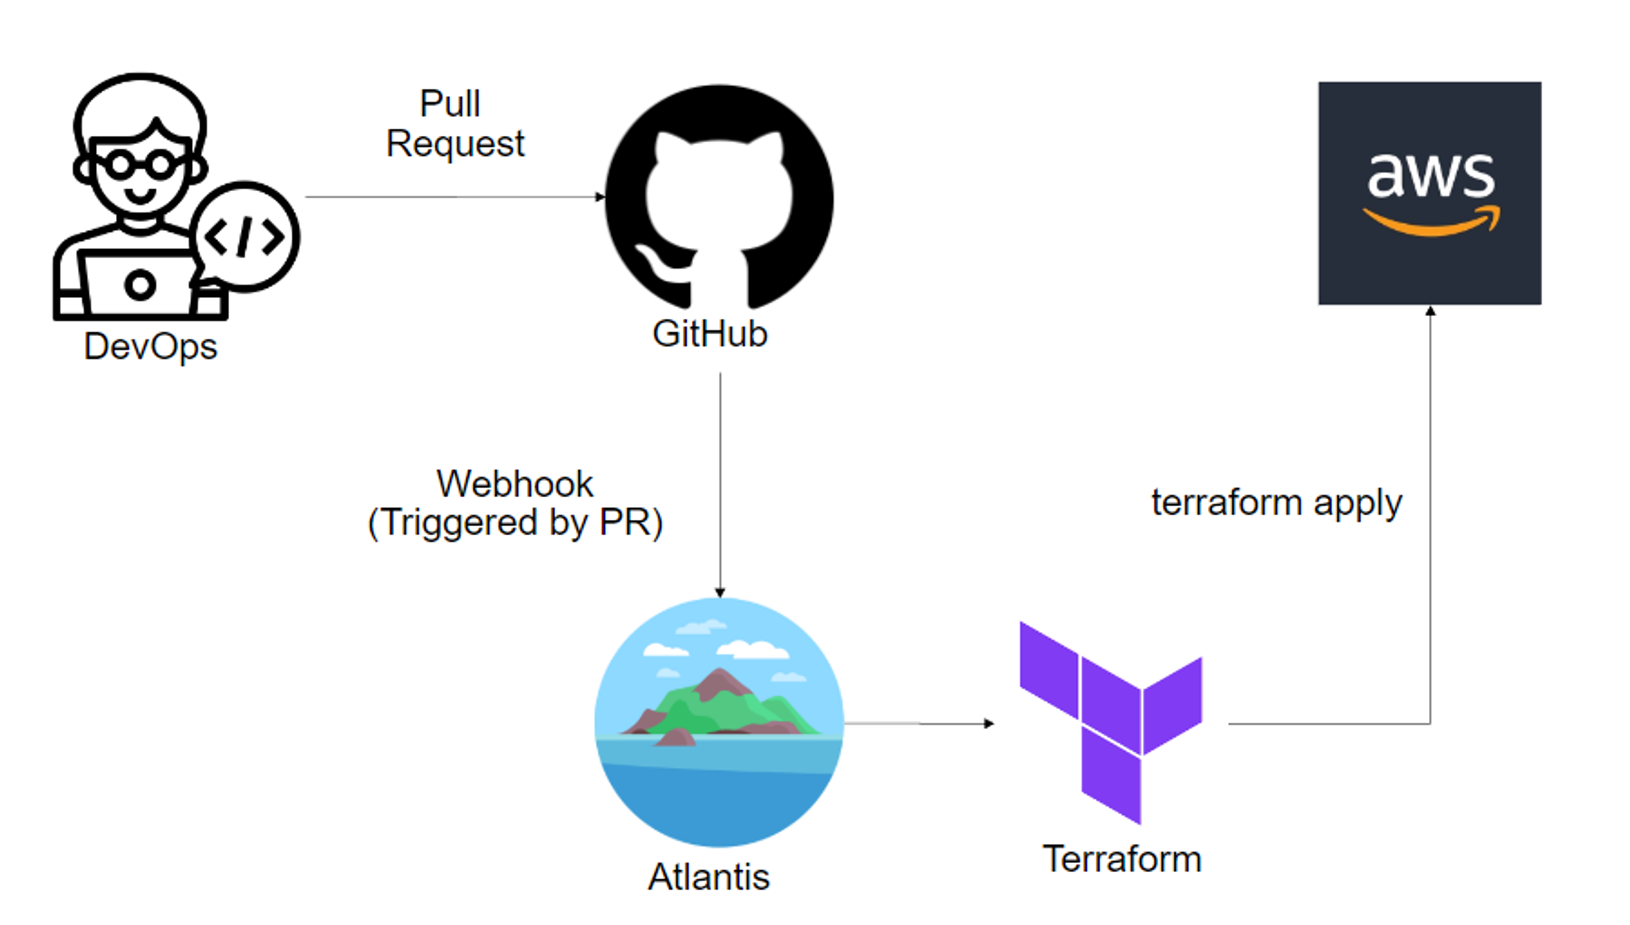
- Atlantis는 Terraform Pull Request Automation 도구로, Terraform 코드를 GitOps 방식으로 관리할 때 사용됩니다. Terraform Pull Request Automation란 개발자와 운영자가 풀 리퀘스트에서 직접 terraform plan과 apply를 실행할 수 있게 하여 Terraform 워크플로우의 협업과 안전성을 개선합니다.
- 이는 개발자가 자격 증명 없이 Terraform을 작성하고 적용할 수 있도록 돕고, 효과적인 협업 문제를 해결합니다. 자세한 내용은 다음 링크에서 확인할 수 있습니다. Link
- 대략적인 동작 방식은 아래와 같습니다.
 출처 : https://isn-t.tistory.com/46
Atlantis 설치
- Atlantis는 다양한 방법으로 설치할 수 있습니다. 이 중에서 Github를 사용하고 Docker를 사용한 설치 방법을 소개합니다.
- 설치 순서
- github 에 repository 생성합니다. (private/public 관계 없음)
- Personal Access Token을 생성합니다.
- 프로필 사진 클릭 > Settings > Developer settings > Personal access tokens > Fine-grained tokens > Generate new token
- 이름 부여
- Only select repositories 선택
- 권한을 줄 저장소 선택 (1. 에서 만든 repository)
- Repository Permissions의 Contents 에 Read & write 선택
- Generate token 버튼 클릭
- 생성된 토큰을 복사합니다.
- 공인 IP가 있는 서버에 Docker를 설치합니다. (공유기로 포트포워딩 해도 좋습니다.)
- Docker 설치 방법은 다양하게 있습니다. Docker 설치 Docker가 설치 되었다고 가정하고 진행하겠습니다.
- Docker에서 atlantis 실행
- docker-compose.yml 작성
services: atlantis: image: ghcr.io/runatlantis/atlantis:v0.28-alpine restart: always ports: - "4141:4141" environment: - ATLANTIS_GH_WEBHOOK_SECRET=<GITHUB연동용 랜덤값> - ATLANTIS_GH_USER=<GITHUB 아이디> - ATLANTIS_GH_TOKEN=<2.에서 생성한 토큰> - ATLANTIS_REPO_ALLOWLIST=<1.에서 생성한 repository 이름> - docker-compose 실행
docker compose up -d
- docker-compose.yml 작성
- Atlantis 접속 테스트
- 브라우저에서
http://<서버 IP>:4141로 접속하여 확인합니다. - Atlantis가 정상적으로 실행되었다면 아래와 같은 화면이 나타납니다.
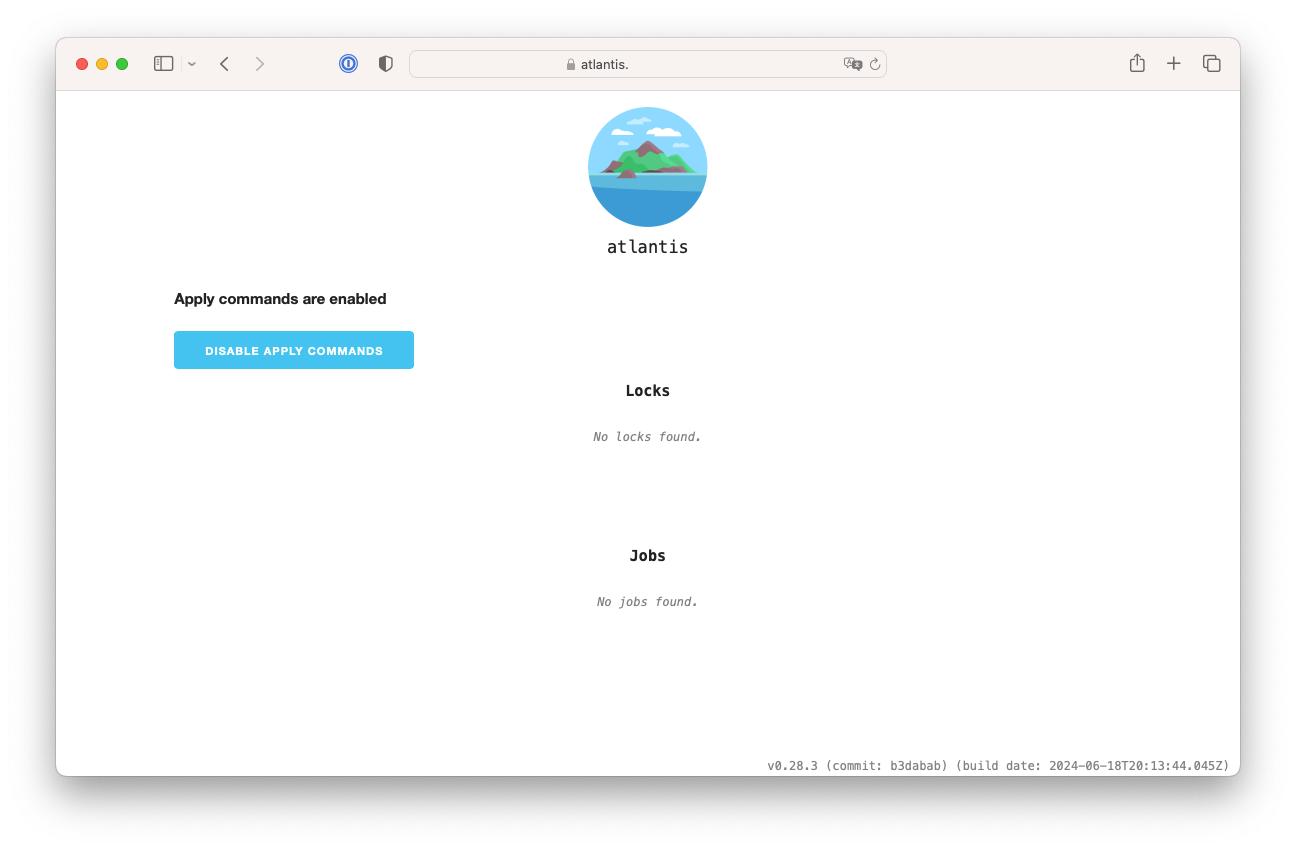
- 브라우저에서
- Github에 Webhook 설정
- 1.에서 생성한 저장소에 접속합니다.
- Settings > Webhooks > Add webhook 클릭합니다.
- Payload URL에 앞서 접속 테스트한
http://<서버 IP>:4141/events를 기입합니다.-
/events로 끝나는지 반드시 확인합니다. 특히 405 에러가 나면 더욱 그러합니다.
-
- Content type에
application/json을 선택합니다. - Secret에 4.에서 등록한
<GITHUB연동용 랜덤값>을 기입합니다. - Let me select individual events를 선택합니다.
- 다음 항목들을 체크합니다.
- Pull request reviews
- Pushes
- Issue comments
- Pull requests
- Active를 체크합니다.
- Add webhook 버튼을 클릭합니다.
- 설치과정이 완료되었습니다. 이제 Terraform 코드를 작성하고 PR을 생성하여 Atlantis를 통해 Terraform 코드를 관리해 보겠습니다.
Atlantis 실습
작업 1. null provider
-
Local에서 git 코드 작업
# git clone $ git clone https://github.com/sweetlittlebird/terraform-atlantis-test && cd terraform-atlantis-test && tree # feature branch 생성 $ git branch test && git checkout test && git branch # main.tf 파일 작성 $ echo 'resource "null_resource" "example" {}' > main.tf # add commit push $ git add main.tf && git commit -m "add main.tf" && git push origin test -
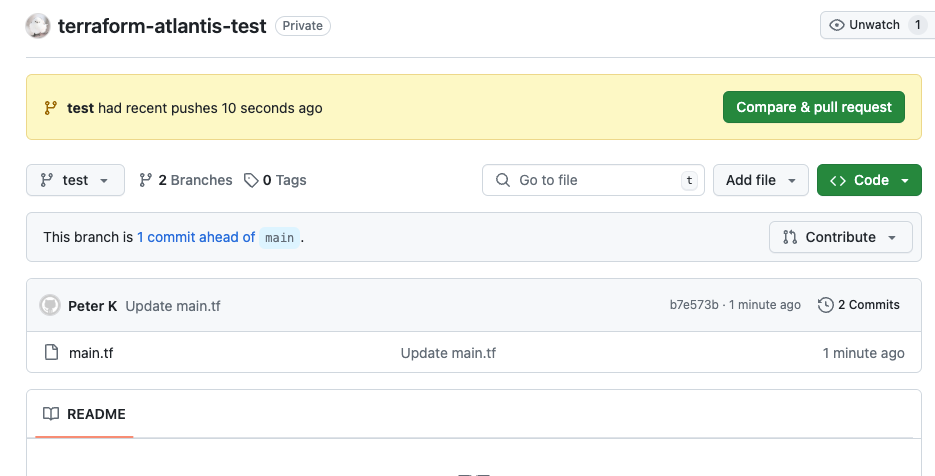
Github PR 생성 => Atlantis 확인
- 서버에서 다음의 명령어로 모니터링합니다.
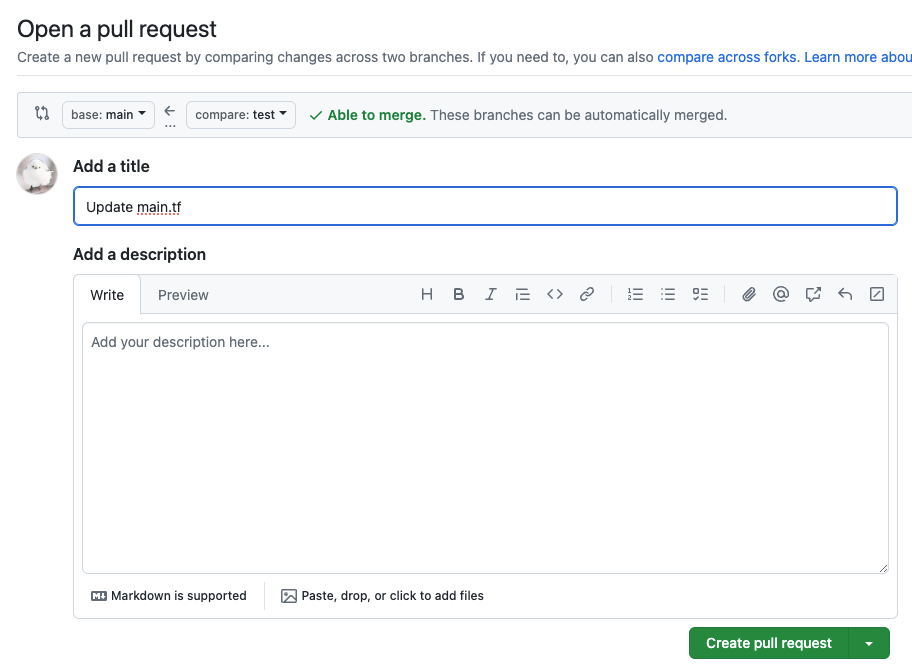
$ docker exec -it docker-atlantis-1 watch -n 1 tree /home/atlantis/.atlantis - Github 에서 Compare & Pull request를 클릭합니다.
- Create pull request : title ( create null resource )
- plan 자동 수행 확인
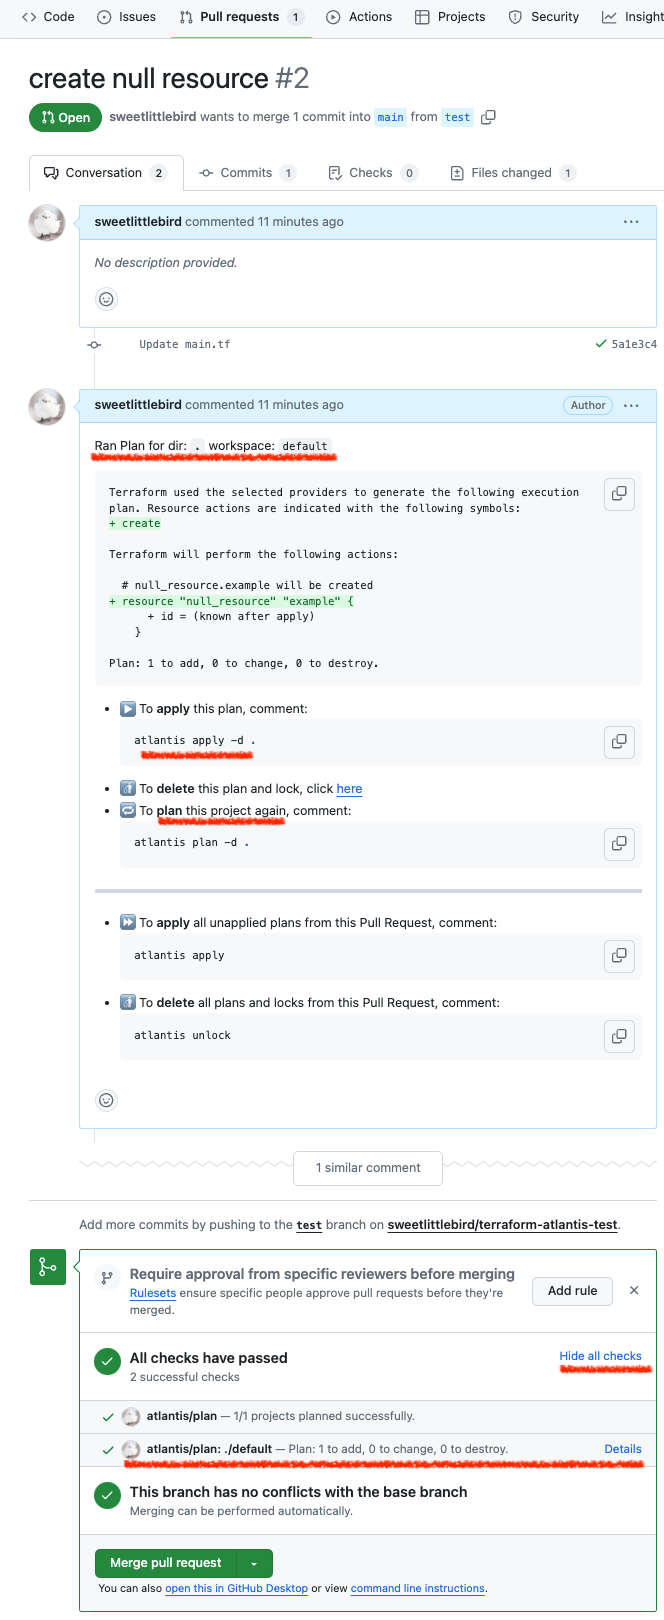
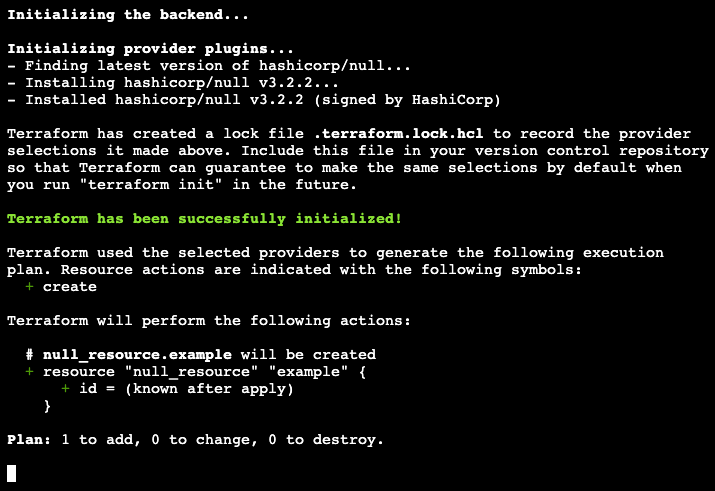
- 서버 모니터링 결과 init 과 plan 이 실행된것을 확인 할 수 있습니다.
$ docker exec -it docker-atlantis-1 watch -n 1 tree /home/atlantis/.atlantis # => /home/atlantis/.atlantis # ├── atlantis.db # ├── bin # ├── plugin-cache # │ └── registry.terraform.io # │ └── hashicorp # │ └── null # │ └── 3.2.2 # │ └── linux_amd64 # │ └── terraform-provider-null_v3.2.2_x5 # └── repos # └── sweetlittlebird # └── terraform-atlantis-test # └── 2 # └── default # ├── default.tfplan # └── main.tf # github repo에서 코드를 가져온것을 확인 $ docker exec -it docker-atlantis-1 cat /home/atlantis/.atlantis/repos/sweetlittlebird/terraform-atlantis-test/2/default/main.tf - PR 코멘트에 이것저것 명령을 넣어봅니다.
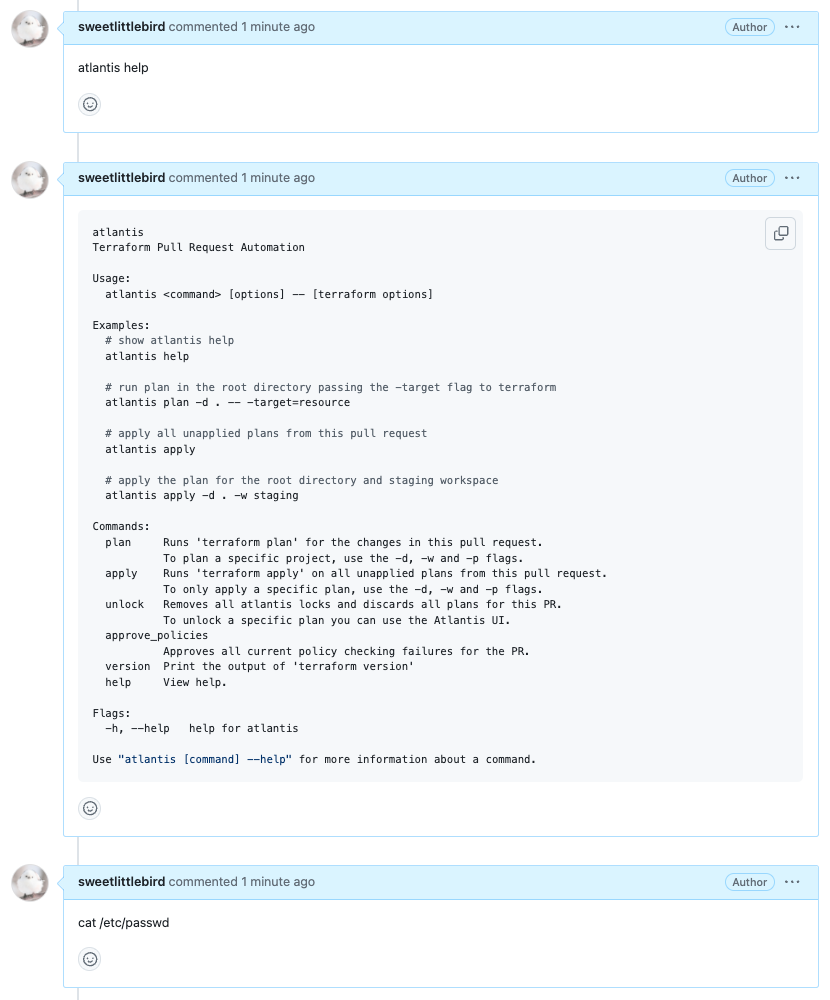
-
atlantis help는 응답이 오지만cat /etc/passwd는 반응이 없습니다.
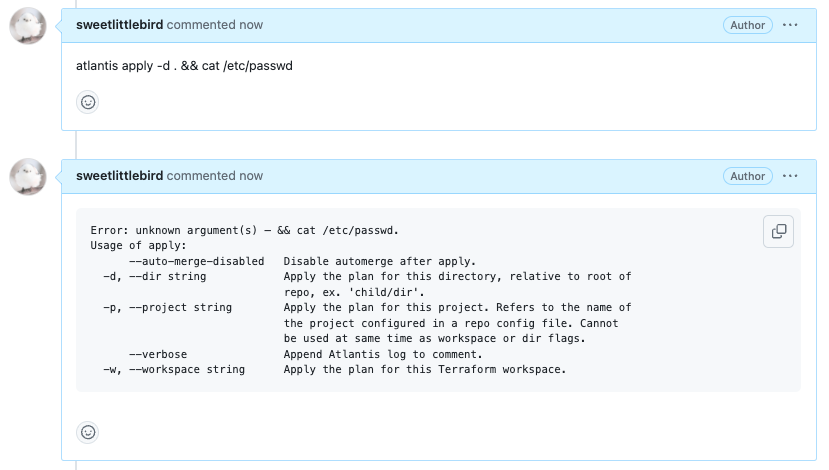
-
- PR 코멘트에 명령을 조합해서 속이려고 해도 되지 않습니다.
- 이제 apply 해보겠습니다.
atlantis plan -d .
atlantis apply -d .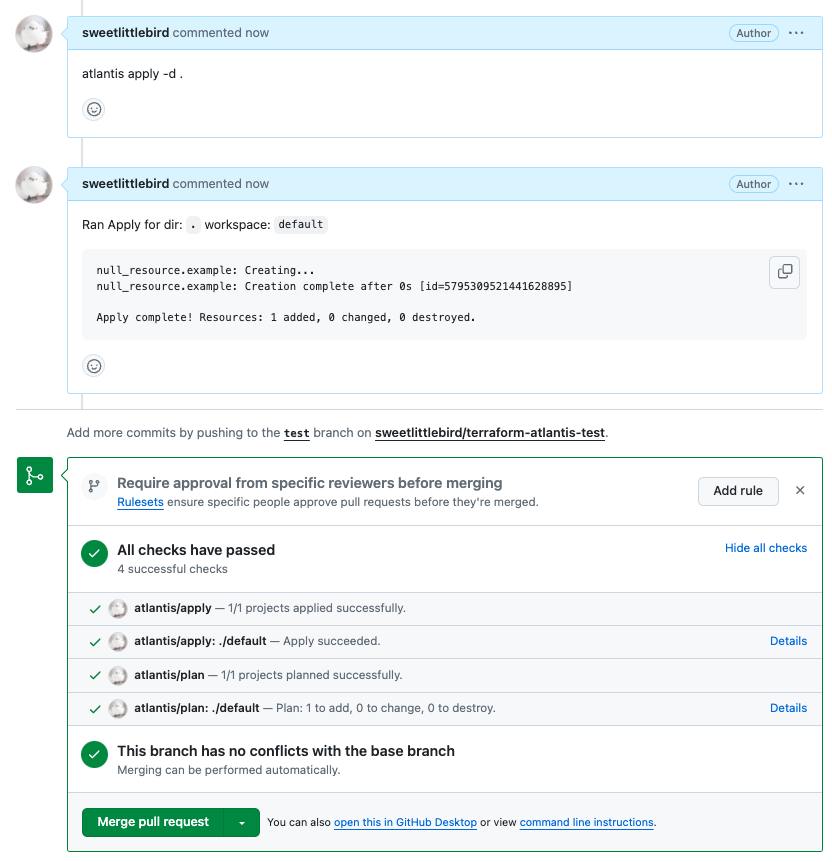
- 아틀란티스 웹에서 확인해보겠습니다.

- plan과 apply가 잘 된 것을 확인할 수 있습니다.
- 만약 Locks에 항목이 있고, 어떤 의도에서든 plan을 다시 실행하고 싶다면 클릭해서 Discard Plan & Unlock 하십시오. 그렇지 않으면 Lock 된 plan으로 apply 됩니다. pull request를 merge 하면 Lock 이 해제됩니다.
- 서버에서 다음의 명령어로 모니터링합니다.
atlantis의 Auto plan, Manual plan, Apply
- auto plan
- Atlantis는 기본적으로 자동으로 plan을 실행합니다.
- manual plan
- variable의 값을 넘기거나 하고 싶다면 수동 plan 실행이 필요합니다.
- PR 코멘트에 다음 명령들을 실행하면 수동 plan이 실행됩니다. (단, Lock이 걸려있지 않아야 합니다.)
atlantis plan -d dir      # 디렉터리
atlantis plan -w staging  # 워크스페이스
atlantis plan -- -target=resource -var 'foo=bar'  # -var로 variable 값 넘기기
- apply
atlantis apply             # 루트 디렉터리에서 실행
atlantis apply -d dir      # 디렉터리
atlantis apply -w staging  # 워크스페이스
작업 2. aws iam user 생성
- AWS S3 버킷 생성 : Terraform Backend state 저장용으로 사용합니다.
aws s3 ls # aws s3 mb s3://<유일한 사용할 S3 버킷명> --region ap-northeast-2 aws s3 mb s3://sweetlittlebird-terraform-state --region ap-northeast-2 # S3 버킷 생성 aws s3 ls # 생성 확인 - Local에서 Git 코드 작업
# feature branch 생성 $ git branch iam && git checkout iam && git branch # 디렉터리 생성 $ mkdir iam && cd iam # main.tf 파일 작성 $ cat <<EOF > main.tf terraform { backend "s3" { bucket = "sweetlittlebird-terraform-state" # 앞서 생성한 S3 버킷명 key = "terraform.tfstate" region = "ap-northeast-2" } } provider "aws" { region = "ap-southeast-1" } resource "aws_iam_user" "myuser" { name = "t101user" } EOF # add commit push git add main.tf && git commit -m "add main.tf" && git push origin iam - Github에서 PR 생성 및 Atlantis 확인
- 서버에서 다음의 명령어로 모니터링합니다.
$ docker exec -it docker-atlantis-1 watch -n 1 tree /home/atlantis/.atlantis - Github 에서 Compare & Pull request를 클릭합니다.
- Create pull request : title ( create iam user )
- plan 자동 수행 확인
- 서버 모니터링 결과 init 과 plan 이 실행된것을 확인 할 수 있습니다.
$ docker exec -it docker-atlantis-1 watch -n 1 tree /home/atlantis/.atlantis

# => /home/atlantis/.atlantis
#    ...
#    └── repos
#        └── sweetlittlebird
#            └── terraform-atlantis-test
#                └── 3
#                    └── default
#                        ├── iam
#                        │   ├── default.tfplan
#                        │   └── main.tf
#                        └── main.tf

# github repo에서 코드를 가져온것을 확인
$ docker exec -it docker-atlantis-1 cat /home/atlantis/.atlantis/repos/sweetlittlebird/terraform-atlantis-test/3/default/iam/main.tf
- 서버에서 다음의 명령어로 모니터링합니다.
- S3 버킷 확인
$ aws s3 ls s3://sweetlittlebird-terraform-state # => 2024-07-XX 00:00:00 180 terraform.tfstate - apply 하기
- PR 코멘트에 아래의 명령을 넣어 apply 합니다.
atlantis plan -d iam

atlantis apply -d iam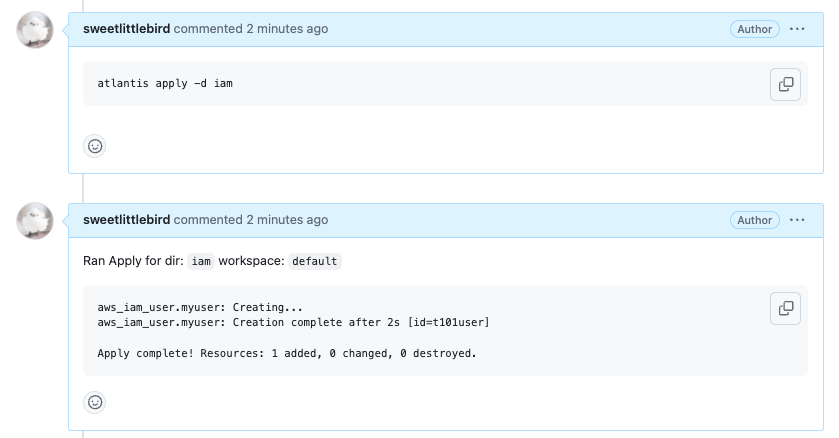
- PR 코멘트에 아래의 명령을 넣어 apply 합니다.
- S3 버킷 확인 - apply 하면서 적용된 최종 상태값을 저장하여 크기가 커진것을 확인할 수 있습니다.
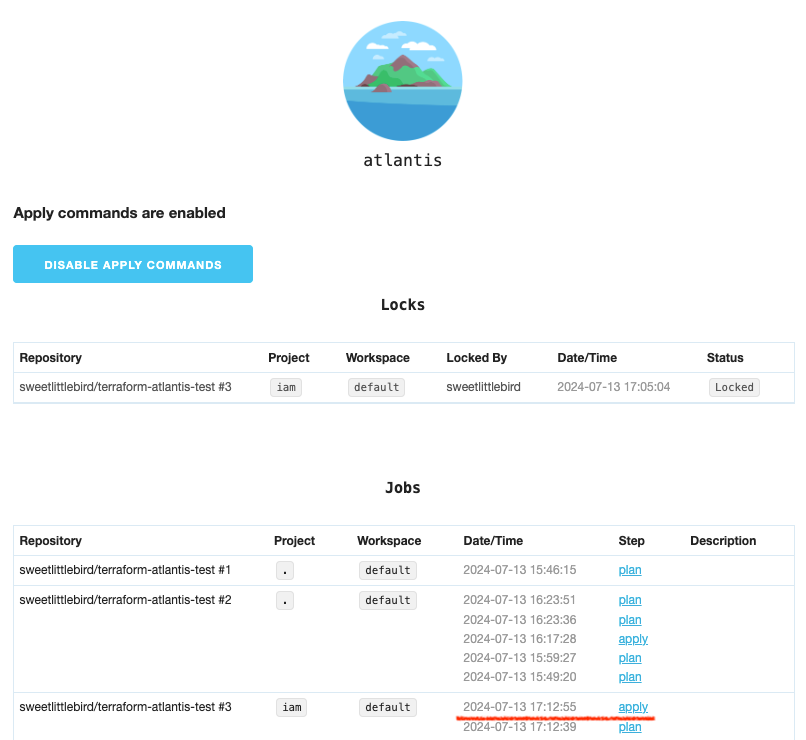
$ aws s3 ls s3://sweetlittlebird-terraform-state # => 2024-07-14 02:12:56 862 terraform.tfstate - Atlantis 웹에서 apply 됨을 확인합니다.
- Merge Pull request => Confirm merge
$ docker exec -it docker-atlantis-1 watch -n 1 tree /home/atlantis/.atlantis

# => /home/atlantis/.atlantis
#    ...
#    └── repos
#        └── sweetlittlebird
#            └── terraform-atlantis-test
terraform-atlantis-test 이하의 디렉터리와 파일들이 정리되어 삭제된것을 확인할 수 있습니다.
- Merge request된 사항을 Local git main 에서 pull 받아서 확인합니다.
$ git checkout main
$ git pull origin main
$ cd ..
$ tree
작업 3. 작업 2에서 생성한 리소스 삭제
- Local에서 Git 코드 작업
# feature branch 생성 git branch deleteiam && git checkout deleteiam && git branch # 디렉터리 생성 mkdir deleteiam && cd deleteiam # main.tf 파일 작성 $ cat <<EOF > main.tf terraform { backend "s3" { bucket = "sweetlittlebird-terraform-state" # 앞서 생성한 S3 버킷명 key = "terraform.tfstate" region = "ap-northeast-2" } } EOF # add commit push git add main.tf && git commit -m "add main.tf" && git push origin deleteiam - Github에서 PR 생성 및 Atlantis 확인
- 서버에서 다음의 명령어로 모니터링합니다.
$ docker exec -it docker-atlantis-1 watch -n 1 tree /home/atlantis/.atlantis - Github 에서 Compare & Pull request를 클릭합니다.
- Create pull request : title ( delete iam user )
- plan 자동 수행 확인
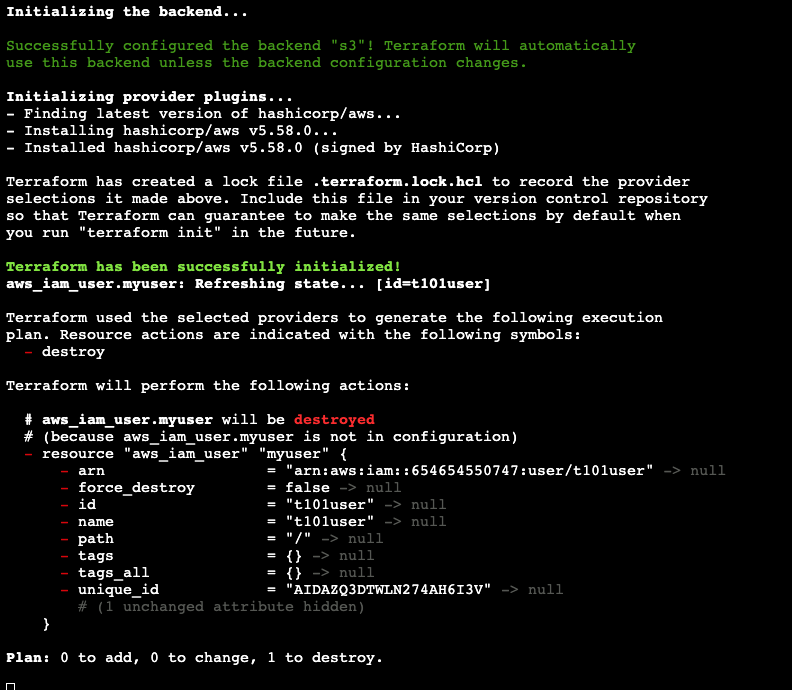
- 서버 모니터링 결과 init 과 plan 이 실행된것을 확인 할 수 있습니다.
$ docker exec -it docker-atlantis-1 watch -n 1 tree /home/atlantis/.atlantis

# => /home/atlantis/.atlantis
#    ...
#    └── repos
#        └── sweetlittlebird
#            └── terraform-atlantis-test
#                └── 4
#                    └── default
#                        ├── deleteiam
#                        │   ├── default.tfplan
#                        │   └── main.tf
#                        ├── iam
#                        │   └── main.tf
#                        └── main.tf

# github repo에서 코드를 가져온것을 확인
$ docker exec -it docker-atlantis-1 cat /home/atlantis/.atlantis/repos/sweetlittlebird/terraform-atlantis-test/4/default/deleteiam/main.tf
- 서버에서 다음의 명령어로 모니터링합니다.
- S3 버킷 확인
$ aws s3 ls s3://sweetlittlebird-terraform-state # => 2024-07-14 02:12:56 862 terraform.tfstate - apply 하기
- PR 코멘트에 아래의 명령을 넣어 apply 합니다.
atlantis apply -d deleteiam
- PR 코멘트에 아래의 명령을 넣어 apply 합니다.
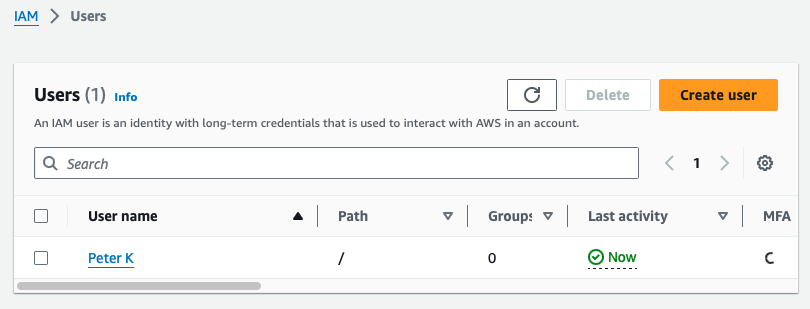
- AWS 콘솔에서 IAM이 삭제됨을 확인합니다.
- S3 버킷 확인 - apply 하면서 리소스가 삭제되어 상태파일 크기가 줄어든것을 확인할 수 있습니다.
$ aws s3 ls s3://sweetlittlebird-terraform-state # => 2024-07-14 02:35:09 180 terraform.tfstate - Atlantis 웹에서 apply 됨을 확인합니다.

- Merge Pull request => Confirm merge
$ docker exec -it docker-atlantis-1 watch -n 1 tree /home/atlantis/.atlantis

# => /home/atlantis/.atlantis
#    ...
#    └── repos
#        └── sweetlittlebird
#            └── terraform-atlantis-test
terraform-atlantis-test 이하의 디렉터리와 파일들이 정리되어 삭제된것을 확인할 수 있습니다.
- Merge request된 사항을 Local git main 에서 pull 받아서 확인합니다.
$ git checkout main && git pull && cd .. && tree
마치며
이상과 같이 Atlantis를 사용하여 Terraform 코드를 관리하는 방법을 알아보았습니다. 팀으로 작업을 할 때 참 유용한 기능인것 같습니다. 또한 이번주 스터디를 통해 Terraform의 생태계가 참 다양하고 크구나 하는것을 느꼈습니다.
공부할 수록 입문하기는 쉽지만 마스터하기는 어렵다는것을 느낍니다. —애초에 마스터한다라는 개념이 존재하는지 모르겠습니다— 계속 공부하고 적용하고 반복하는것이 중요한것 같다라는것을 이번 T101 4기 스터디를 통해 다시 한번 느낍니다.
기본 상태에서는 누구나 Atlantis 페이지에 접속해서 이력을 확인할 수 있어서 염려되는데 해당 부분에 대해 보완할 방법을 조금더 찾아봐야 할것 같습니다. 이번 주 수업도 기대됩니다. 완주까지 화이팅입니다.