[T101 4기] OpenTofu
들어가며
이번 주가 8주차이자 벌써 마지막주차입니다. T101 4기에서 마지막으로 알아볼 주제는 OpenTofu로 Terraform의 오픈소스 커뮤니티에서 포크한 버전으로 앞으로가 기대되는 프로젝트입니다. 이 블로그 글의 내용은 테라폼으로 시작하는 IaC를 참고하였습니다.

OpenTofu
개요
 OpenTofu 로고
- OpenTofu는 HashiCorp가 Terraform의 라이센스를 MPL(Mozilla Public License)에서 비오픈 소스 라이센스인 BUSL(Business Source License)로 변경한 것에
반발하여 만들어진 프로젝트입니다. BUSL로 라이센스가 변경되기 전의 소스를 포크하였으며, 초기에는 OpenTF 라는 이름을 사용하다가
OpenTofu로 변경하였습니다.
- Terraform AWS Provider 등은 아직 MPL 버전이어서 OpenTofu에서 사용 가능합니다.
- 초기에는 Terraform의 오픈소스버전을 유지하기 위한 프로젝트였으나, 현재는 상태파일 암호화나 Backend 블록에서 Variable을 사용할 수 있게 하는 등 본가의 Terraform 에서 조차 지원하지 않는 편리한 기능들을 추가하며 발전해가고 있습니다.
특이사항
- OpenTofu 1.6.x는 Terraform 1.6.x와 기능적으로 매우 유사하지만, 앞으로 기능추가 등 각각 독자적인 방향으로 발전할 가능성이 있습니다.
- Terraform 1.5.x 및 1.6.x 와 상당 부분 호환되므로 해당 버전을 사용 중이었다면 OpenTofu로 전환하기가 쉽습니다.
- Terraform 1.5.x 까지와는 상태 파일 그대로 호환 될정도입니다.
- OpenTofu는 현재 자체 Provider가 없으며, Terraform의 Provider는 라이센스가 변경되지 않는 이상 최신버전을 사용할 수 없습니다.
- 현재 OpenTofu는 Terraform 공급자와 함께 동작할 수 있지만 별도의 레지스트리를 사용합니다.
- OpenTofu 1.7 버전 부터는 프로덕션환경에서 쓸 수 있는 버전으로 알려져있습니다.
OpenTofu는 Terraform과 유사하여 바로 설치 후 실습을 진행하겠습니다.
OpenTofu 설치
tenv를 사용하여 OpenTofu를 설치해보겠습니다. tenv는 tfenv와 유사하나 Terraform만 관리하는 tfenv와는 달리 tenv는 Terraform 외에도 OpenTofu, Terragrunt 등을 설치하고 버전을 관리할 수 있습니다.
각 툴별로 명령과 환경 변수는 아래와 같습니다.
| 툴 | 명령어 | 환경변수 |
|---|---|---|
| OpenTofu | tofu | TOFUENV_ |
| Terraform | terraform | TFENV_ |
| Terragrunt | terragrunt | TG_ |
| Atmos | atmos | ATMOS_ |
MacOS를 기준으로 설치하겠습니다.
- tenv 설치
# 먼저 tfenv를 삭제합니다. $ brew remove tfenv # tenv를 설치 $ brew install tenv $ tenv --version # => tenv version 2.7.9 $ tenv -h # 도움말 보기 $ tenv tofu -h # OpenTofu 도움말 보기 # (옵션) Install shell completion $ tenv completion zsh > ~/.tenv.completion.zsh $ echo "source '~/.tenv.completion.zsh'" >> ~/.zshrc - OpenTofu 설치
$ tenv tofu list            # 현재 설치된 목록 확인
$ tenv tofu list-remote     # 설치가능한 목록 확인

# 설치
$ tenv tofu install 1.7.3   # 1.8은 너무 최신이어서 안정적인 1.7.3 버전을 설치합니다.
# => Installation of OpenTofu 1.7.3 successful

$ tenv tofu list            # 설치된 목록 확인
# => 1.7.3
$ tenv tofu use 1.7.3       # 사용할 버전 선택
$ tenv tofu detect          # 현재 사용하는 버전의 위치를 확인

$ tofu version       # OpenTofu 버전 확인
# => OpenTofu v1.7.3
#    on darwin_arm64
OpenTofu 1.7
[실습] Provider-defined functions
OpenTofu에서 Provider-defined functions을 사용해 보겠습니다. Functions는 크게 Built-in functions와 Provider-defined functions로 나뉩니다. Built-in functions는 OpenTofu(Terraform)에서 기본적으로 제공하는 함수이며, Provider-defined functions는 Provider에서 제공하는 함수입니다. 각각 아래의 링크에서 목록을 확인할 수 있습니다.
- Built-in functions: https://opentofu.org/docs/language/functions/
- Provider-defined functions: https://library.tf/providers => (Provider를 선택하고 Functions 탭에서 확인)
이번 실습에서 사용할 함수는 Provider::corefunc::str_snake으로 문자열을 snake_case로 변환하는 함수입니다.
- main.tf 생성
# main.tf terraform { required_providers { corefunc = { source = "northwood-labs/corefunc" version = "1.4.0" } } } provider "corefunc" { } output "test" { value = provider::corefunc::str_snake("Hello world!") # Prints: hello_world } - 실행
# 초기화 (프로바이더 다운로드 등)
$ tofu init

# 프로바이더 정보 확인
$ tree .terraform
# => .terraform
#    └── providers
#        └── registry.opentofu.org
#            └── northwood-labs
#                └── corefunc
#                    ...

# 실행계획 보기
$ tofu plan
# 적용
$ tofu apply -auto-approve
# => ...
#    Outputs:
#    test = "hello_world"

$ tofu output
# => test = "hello_world"
$ cat terraform.tfstate | jq
명령만 terraform에서 tofu로 바뀌었을 뿐, 사용법과 결과는 거의 동일한것을 확인할 수 있었습니다.
- main.tf 를 수정하여 str_camel 함수를 사용하여 snake_case를 camelCase로 변환해보겠습니다.
# main.tf terraform { required_providers { corefunc = { source = "northwood-labs/corefunc" version = "1.4.0" } } } provider "corefunc" { } output "test" { value = provider::corefunc::str_camel("Hello world!") # str_snake => str_camel로 변경 # Prints: hello_world } - 실행
$ tofu plan
# => Changes to Outputs:
#    ~ test = "hello_world" -> "helloWorld"

# 적용
$ tofu apply -auto-approve
# => ...
#    Outputs:
#    test = "helloWorld"

$ ls -l terraform.tfstate*
# => -rw-r--r--  1 user  staff  255  8  3 16:02 terraform.tfstate
#    -rw-r--r--  1 user  staff  256  8  3 16:02 terraform.tfstate.backup
[실습] Loopable import blocks
-
import블록은 `terraform import 명령 처럼 기존 리소스를 가져오는 기능입니다. 차이점은 terraform 선언 파일에서 사용할 수 있다는 것입니다. - 아래는 aws_instance.example 리소스를 가져오는 예제입니다.
import블록에서id를 사용하여 가져올 리소스를 지정합니다.# import 블록 예제 import { to = aws_instance.example id = "i-abcd1234" } resource "aws_instance" "example" { name = "hashi" # (other resource arguments...) }위의 예제를 수행하면
aws_instance.example은 마치OpenTofu에서 프로비저닝한것 처럼 state 파일에 추가 됩니다. - 이번 실습에서는 위의
import블록을 Loop를 돌려서 여러개의 리소스를 가져와 보겠습니다. - 먼저 정상적으로 AWS 상에 EC2 인스턴스를 생성하겠습니다.
- main.tf 생성
# main.tf data "aws_ami" "ubuntu" { most_recent = true filter { name = "name" values = ["ubuntu/images/hvm-ssd/ubuntu-jammy-22.04-amd64-server-*"] } filter { name = "virtualization-type" values = ["hvm"] } owners = ["099720109477"] # Canonical } variable "instance_tags" { type = list(string) default = ["web", "app"] } resource "aws_instance" "this" { count = length(var.instance_tags) ami = data.aws_ami.ubuntu.id instance_type = "t3.micro" tags = { Name = var.instance_tags[count.index] } } - 실행
# 초기화 $ tofu init # 프로바이더 정보 확인 $ tree .terraform # => .terraform # └── providers # └── registry.opentofu.org # └── hashicorp # └── aws # └── 5.60.0 # 적용 $ tofu apply -auto-approve # => Apply complete! Resources: 2 added, 0 changed, 0 destroyed. # EC2 확인 $ while true; do aws ec2 describe-instances --query "Reservations[*].Instances[*].{PublicIPAdd:PublicIpAddress,InstanceName:Tags[?Key=='Name']|[0].Value,Status:State.Name}" --filters Name=instance-state-name,Values=running --output text ; echo "------------------------------" ; sleep 1; done # => app 3.36.26.23 running # web 3.39.248.105 running # 확인 $ tofu state list $ tofu state ls $ echo "data.aws_ami.ubuntu" | tofu console $ tofu show - tfstate 파일을 삭제하여 문제 상황을 만들어보겠습니다.
# 문제 상황 발생 : tfstate 파일 삭제 $ rm -r .terraform* terraform.tfstate* # EC2 ID 확인 : ID 메모 $ aws ec2 describe-instances --query 'Reservations[*].Instances[*].{InstanceID:InstanceId,PublicIP:PublicIpAddress,Name:Tags[?Key==`Name`]|[0].Value}' --output json | jq -r '.[][] | "\(.InstanceID)\t\(.PublicIP)\t\(.Name)"' # => i-051d42d1feafc4d4a 3.36.26.23 app # i-0bb0a855d1749a7c2 3.39.248.105 web - main.tf 파일 수정하여 instance id를 위에서 확인한 ID 값으로 수정합니다.
# main.tf data "aws_ami" "ubuntu" { most_recent = true filter { name = "name" values = ["ubuntu/images/hvm-ssd/ubuntu-jammy-22.04-amd64-server-*"] } filter { name = "virtualization-type" values = ["hvm"] } owners = ["099720109477"] # Canonical } # 추가 시작 variable "instance_ids" { type = list(string) default = ["i-051d42d1feafc4d4a", "i-0bb0a855d1749a7c2"] } # 추가 종료 variable "instance_tags" { type = list(string) default = ["web", "app"] } resource "aws_instance" "this" { count = length(var.instance_tags) ami = data.aws_ami.ubuntu.id instance_type = "t3.micro" tags = { Name = var.instance_tags[count.index] } } # 추가 시작 import { for_each = { for idx, item in var.instance_ids : idx => item } to = aws_instance.this[tonumber(each.key)] id = each.value } # 추가 종료 - 실행
# 초기화
$ tofu init

# import 실행
$ tofu apply -auto-approve
# => Plan: 2 to import, 0 to add, 2 to change, 0 to destroy.
#    aws_instance.this[1]: Importing... [id=i-0bb0a855d1749a7c2]
#    aws_instance.this[1]: Import complete [id=i-0bb0a855d1749a7c2]
#    aws_instance.this[0]: Importing... [id=i-051d42d1feafc4d4a]
#    aws_instance.this[0]: Import complete [id=i-051d42d1feafc4d4a]
#    aws_instance.this[0]: Modifying... [id=i-051d42d1feafc4d4a]
#    aws_instance.this[1]: Modifying... [id=i-0bb0a855d1749a7c2]
#    aws_instance.this[0]: Modifications complete after 1s [id=i-051d42d1feafc4d4a]
#    aws_instance.this[1]: Modifications complete after 1s [id=i-0bb0a855d1749a7c2]
#    Apply complete! Resources: 2 imported, 0 added, 2 changed, 0 destroyed.

# 확인
$ tofu state ls
$ tofu show

# 상태파일 확인
$ cat terraform.tfstate | jq
- main.tf 생성
테라폼에서 한번에 하나씩만 import 할 수 있었는데 OpenTofu에서는 여러 건을 한꺼번에 import 할 수 있어 편리한것 같습니다. 테라폼과 OpenTofu의 경쟁을 통해 더욱 빠르고 강력하게 될것같아 기대됩니다.
[실습] State file encryption - Local
- OpenTofu에서는 상태파일을 로컬 스토리지 및 백엔드에서 암호화 하는것을 지원합니다. 또한
terraform_remote_state데이터 소스와 함께 암호화를 사용할 수도 있습니다. - 사용 형태
terraform { encryption { key_provider "some_key_provider" "some_name" { # 키 프로바이더 옵션 지정 } method "some_method" "some_method_name" { # 메쏘드 옵션 지정 keys = key_provider.some_key_provider.some_name } state { # 상태데이터 암호화/복호화 method = method.some_method.some_method_name fallback { # (선택사항) # 위의 method가 실패할 경우 사용할 method method = method.some_method.old_method_name } } plan { # 계획(plan) 데이터 암호화/복호화 method = method.some_method.some_method_name fallback { # (선택사항) # 위의 method가 실패할 경우 사용할 method method = method.some_method.old_method_name } } remote_state_data_sources { # terraform_remote_state 데이터 소스 지정 } } } - 위의 사용 형태를 조금 더 자세하게 알아보겠습니다.
terraform { encryption { ## Step 1: 암호화 되지 않은 method: method "unencrypted" "migrate" {} ## Step 2: key provider 지정 - 아래의 예제에서는 pbkdf2 키 프로바이더를 사용하고 리소스 이름을 mykey로 지정합니다. key_provider "pbkdf2" "mykey" { # 암호화 키를 지정합니다. (pbkdf2는 16자 이상 지정이 필요합니다.) passphrase = "correct-horse-battery-staple" # 암호화 키를 암호화 method에 맞게 조정합니다. (aes-gcm은 32자로 지정합니다.) key_length = 32 # Specify the number of iterations (min. 200.000, default: 600.000) ## The work factor for PBKDF2 is implemented through an iteration count, which should set differently based on the internal hashing algorithm used. ## PBKDF2-HMAC-SHA1: 1,300,000 iterations ## PBKDF2-HMAC-SHA256: 600,000 iterations ## PBKDF2-HMAC-SHA512: 210,000 iterations # PBKDF2에서 사용할 반복 횟수를 지정하십시오 (최소 200,000, 기본값: 600,000) ## PBKDF2-HMAC-SHA1: 1,300,000 iterations ## PBKDF2-HMAC-SHA256: 600,000 iterations ## PBKDF2-HMAC-SHA512: 210,000 iterations iterations = 600000 # 암호화 salt 길이를 byte로 지정하십시오. (기본값: 32) salt_length = 32 # 해시함수를 지정하십시오. (sha256 or sha512, default: sha512) hash_function = "sha512" } ## Step 3: 암호화 method를 지정하십시오 - 아래의 예제에서는 aes_gcm 암호화 method를 사용하고 리소스 이름을 new_method로 지정합니다. method "aes_gcm" "new_method" { # 암호화 키를 지정합니다. 앞에서 만든 my_key 리소스를 지정합니다. keys = key_provider.pbkdf2.mykey } state { # 상태 파일의 암호화 방법을 지정합니다. ## Step 4: 암호화 method를 지정하십시오. method = method.aes_gcm.new_method ## Step 5: Step 4가 실패할 경우 사용할 "fallback" method를 지정하십시오. fallback { ## "unencrypted" method를 사용합니다. method = method.unencrypted.migrate } ## Step 6: "tofu apply" 적용 ## Step 7: 암호화를 강제 하고 싶으면 fallback 블록을 삭제하고 아래의 enforce = true 옵션을 추가하십시오. # enforced = true } ## Step 8: 계획(plan)도 암호화 하고 싶다면 Step 4 ~ 7을 반복하십시오. } } - 암호화 실습
# main.tf terraform { encryption { key_provider "pbkdf2" "my_passphrase" { ## Enter a passphrase here: passphrase = "ChangeIt_123abcd" } method "aes_gcm" "my_method" { keys = key_provider.pbkdf2.my_passphrase } ## Remove this after the migration: method "unencrypted" "migration" { } state { method = method.aes_gcm.my_method ## Remove the fallback block after migration: fallback{ method = method.unencrypted.migration } ## Enable this after migration: #enforced = true } } }- 실행
$ tofu init && tofu apply -auto-approve $ tofu state list $ tofu show # 상태 파일 암호화 확인 $ cat terraform.tfstate | jq # => { # "serial": 1, # "lineage": "35fa959f-d819-8d1b-e036-c81f4827cf21", # "meta": { # "key_provider.pbkdf2.my_passphrase": "eyJzYWx0IjoiRGJXSzhyR3hBSHdQOUoxSmZncTYyaEJFSW9LaVZGNy9GK2JjSmlxQTBiT # T0iLCJpdGVyYXRpb25zIjo2MDAwMDAsImhhc2hfZnVuY3Rpb24iOiJzaGE1MTIiLCJrZXlfbGVuZ3RoIjozMn0=" # }, # "encrypted_data": "EIuEr7sU9kb37t11Oy2JmbI1F/WFOYPuBjUlVV//IlrXVQYWyhlgw+JXu8m+2cztDGbkNIZ5h/giflO4nCUESI3mSP # D8ZGETc80hR/JptGIv03RnKcyYXqzwoFDHS/7D8I4E5/itpBnmWCAXsFUTpoJ/vKySl3DfUrd/KFDKm0Db5RK2BjYywF+BeexpL7l//EZM # zvyXkz0Tx85b+7q6SopHwUm1FztxSjqL2yiz1uZlyv5cJgUFHpsYV4geF/geMmDc5Kf9sysRNiJYaEJSrg==", # "encryption_version": "v0" # } - 암호화 된 것을 확인할 수 있습니다.
- 암호화가 apply 된 이후에는
method "unencrypt"와fallback블록을 삭제하고,enforced = true옵션을 추가하여 암호화를 강제할 수 있습니다.
- 실행
- 복호화 실습
terraform { encryption { key_provider "pbkdf2" "my_passphrase" { ## Enter a passphrase here: passphrase = "ChangeIt_123abcd" } method "aes_gcm" "my_method" { keys = key_provider.pbkdf2.my_passphrase } ## Remove this after the migration: method "unencrypted" "migration" { } state { method = method.unencrypted.migration ## Remove the fallback block after migration: fallback{ method = method.aes_gcm.my_method } # Enable this after migration: enforced = false } } }- 실행
$ tofu apply -auto-approve

# 상태 파일 복호화 확인
$ cat terraform.tfstate | jq
# => {
#      "version": 4,
#      "terraform_version": "1.7.3",
#      "serial": 1,
#      "lineage": "35fa959f-d819-8d1b-e036-c81f4827cf21",
#      "outputs": {},
#      "resources": [],
#      "check_results": null
#    }
- 실행
- 복호화가 정상적으로 되었음을 확인할 수 있습니다. 실습에서는 암호화키를 하드코딩하였지만, 실제 사용할때는 암호화 키를 변수로 입력 받도록 하거나, AWS KMS 와 같이 관리되는 키를 사용하면 보안성을 높일 수 있을것 같습니다.
[실습] Removed Block
-
removed블록을 사용하면 실제 인프라스트럭쳐에 프로비저닝된 리소스는 삭제하지 않고 상태파일에서만 삭제할 수 있습니다. - 사용 방법
- 먼저 리소스를 생성 합니다.
resource "local_file" "test" { content = "Hello world!" filename = "test.txt" } -
removed블록을 추가하여 상태파일에서만 삭제합니다.removed { from = local_file.test } - 실행을 하면
local_file.test리소스는 상태 파일에서 삭제 되지만, 프로비저닝된 test.txt는 그대로 남아있음을 확인 할 수 있습니다. -
removed블록을 apply 한 이후에resource블록을 삭제해도 됩니다.
- 먼저 리소스를 생성 합니다.
- 실습
# main.tf data "aws_ami" "ubuntu" { most_recent = true filter { name = "name" values = ["ubuntu/images/hvm-ssd/ubuntu-jammy-22.04-amd64-server-*"] } filter { name = "virtualization-type" values = ["hvm"] } owners = ["099720109477"] # Canonical } variable "instance_tags" { type = list(string) default = ["web", "app"] } resource "aws_instance" "this" { count = length(var.instance_tags) ami = data.aws_ami.ubuntu.id instance_type = "t3.micro" tags = { Name = var.instance_tags[count.index] } } resource "aws_ssm_parameter" "this" { count = length(var.instance_tags) name = var.instance_tags[count.index] type = "String" value = aws_instance.this[count.index].id }- 실행
$ tofu init && tofu apply -auto-approve # => Apply complete! Resources: 4 added, 0 changed, 0 destroyed. $ tree .terraform $ tofu state ls $ tofu show $ tofu state show 'aws_ssm_parameter.this[0]' # tfstate 파일 확인 $ cat terraform.tfstate | jq $ cat terraform.tfstate | jq | grep -E '"i-' # => "id": "i-036b9e057c2eb71d8", # "id": "i-0f8f05caabc524b47", # "value": "i-036b9e057c2eb71d8", # "value": "i-0f8f05caabc524b47", # parameters 정보 확인 $ aws ssm describe-parameters | jq $ aws ssm get-parameter --name "web" $ aws ssm get-parameter --name "web" --query "Parameter.Value" --output text # => i-036b9e057c2eb71d8 $ aws ssm get-parameter --name "app" $ aws ssm get-parameter --name "app" --query "Parameter.Value" --output text # => i-0f8f05caabc524b47 # EC2 목록 확인 $ aws ec2 describe-instances --query 'Reservations[*].Instances[*].{InstanceID:InstanceId,PublicIP:PublicIpAddress,Name:Tags[?Key==`Name`]|[0].Value}' --output json | jq -r '.[][] | "\(.InstanceID)\t\(.PublicIP)\t\(.Name)"' # => i-036b9e057c2eb71d8 3.34.132.49 web # i-0f8f05caabc524b47 3.35.51.118 app -
removed블록 추가하여 ssm parameter와 EC2를 리소스는 그대로 두고 state 파일에서만 삭제하겠습니다.data "aws_ami" "ubuntu" { most_recent = true filter { name = "name" values = ["ubuntu/images/hvm-ssd/ubuntu-jammy-22.04-amd64-server-*"] } filter { name = "virtualization-type" values = ["hvm"] } owners = ["099720109477"] # Canonical } variable "instance_tags" { type = list(string) default = ["web", "app"] } ## 리소스 정의 파일에서 주석처리하여 삭제 # resource "aws_instance" "this" { # count = length(var.instance_tags) # ami = data.aws_ami.ubuntu.id # instance_type = "t3.micro" # # tags = { # Name = var.instance_tags[count.index] # } # } ## 리소스 정의 파일에서 주석처리하여 삭제 # resource "aws_ssm_parameter" "this" { # count = length(var.instance_tags) # name = var.instance_tags[count.index] # type = "String" # value = aws_instance.this[count.index].id # } removed { # 추가 from = aws_ssm_parameter.this } removed { # 추가 from = aws_instance.this } - 실행
$ tofu apply -auto-approve
# => ...
#    # aws_ssm_parameter.this[0] will be removed from the OpenTofu state but will not be destroyed
#    ...
#    # aws_ssm_parameter.this[1] will be removed from the OpenTofu state but will not be destroyed
#    Apply complete! Resources: 0 added, 0 changed, 0 destroyed.

# tfstate 파일 확인
$ cat terraform.tfstate | jq

$ cat terraform.tfstate | jq | grep -E '"i-'
# => <결과 없음>
상태파일에서 삭제된것을 확인할 수 있었습니다. AWS에서 리소스를 확인해보겠습니다.
$ aws ssm describe-parameters | jq
$ aws ssm get-parameter --name "web"
$ aws ssm get-parameter --name "web" --query "Parameter.Value" --output text
# => i-036b9e057c2eb71d8
$ aws ssm get-parameter --name "app"
$ aws ssm get-parameter --name "app" --query "Parameter.Value" --output text
# => i-0f8f05caabc524b47

$ aws ec2 describe-instances --query 'Reservations[*].Instances[*].{InstanceID:InstanceId,PublicIP:PublicIpAddress,Name:Tags[?Key==`Name`]|[0].Value}' --output json | jq -r '.[][] | "\(.InstanceID)\t\(.PublicIP)\t\(.Name)"'
# => i-036b9e057c2eb71d8     3.34.132.49     web
#    i-0f8f05caabc524b47     3.35.51.118     app
상태 파일에서는 없어졌지만 AWS에 프로비저닝된 리소스는 남아있는것을 확인할 수 있습니다.
- 이렇게하여
removed블록을 실습해보았습니다. AWS에서 실습한 리소스를 삭제하시거나, 추가적으로 import 블록을 사용하여 상태파일에 다시 넣은 다음 destroy 하는것을 실습해보는것도 좋을것 같습니다.
- 실행
[실습] Test
- OpenTofu에서는
tofu test라는 명령을 통해 구성파일의 내용을 테스트 할 수 있습니다. 실제 인프라를 프로비저닝하고 원하는 조건이 맞는지 확인하는 과정을 거칩니다.postcondition과 유사한데 다른 점은 테스트 중에 생성한 리소스는 자동으로 삭제된다는 것입니다. - 사용 방법
- 먼저 구성파일과 같은 디렉터리 또는
tests디렉터리 아래에*.tftest.hcl파일을 생성합니다. -
*.tftest.hcl파일에 테스트 코드를 작성합니다. 또한 테스트를 위한 변수파일 (.tfvars)가 필요하면 해당 파일도tests디렉터리에 만들면 테스트 시에만 사용 됩니다. -
*.tftest.hcl의 형태는 아래와 같습니다.run "test" { assert { condition = file(local_file.test.filename) == "Hello world!" error_message = "Incorrect content in ${local_file.test.filename}." } }
- 먼저 구성파일과 같은 디렉터리 또는
- 실습
- main.tf 작성
# main.tf variable "test" { type = string } resource "local_file" "this" { filename = "${path.module}/test.txt" content = var.test } - tests/main.tftest.hcl 작성
# tests/main.tftest.hcl run "test" { assert { condition = file(local_file.this.filename) == var.test error_message = "Incorrect content in file" } } - 실행 후 확인
$ tofu init $ tree .terraform # Test 실행 $ tofu test # => tests/main.tftest.hcl... fail # run "test"... fail # │ Error: No value for required variable - 변수가 없다며 테스트가 실패합니다. 변수를 넣어서 다시 실행해 보겠습니다.
# 방법1. -var 로 변수를 넣어서 실행 $ tofu test -var 'test=Hello world!' # => tests/main.tftest.hcl... pass # run "test"... pass # Success! 1 passed, 0 failed. # 방법2. tests/terraform.tfvars 파일 작성 $ echo 'test = "T101 4th thank you!"' > tests/terraform.tfvars $ tofu test # => tests/main.tftest.hcl... pass # run "test"... pass # Success! 1 passed, 0 failed. $ tofu state list # => No state file was found! # 상태파일이 없다고 나오는데, 테스트를 위해 프로비저닝한 리소스는 자동으로 삭제되어서 별도로 상태파일을 생성하지 않는것 같습니다. $ cat test.txt # => cat: test.txt: No such file or directory # 테스트된 파일은 삭제된것을 확인할 수 있습니다. # Apply 확인 $ tofu apply -auto-approve $ tofu state list # => local_file.this $ cat test.txt # => T101 4th thank you! - 혹시나 해서
tofu test를 한번더 실행한 다음 결과를 확인해보겠습니다.$ tofu test $ tofu state list # => local_file.this $ cat test.txt # => cat: test.txt: No such file or directory - 이미 프로비저닝 된 상태에서 test를 할 경우 상태파일은 남아있지만 실제 리소스(여기서는 파일)은 삭제되는것 같습니다.
프로덕션 환경에서 사용시 주의가 필요해보입니다.

- main.tf 작성
[실습] Terraform을 OpenTofu 1.7로 이전하기
- OpenTofu 1.7로 Terraform을 이전하는 방법을 실습해보겠습니다. Terraform 버전은 최소 1.8.2 이상을 사용할것을 권고한다 합니다. 여기에서는 Terraform 1.8.5 버전으로 실습해 보겠습니다.
- Tenv로 Terraform 1.8.5 설치
$ tenv tf install 1.8.5 # => ... # Installation of Terraform 1.8.5 successful $ tenv tf list # => 1.8.5 (never used) $ tenv tf detect - main.tf 파일 작성
# main.tf data "aws_ami" "ubuntu" { most_recent = true filter { name = "name" values = ["ubuntu/images/hvm-ssd/ubuntu-jammy-22.04-amd64-server-*"] } filter { name = "virtualization-type" values = ["hvm"] } owners = ["099720109477"] # Canonical } variable "instance_tags" { type = list(string) default = ["web", "app"] } resource "aws_instance" "this" { count = length(var.instance_tags) ami = data.aws_ami.ubuntu.id instance_type = "t3.micro" tags = { Name = var.instance_tags[count.index] } } - 실행 후 확인
# 초기화 $ terraform init # 프로바이더 정보 확인 $ tree .terraform # => .terraform # └── providers # └── registry.terraform.io # └── hashicorp # └── aws # └── 5.61.0 # 적용 $ terraform apply -auto-approve # => Apply complete! Resources: 2 added, 0 changed, 0 destroyed. # EC2 확인 $ while true; do aws ec2 describe-instances --query "Reservations[*].Instances[*].{PublicIPAdd:PublicIpAddress,InstanceName:Tags[?Key=='Name']|[0].Value,Status:State.Name}" --filters Name=instance-state-name,Values=running --output text ; echo "------------------------------" ; sleep 1; done # => app 3.38.165.56 running # web 43.203.241.233 running # 상태 확인 $ terraform state list # => data.aws_ami.ubuntu # aws_instance.this[0] # aws_instance.this[1] # tfstate 파일 확인 $ cat terraform.tfstate | jq - 마이그레이션
- 현재 최신 상태여부 확인
$ terraform plan # => No changes. Your infrastructure matches the configuration. - tfstate 파일과 구성 파일 백업
$ cp terraform.tfstate terraform.tfstate.bak $ cp main.tf main.tf.bak - Terraform과 OpenTofu 간의 차이로 인한 수정이 불가피한 코드 변경
- S3 Backend 사용시 다음의 변경이 필요합니다.
-
skip_s3_checksum옵션을 사용중이라면 OpenTofu는 필요로 하지 않기 때문에 삭제합니다. -
endpoints=>sso옵션을 사용중이거나AWS_ENDPOINT_URL환경 변수를 사용중이라면 삭제합니다.
-
-
removed블록 삭제 : OpenTofu의removed블록과는 동작 방식 차이가 있기 때문에 삭제합니다.
- S3 Backend 사용시 다음의 변경이 필요합니다.
- OpenTofu 초기화 및 Plan
# 초기화 $ tofu init $ tree .terraform -L 5 # => .terraform # └── providers # ├── registry.opentofu.org # │ └── hashicorp # │ └── aws # │ └── 5.61.0 # └── registry.terraform.io # └── hashicorp # └── aws # └── 5.61.0 # Plan $ tofu plan # => No changes. Your infrastructure matches the configuration. - 정상적으로 Terraform을 OpenTofu로 마이그레이션 완료한것 같습니다.
.terraform디렉터리에는 Terraform용 프로바이더와 OpenTofu용 프로바이더 둘 다 존재하는것을 확인할 수 있습니다. - 이제 실제 적용해 보겠습니다.
$ tofu apply -auto-approve
# => No changes. Your infrastructure matches the configuration.
#    OpenTofu has compared your real infrastructure against your configuration and found no differences, so no changes are needed.
#    Apply complete! Resources: 0 added, 0 changed, 0 destroyed.

# EC2 인스턴스에 신규 태그를 추가 후 apply 해보겠습니다.
$ vi main.tf
...
tags = {
  Name = var.instance_tags[count.index]
  T101 = "end"
}
...

# 적용
$ tofu apply -auto-approve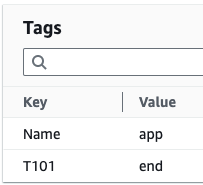
- 현재 최신 상태여부 확인
- 실습 리소스 삭제
$ tofu destroy -auto-approve
OpenTofu 1.8
- OpenTofu 1.8이 지난 7월 29일 출시 되었습니다. 자세한 소식은 아래의 블로그에서 확인할 수 있습니다.
- 주요 변경점은 아래와 같습니다.
- variable과 locals를 module 소스와 backend 설정에 사용할 수 있게 되었습니다.
-
.tofu확장자가 추가되었습니다..tf파일에 추가적으로 OpenTofu 전용 기능을 사용할 수 있습니다. - 테스트 프레임워크에서 사용할 수 있는
override_resource,override_data,override_module,mock_resource,mock_data,mock_module등이 추가되었습니다. - Deprecation :
use_legacy_workflow가 S3 backend 설정에서 제거되었습니다.
- 1.8.0 사용 설정
$ tenv tofu list
# => * 1.7.3
$ tenv tofu list-remote
# => ...
#    1.7.3 (installed)
#    ...
#    1.8.0

# 설치
$ tenv tofu install 1.8.0
$ tenv tofu list
$ tenv tofu use 1.8.0
$ tenv tofu detect

# 버전 확인
$ tofu -h
$ tofu version
# => OpenTofu v1.8.0
#    on darwin_arm64
#    + provider registry.opentofu.org/hashicorp/aws v5.61.0
[실습] Early variable/locals evaluation
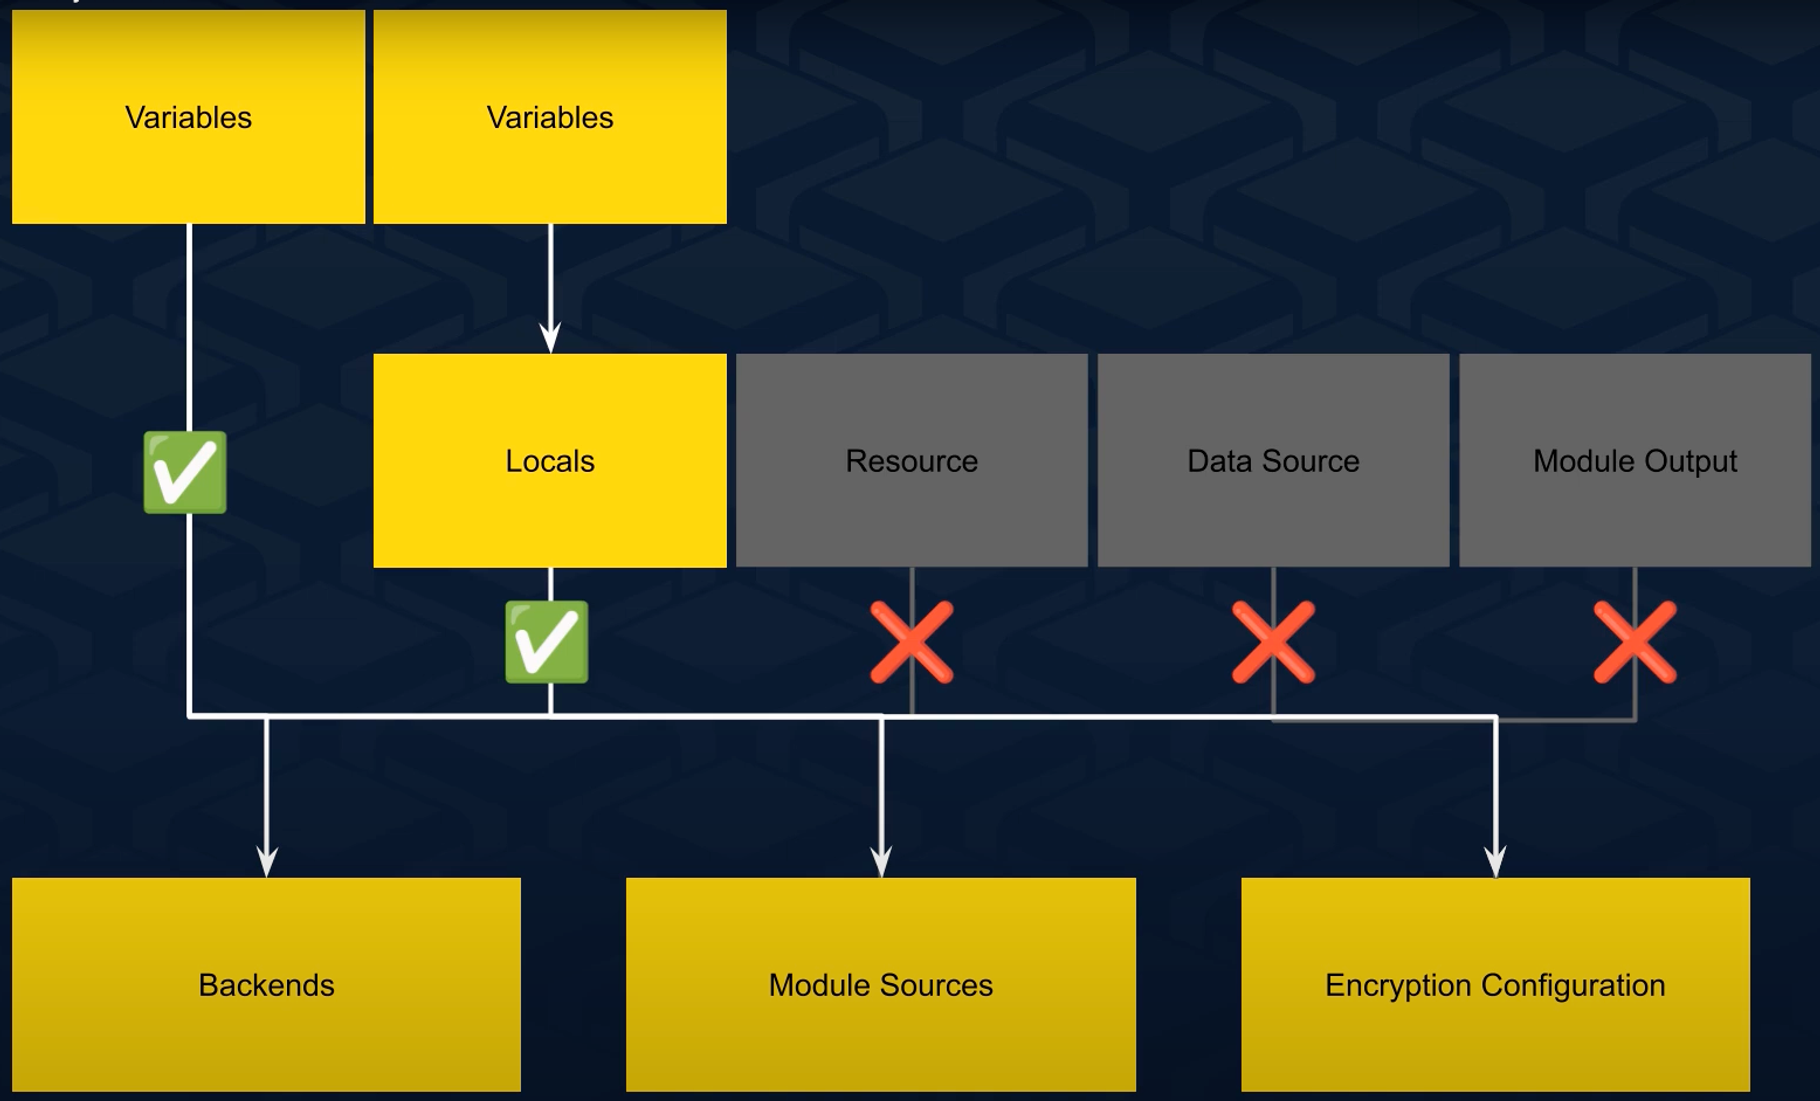 기존에는 variable을 Backend 설정이나 mobule 블록, 암호화 설정 등에서 사용하지 못하였는데 OpenTofu 1.8부터는 사용할
수 있게 되었습니다. 실습을 통해 알아보겠습니다.
기존에는 variable을 Backend 설정이나 mobule 블록, 암호화 설정 등에서 사용하지 못하였는데 OpenTofu 1.8부터는 사용할
수 있게 되었습니다. 실습을 통해 알아보겠습니다.
- AWS S3 버킷 생성 : Backend State 저장용도
$ aws s3 mb s3://<생성할 고유한 S3 버킷명> --region ap-northeast-2 $ aws s3 mb s3://t101-4th-tofu-1-8 --region ap-northeast-2 # 버킷 확인 $ aws s3 ls - main.tf 생성
# main.tofu variable "s3bucket_myname" { type = string default = "t101-4th-tofu-1-8" # 생성한 S3 버킷명 } terraform { backend "s3" { bucket = var.s3bucket_myname key = "terraform.tfstate" region = "ap-northeast-2" encrypt = true } } data "aws_ami" "ubuntu" { most_recent = true filter { name = "name" values = ["ubuntu/images/hvm-ssd/ubuntu-jammy-22.04-amd64-server-*"] } filter { name = "virtualization-type" values = ["hvm"] } owners = ["099720109477"] # Canonical } resource "aws_instance" "this" { ami = data.aws_ami.ubuntu.id instance_type = "t3.micro" tags = { Name = "final-labs" } } - 초기화 및 프로바이더 확인
# 테라폼으로 확인
$ terraform init
# => Initializing the backend...
#    │ Error: Variables not allowed
#    │   on main.tf line 8, in terraform:
#    │    8:     bucket = var.s3bucket_myname
#    │ Variables may not be used here.

# OpenTofu 1.7.x로 확인
$ tenv tofu use 1.7.3
$ tofu version
# => OpenTofu v1.7.3
#    on darwin_arm64
$ tofu init
# => Initializing the backend...
#    │ Error: Variables not allowed
#    │   on main.tf line 8, in terraform:
#    │    8:     bucket = var.s3bucket_myname
#    │ Variables may not be used here.

# OpenTofu 1.8.0로 확인
$ tenv tofu use 1.8.0
$
# => OpenTofu v1.8.0
#    on darwin_arm64
$ tofu init
# => Initializing the backend...
#    ...
#    OpenTofu has been successfully initialized!
Terraform이나 OpenTofu 1.7.x에서는 Backend 설정에 variable을 사용할 수 없었지만, OpenTofu 1.8.0에서는 사용할 수 있게 된것을 확인하였습니다. 이제 적용을 해서 실제 동작하는지 확인해보겠습니다.
- 실행
$ tofu apply -auto-approve
# => Apply complete! Resources: 1 added, 0 changed, 0 destroyed.

# 확인
$ aws s3 ls s3://t101-4th-tofu-1-8
# => 2024-08-03 21:04:56       4890 terraform.tfstate
$ cat .terraform/terraform.tfstate | grep bucket
# => "bucket": "t101-4th-tofu-1-8",
잘 동작하여 상태파일이 S3 Backend에 잘 저장되었음을 확인할 수 있습니다.
- 실습 리소스 삭제
# 리소스 삭제
$ tofu apply -destroy -auto-approve

# 상태파일은 아직 존재 합니다.
$ aws s3 ls s3://t101-4th-tofu-1-8

# 상태파일을 삭제하고
$ aws s3 rm s3://t101-4th-tofu-1-8 --recursive
# 버킷을 삭제합니다.
$ aws s3 rb s3://t101-4th-tofu-1-8

# 버킷이 삭제되었음을 확인합니다.
$ aws s3 ls
마치며
이렇게 OpenTofu에 대하여 알아보았습니다. Terraform이 계속 오픈소스 커뮤니티의 사랑을 받았었다면 좋았겠지만, 그러지 못하여 OpenTofu가 나온것을 보면 다소 씁쓸합니다. 아무쪼록 경쟁을 통해 둘 다 발전하는 모습을 보여주었으면 좋겠습니다.
이번 테라폼 기초 입문 실습 스터디 4기 과정을 통해 IaC가 무엇인지와
Terraform 사용 방법 등 많은것을 배울 수 있었습니다.
가장 큰 결실은 블로그를 만들었다는 것입니다!
회사 팀장님의 추천에 얼떨결에 시작하였고,
매주 블로그 글 쓰기가 벅차서 몇 번이고 포기 할뻔 했지만
무사히 마칠 수 있어서 감개무량합니다. (이번주도 무사히 지나가야 하긴 합니다. ![]() )
앞으로도 꾸준히 배우고 누군가에게 도움이 될 수 있도록
블로그에 기록하며 성장해 나가겠습니다.
)
앞으로도 꾸준히 배우고 누군가에게 도움이 될 수 있도록
블로그에 기록하며 성장해 나가겠습니다.
함께 고생한 Gasida님을 비롯한 T101 4기 멤버분들도 모두 고생 많으셨습니다.
특히 매주 실습을 준비하고, 강의를 진행해주신 Gasida님과 조력자 분들께 감사드립니다.
다음 스터디도 참여할 수 있다면 또 열심히 달려보겠습니다.
다들 건강하시고 행복한 모습으로 다시 뵙기를 고대합니다! ![]()