[KANS 3기] K8S Service : ClusterIP, NodePort
들어가며
지난주에 이어 이번주에는 Kubernetes의 Service, 그 중에 ClusterIP, NodePort에 대해 알아보겠습니다. KANS 3기 4주차 스터디를 시작하겠습니다.
K8S Service
Kubernetes의 Service는 개별 Pod에 접근하기 위한 추상화된 방법을 제공합니다. Pod는 생성될 때마다 IP가 동적으로 할당되기 때문에 Pod의 IP를 직접 사용하는 것은 좋은 방법이 아닙니다. Service는 Pod의 IP를 추상화하여 Pod에 접근할 수 있도록 해줍니다.
Service의 탄생 배경

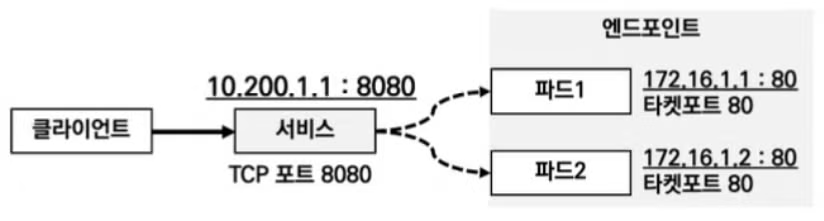
위의 그림과 같이 하나의 파드의 엔드포인트를 다른 파드 (또는 외부)에서 사용할때, 해당 파드의 IP로 지정을 하면, 파드가 재실행 될 때 IP가 변경되어 접속이 안 되서 장애가 발생하는 현상이 생깁니다.
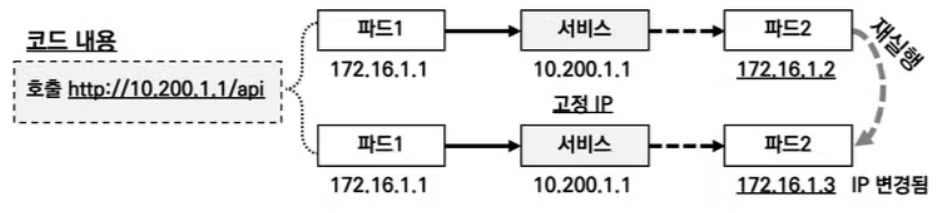
그래서 고정된 IP의 서비스를 만들고 서비스의 IP로 접속시 파드가 재실행되어도 안정적으로 접속할 수 있도록 하기위해서 만들어졌습니다.

서비스는 또한 부하분산의 기능도 할 수 있습니다. 위의 그림과 같이 파드가 여러개일때 서비스 IP로 접속시 각 파드들에 부하를 분산시킬 수 있게 됩니다.
K8S Service 종류
ClusterIP
- 동일한 애플리케이션을 실행하는 여러 Pod에 접속을 용이하기 위해 사용합니다.
- ClusterIP는 Cluster 내부에서만 접근이 가능하며 외부에서는 접근이 불가능합니다.
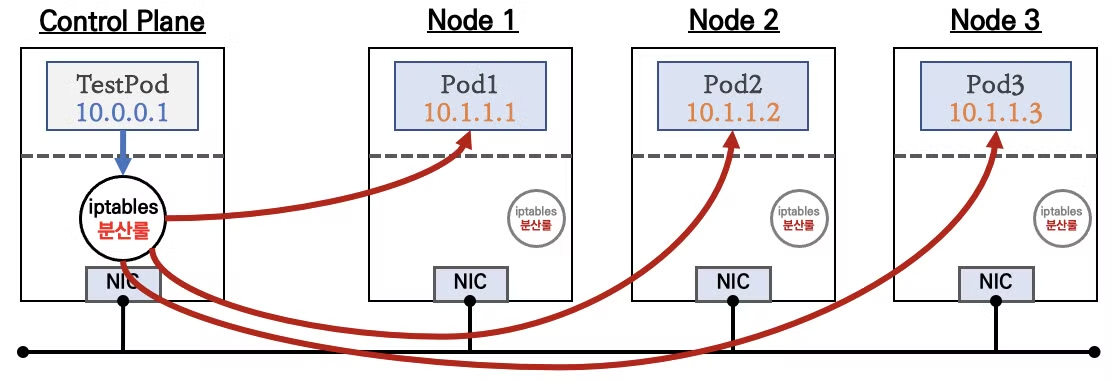
- iptables 의 NAT 기능을 이용하여 Pod에 접근하며, 동일한 iptables 분산룰을 각 노드에 적용합니다.
NodePort
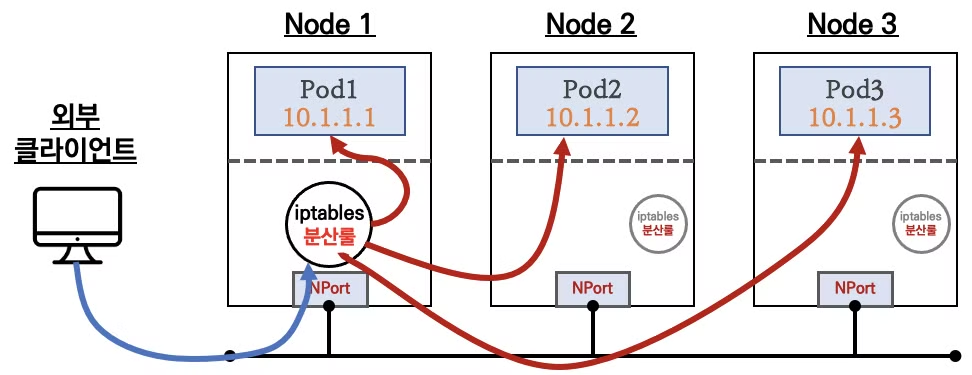
- NodePort는 ClusterIP와 같이 Cluster 내부에서 접근이 가능하며, 외부에서도 접근이 가능합니다.
- NodePort도 ClusterIP와 같이 iptables의 NAT 기능을 이용하여 Pod에 접근하며, 각 노드에 NodePort를 할당합니다.
- 외부에서는 NodePort를 통해 각 노드에 접근 할 수 있습니다.
LoadBalancer
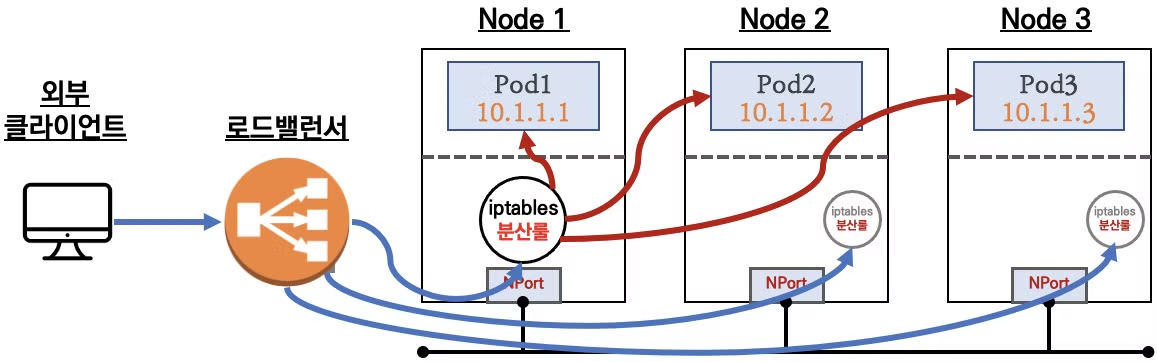
- LoadBalancer도 외부에서 접근이 가능하며, 클라우드 서비스에서 제공하는 LoadBalancer를 사용합니다. (AWS의 경우 ELB(Elastic Load Balancer)가 사용됩니다.)
- 온프레미스 환경에서도 MetalLB와 같은 LoadBalancer를 사용할 수 있습니다.
서비스의 구조
서비스를 선언시 port와 targetPort, 그리고 label selector 를 사용합니다. 각각의 역할은 다음과 같습니다.
-
port: 서비스가 listen 할 포트를 지정합니다. -
targetPort: 대상 파드의 port를 지정합니다. -
label selector: 대상 파드를 특정합니다.
kube-proxy 모드
- kube-proxy는 서비스 통신 동작에 대한 설정을 관리합니다. 데몬셋으로 배포되어 모든 노드에 파드가 생성됩니다.
- kube-proxy 모드의 종류는 userspace proxy 모드, iptables proxy 모드, ipvs proxy 모드, nftables proxy 모드 등이 있습니다.
userspace proxy 모드
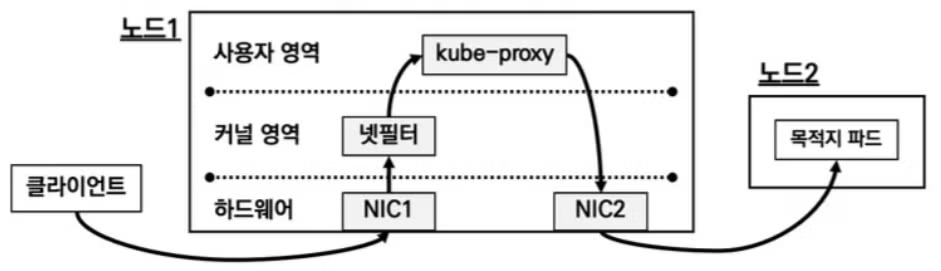
- 기초적인 모드이며 사용자 영역의 kube-proxy를 통해 NIC1으로 들어온 패킷을 NIC2로 전달하여 목적 파드로 전달합니다.
- 이렇게 하는 과정에서 커널영역(netfilter)과 사용자영역(kube-proxy)를 오가는 과정에서 스위칭에 의한 오버헤드가 발생하는 단점이 있습니다.
iptables proxy 모드
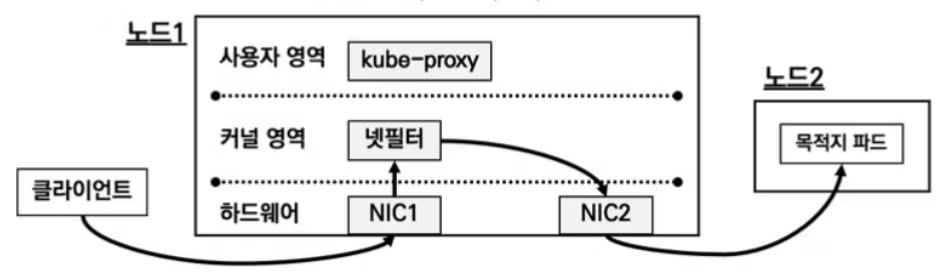
- 쿠버네티스 설치시 기본 모드이며, kube-proxy는 트래픽 전달에 직접 관여하지는 않고, iptables 규칙을 관리하는 역할을 합니다.
- iptables proxy 모드는 트래픽 전달 과정에서 kube-proxy를 경유하지 않고, 커널 영역과 사용자 영역 전환이 필요하지 않아서, 유저스페이스 proxy 모드에 비해 오버헤드가 줄어듭니다.
- 단점으로는 iptables 규칙이 많아 질 경우 모든 규칙 평가 하는데 지연이 발생할 수 있습니다.
- 또한 장애시 모든 규칙을 확인하기 어려워 장애 처리에 불리합니다.
ipvs proxy 모드
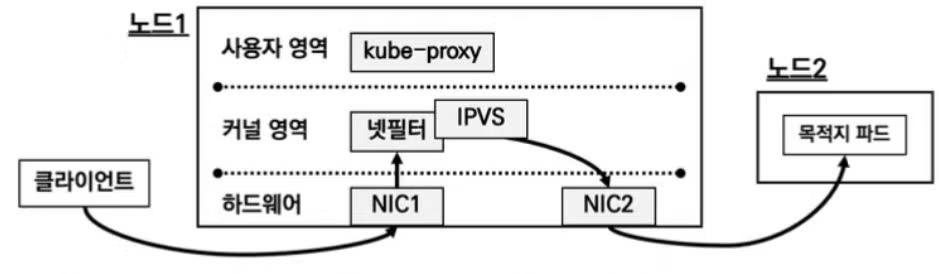
- ipvs proxy 모드는 지금까지의 모드 중 가장 효율적인 모드입니다. IPVS(IP Virtual Server)는 넷필터에서 동작하는 Layer 4 로드밸런서입니다. iptables 보다 더 높은 성능 처리를 보여주고, 규칙 갯수를 줄일 수 있습니다. 또한 다양한 부하분산 알고리즘을 제공합니다.
nftables proxy 모드
- nftables 는 iptables를 대체하기 위해 개발된 패킷 필터링 프레임워크로, iptables 보다 더 유연하고 강력한 규칙 설정을 제공합니다.
- 하지만 아직 실험적으로 개발중인 단계로 실무에서는 ipvs proxy 모드를 권장합니다.
eBPF 모드 + XDP
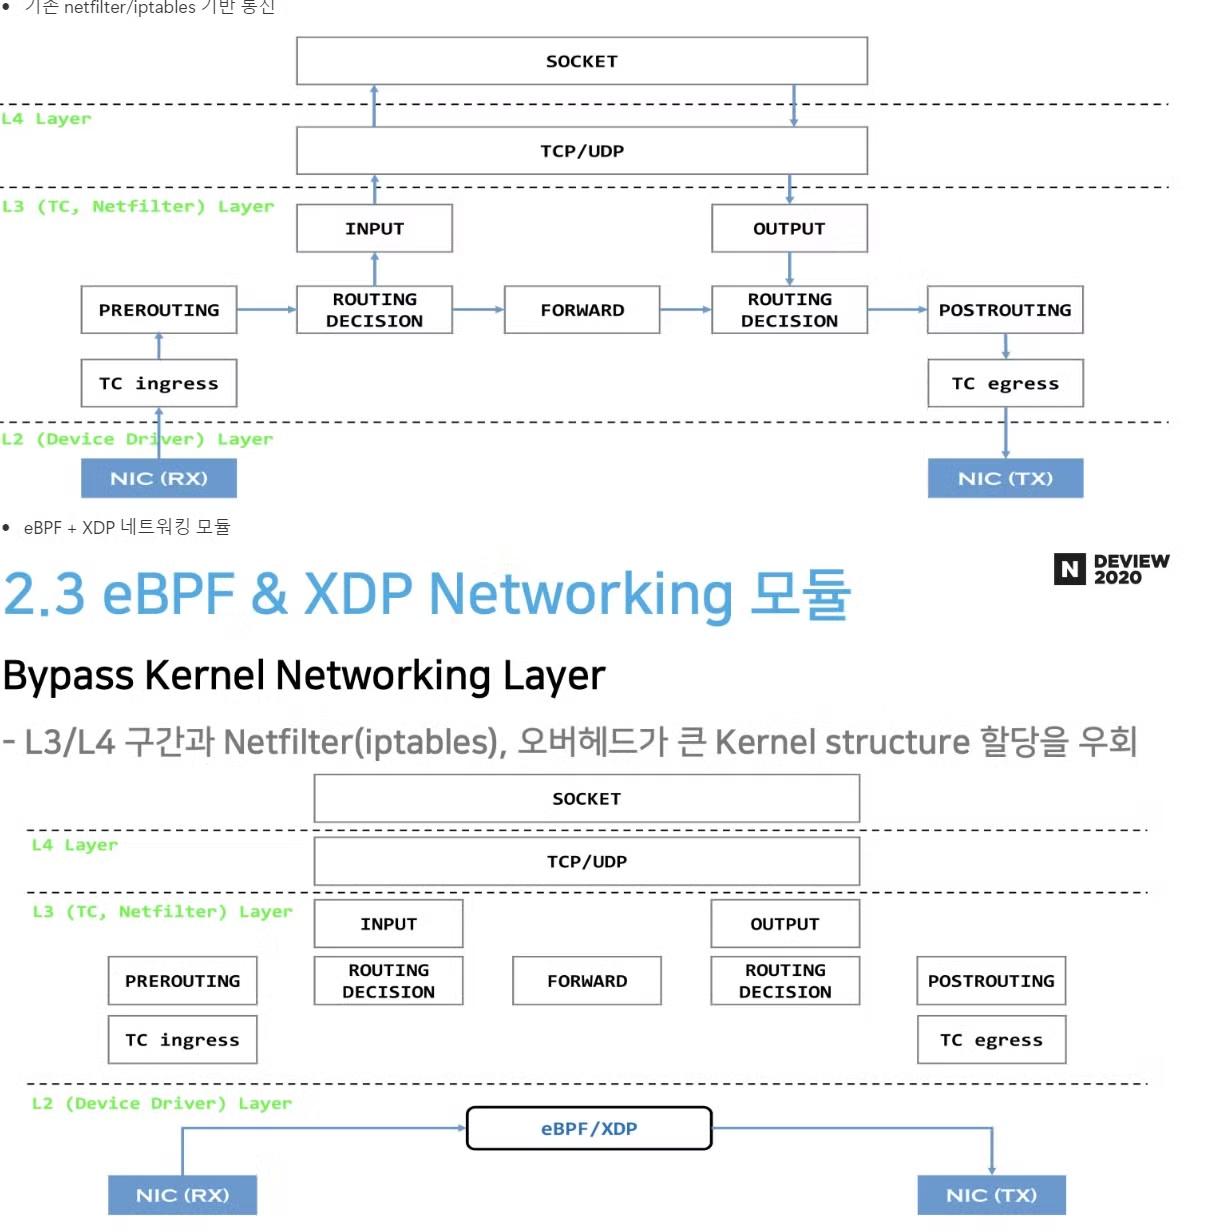
- 앞에서 알아보았던 모든 모드들이 netfilter 기반인데 반해, eBPF 모드 + XDP 는 netfilter 전 단계에서 트래픽 라우팅을 처리하여 훨씬 효율 적입니다. calico나 cilium을 사용하여서 eBPF 모드를 사용할 수 있습니다.
실습
실습환경 구축
- 이번 실습은 실습환경 구축의 용이성을 위해서 kind를 이용하여 실습하였습니다.
- 실습 환경 구축은 다음과 같이 진행 하였습니다.
# kind 클러스터 정의 파일 생성
$ cat <<EOT> kind-svc-w3.yaml
kind: Cluster
apiVersion: kind.x-k8s.io/v1alpha4
featureGates:
"InPlacePodVerticalScaling": true
"MultiCIDRServiceAllocator": true
nodes:
- role: control-plane
labels:
mynode: control-plane
extraPortMappings:
- containerPort: 30000
hostPort: 30000
- containerPort: 30001
hostPort: 30001
- containerPort: 30002
hostPort: 30002
kubeadmConfigPatches:
- |
kind: ClusterConfiguration
apiServer:
extraArgs:
runtime-config: api/all=true
- role: worker
labels:
mynode: worker1
- role: worker
labels:
mynode: worker2
- role: worker
labels:
mynode: worker3
networking:
podSubnet: 10.10.0.0/16
serviceSubnet: 10.200.1.0/24
EOT
# k8s 클러스터 설치
$ kind create cluster --config kind-svc-w3.yaml --name myk8s --image kindest/node:v1.31.0
# => Creating cluster "myk8s" ...
# ✓ Ensuring node image (kindest/node:v1.31.0) 🖼
# ✓ Preparing nodes 📦 📦 📦 📦
# ✓ Writing configuration 📜
# ✓ Starting control-plane 🕹️
# ✓ Installing CNI 🔌
# ✓ Installing StorageClass 💾
# ✓ Joining worker nodes 🚜
# Set kubectl context to "kind-myk8s"
# You can now use your cluster with:
#
# kubectl cluster-info --context kind-myk8s
$ docker ps
# => CONTAINER ID IMAGE COMMAND CREATED STATUS PORTS NAMES
# 1b7e6b646e48 kindest/node:v1.31.0 "/usr/local/bin/entr…" 18 minutes ago Up 18 minutes myk8s-worker
# 5406c013a571 kindest/node:v1.31.0 "/usr/local/bin/entr…" 18 minutes ago Up 18 minutes 0.0.0.0:30000-30002->30000-30002/tcp, 127.0.0.1:43315->6443/tcp myk8s-control-plane
# 4134657c5a70 kindest/node:v1.31.0 "/usr/local/bin/entr…" 18 minutes ago Up 18 minutes myk8s-worker3
# 6caf2b177502 kindest/node:v1.31.0 "/usr/local/bin/entr…" 18 minutes ago Up 18 minutes myk8s-worker2
# 노드에 기본 툴 설치
$ docker exec -it myk8s-control-plane sh -c 'apt update && apt install tree psmisc lsof wget bridge-utils net-tools ipset ipvsadm nfacct tcpdump ngrep iputils-ping arping git vim arp-scan -y'
$ for i in worker worker2 worker3; do echo ">> node myk8s-$i <<"; docker exec -it myk8s-$i sh -c 'apt update && apt install tree psmisc lsof wget bridge-utils net-tools ipset ipvsadm nfacct tcpdump ngrep iputils-ping arping -y'; echo; done
# k8s v1.31.0 버전 확인
$ kubectl get node
# => NAME STATUS ROLES AGE VERSION
# myk8s-control-plane Ready control-plane 40m v1.31.0
# myk8s-worker Ready <none> 40m v1.31.0
# myk8s-worker2 Ready <none> 40m v1.31.0
# myk8s-worker3 Ready <none> 40m v1.31.0
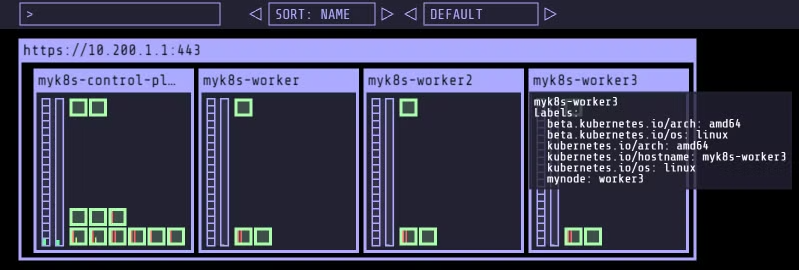
# 노드 labels 확인
$ kubectl get nodes -o jsonpath="{.items[*].metadata.labels}" | grep mynode
$ kubectl get nodes -o jsonpath="{.items[*].metadata.labels}" | jq | grep mynode
# => "mynode": "control-plane",
# "mynode": "worker1"
# "mynode": "worker2"
# "mynode": "worker3"
# kind network 중 컨테이너(노드) IP(대역) 확인 : 172.18.0.2~ 부터 할당되며, control-plane 이 꼭 172.18.0.2가 안될 수 도 있음
$ docker ps -q | xargs docker inspect --format ' '
# => /myk8s-control-plane 172.23.0.2
# /myk8s-worker 172.23.0.4
# /myk8s-worker2 172.23.0.5
# /myk8s-worker3 172.23.0.3
# 파드CIDR 과 Service 대역 확인 : CNI는 kindnet 사용
$ kubectl get cm -n kube-system kubeadm-config -oyaml | grep -i subnet
# => podSubnet: 10.10.0.0/16
# serviceSubnet: 10.200.1.0/24
$ kubectl cluster-info dump | grep -m 2 -E "cluster-cidr|service-cluster-ip-range"
# => "--service-cluster-ip-range=10.200.1.0/24",
# "--cluster-cidr=10.10.0.0/16",
# feature-gates 확인 : https://kubernetes.io/docs/reference/command-line-tools-reference/feature-gates/
$ kubectl describe pod -n kube-system | grep feature-gates
# => --feature-gates=InPlacePodVerticalScaling=true,MultiCIDRServiceAllocator=true
$ kubectl describe pod -n kube-system | grep runtime-config
# => --runtime-config=api/all=true
# MultiCIDRServiceAllocator : https://kubernetes.io/docs/tasks/network/extend-service-ip-ranges/
$ kubectl get servicecidr
# => NAME CIDRS AGE
# kubernetes 10.200.1.0/24 62m
# 노드마다 할당된 dedicated subnet (podCIDR) 확인
$ kubectl get nodes -o jsonpath="{.items[*].spec.podCIDR}"
# => 10.10.0.0/24 10.10.4.0/24 10.10.1.0/24 10.10.2.0/24
# kube-proxy configmap 확인
$ kubectl describe cm -n kube-system kube-proxy
# => ...
# iptables:
# localhostNodePorts: null
# masqueradeAll: false
# masqueradeBit: null
# minSyncPeriod: 1s
# syncPeriod: 0s
# mode: iptables
# ...
# kube-proxy가 iptables 모드로 동작중임을 확인할 수 있습니다.
# 노드 별 네트워트 정보 확인 : CNI는 kindnet 사용
$ for i in control-plane worker worker2 worker3; do echo ">> node myk8s-$i <<"; docker exec -it myk8s-$i ls /opt/cni/bin/; echo; done
$ for i in control-plane worker worker2 worker3; do echo ">> node myk8s-$i <<"; docker exec -it myk8s-$i cat /etc/cni/net.d/10-kindnet.conflist; echo; done
$ for i in control-plane worker worker2 worker3; do echo ">> node myk8s-$i <<"; docker exec -it myk8s-$i ip -c route; echo; done
$ for i in control-plane worker worker2 worker3; do echo ">> node myk8s-$i <<"; docker exec -it myk8s-$i ip -c addr; echo; done
$ for i in control-plane worker worker2 worker3; do echo ">> node myk8s-$i <<"; docker exec -it myk8s-$i ip -c -4 addr show dev eth0; echo; done
# iptables 정보 확인
$ for i in filter nat mangle raw ; do echo ">> IPTables Type : $i <<"; docker exec -it myk8s-control-plane iptables -t $i -S ; echo; done
$ for i in filter nat mangle raw ; do echo ">> IPTables Type : $i <<"; docker exec -it myk8s-worker iptables -t $i -S ; echo; done
$ for i in filter nat mangle raw ; do echo ">> IPTables Type : $i <<"; docker exec -it myk8s-worker2 iptables -t $i -S ; echo; done
$ for i in filter nat mangle raw ; do echo ">> IPTables Type : $i <<"; docker exec -it myk8s-worker3 iptables -t $i -S ; echo; done
# 각 노드 bash 접속
$ docker exec -it myk8s-control-plane bash
$ docker exec -it myk8s-worker bash
$ docker exec -it myk8s-worker2 bash
$ docker exec -it myk8s-worker3 bash
----------------------------------------
$ exit
----------------------------------------
# kind 설치 시 kind 이름의 도커 브리지가 생성됩니다. : 172.18.0.0/16 대역
$ docker network ls
# => NETWORK ID NAME DRIVER SCOPE
# ...
# 1c5d73657215 kind bridge local
$ docker inspect kind
# => [
# {
# "Name": "kind",
# ...
# "IPAM": {
# ...
# "Config": [
# {
# "Subnet": "172.23.0.0/16",
# "Gateway": "172.23.0.1"
# }
# ]
# },
# ...
# "Containers": {
# "1b7e6b646e4867591b5dd2a3bb4fcd2223dfcfd36dc08d86c8efc8fdc2112462": {
# "Name": "myk8s-worker",
# "IPv4Address": "172.23.0.4/16",
# },
# "4134657c5a7049d20944c2f80d3a3183a91a70107a47be72888e5c5fa972312a": {
# "Name": "myk8s-worker3",
# "IPv4Address": "172.23.0.3/16",
# },
# "5406c013a57167caf9a94ee9e89e550899a6efed9386f35548f03d2f670e8196": {
# "Name": "myk8s-control-plane",
# "IPv4Address": "172.23.0.2/16",
# },
# "6caf2b177502b92eccd4353ae3f4b3ac2da2949fc840225a02c9e83e1d24b09a": {
# "Name": "myk8s-worker2",
# "IPv4Address": "172.23.0.5/16",
# }
# },
# ...
# }
# ]
# arp scan 해두기
$ docker exec -it myk8s-control-plane arp-scan --interfac=eth0 --localnet
# => Interface: eth0, type: EN10MB, MAC: 02:42:ac:17:00:02, IPv4: 172.23.0.2
# Starting arp-scan 1.10.0 with 65536 hosts (https://github.com/royhills/arp-scan)
# 172.23.0.1 02:42:a4:3f:b3:d9 (Unknown: locally administered)
# 172.23.0.3 02:42:ac:17:00:03 (Unknown: locally administered)
# 172.23.0.4 02:42:ac:17:00:04 (Unknown: locally administered)
# 172.23.0.5 02:42:ac:17:00:05 (Unknown: locally administered)
# mypc 컨테이너 기동 : kind 도커 브리지를 사용하고, 컨테이너 IP를 직접 지정
$ docker run -d --rm --name mypc --network kind --ip 172.23.0.100 nicolaka/netshoot sleep infinity
$ docker ps
## 만약 kind 네트워크 대역이 다를 경우 위 IP 지정이 실패할 수 있으니, 그냥 IP 지정 없이 mypc 컨테이너 기동 할 것
## docker run -d --rm --name mypc --network kind nicolaka/netshoot sleep infinity
# 통신 확인
$ docker exec -it mypc ping -c 1 172.23.0.1
# => PING 172.23.0.1 (172.23.0.1) 56(84) bytes of data.
# 64 bytes from 172.23.0.1: icmp_seq=1 ttl=64 time=0.154 ms
#
# --- 172.23.0.1 ping statistics ---
# 1 packets transmitted, 1 received, 0% packet loss, time 0ms
# rtt min/avg/max/mdev = 0.154/0.154/0.154/0.000 ms
$ for i in {1..5} ; do docker exec -it mypc ping -c 1 172.23.0.$i; done
$ docker exec -it mypc zsh
-------------
$ ifconfig
# => eth0 Link encap:Ethernet HWaddr 02:42:AC:17:00:06
# inet addr:172.23.0.6 Bcast:172.23.255.255 Mask:255.255.0.0
# ...
$ ping -c 1 172.23.0.2
# => PING 172.23.0.2 (172.23.0.2) 56(84) bytes of data.
# 64 bytes from 172.23.0.2: icmp_seq=1 ttl=64 time=0.258 ms
#
# --- 172.23.0.2 ping statistics ---
# 1 packets transmitted, 1 received, 0% packet loss, time 0ms
# rtt min/avg/max/mdev = 0.258/0.258/0.258/0.000 ms
$ exit
-------------
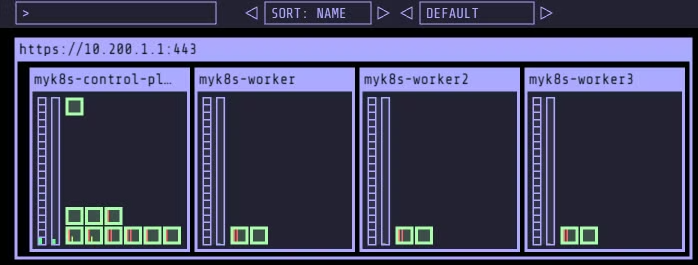
# kube-ops-view 설치
$ helm repo add geek-cookbook https://geek-cookbook.github.io/charts/
# => "geek-cookbook" has been added to your repositories
$ helm install kube-ops-view geek-cookbook/kube-ops-view --version 1.2.2 --set service.main.type=NodePort,service.main.ports.http.nodePort=30000 --set env.TZ="Asia/Seoul" --namespace kube-system
# => NAME: kube-ops-view
# ...
# 1. Get the application URL by running these commands:
# export NODE_PORT=$(kubectl get --namespace kube-system -o jsonpath="{.spec.ports[0].nodePort}" services kube-ops-view)
# export NODE_IP=$(kubectl get nodes --namespace kube-system -o jsonpath="{.items[0].status.addresses[0].address}")
# echo http://$NODE_IP:$NODE_PORT
# myk8s-control-plane 배치
$ kubectl -n kube-system edit deploy kube-ops-view
---
spec:
...
template:
...
spec:
nodeSelector:
mynode: control-plane
tolerations:
- key: "node-role.kubernetes.io/control-plane"
operator: "Equal"
effect: "NoSchedule"
---
# 설치 확인
$ kubectl -n kube-system get pod -o wide -l app.kubernetes.io/instance=kube-ops-view
# => NAME READY STATUS RESTARTS AGE IP NODE NOMINATED NODE READINESS GATES
# kube-ops-view-58f96c464d-t5t68 1/1 Running 0 30s 10.10.0.5 myk8s-control-plane <none> <none>
# kube-ops-view 접속 URL 확인 (1.5 , 2 배율) : macOS 사용자
$ echo -e "KUBE-OPS-VIEW URL = http://localhost:30000/#scale=1.5"
$ echo -e "KUBE-OPS-VIEW URL = http://localhost:30000/#scale=2"
# kube-ops-view 접속 URL 확인 (1.5 , 2 배율) : Windows 사용자
$ echo -e "KUBE-OPS-VIEW URL = http://192.168.50.10:30000/#scale=1.5"
$ echo -e "KUBE-OPS-VIEW URL = http://192.168.50.10:30000/#scale=2"
ClusterIP 실습
- 앞에서 알아본 ClusterIP 타입에 대해 실습해 보겠습니다.
- 다음의 사항들을 살펴볼 것입니다.
- ClusterIP의 서비스의 경우 클러스터 내부에서만 접근이 가능한 특성이 있습니다.
- IP로도 접속할 수 있지만 도메인 명으로도 접속이 가능합니다.
- 서비스 타입(ClusterIP)을 생성하면 apiserver ⇒ (kubelet) ⇒ kube-proxy ⇒ iptables 에 rule 이 생성 됩니다.
- 모든 노드(컨트롤 플레인 포함) 에 iptables rule이 설정 되므로, 파드에서 접속 시 해당 노드에 존재하는 iptables rule 에 의해 분산 접속됩니다.
- 실습 구성
-
목적지(backend) 파드 (pod) 생성 : 3pod.yml
# 3pod.yml apiVersion: v1 kind: Pod metadata: name: webpod1 labels: app: webpod spec: nodeName: myk8s-worker containers: - name: container image: traefik/whoami terminationGracePeriodSeconds: 0 --- apiVersion: v1 kind: Pod metadata: name: webpod2 labels: app: webpod spec: nodeName: myk8s-worker2 containers: - name: container image: traefik/whoami terminationGracePeriodSeconds: 0 --- apiVersion: v1 kind: Pod metadata: name: webpod3 labels: app: webpod spec: nodeName: myk8s-worker3 containers: - name: container image: traefik/whoami terminationGracePeriodSeconds: 0 -
클라이언트 생성 : netpod.yml
# netpod.yml apiVersion: v1 kind: Pod metadata: name: net-pod spec: nodeName: myk8s-control-plane containers: - name: netshoot-pod image: nicolaka/netshoot command: ["tail"] args: ["-f", "/dev/null"] terminationGracePeriodSeconds: 0 -
서비스(ClusterIP) 생성 : svc-clusterip.yml
# svc-clusterip.yml apiVersion: v1 kind: Service metadata: name: svc-clusterip spec: ports: - name: svc-webport port: 9000 # 서비스 IP 에 접속 시 사용하는 포트 port 를 의미 targetPort: 80 # 타킷 targetPort 는 서비스를 통해서 목적지 파드로 접속 시 해당 파드로 접속하는 포트를 의미 selector: app: webpod # 셀렉터 아래 app:webpod 레이블이 설정되어 있는 파드들은 해당 서비스에 연동됨 type: ClusterIP # 서비스 타입 -
생성 및 확인
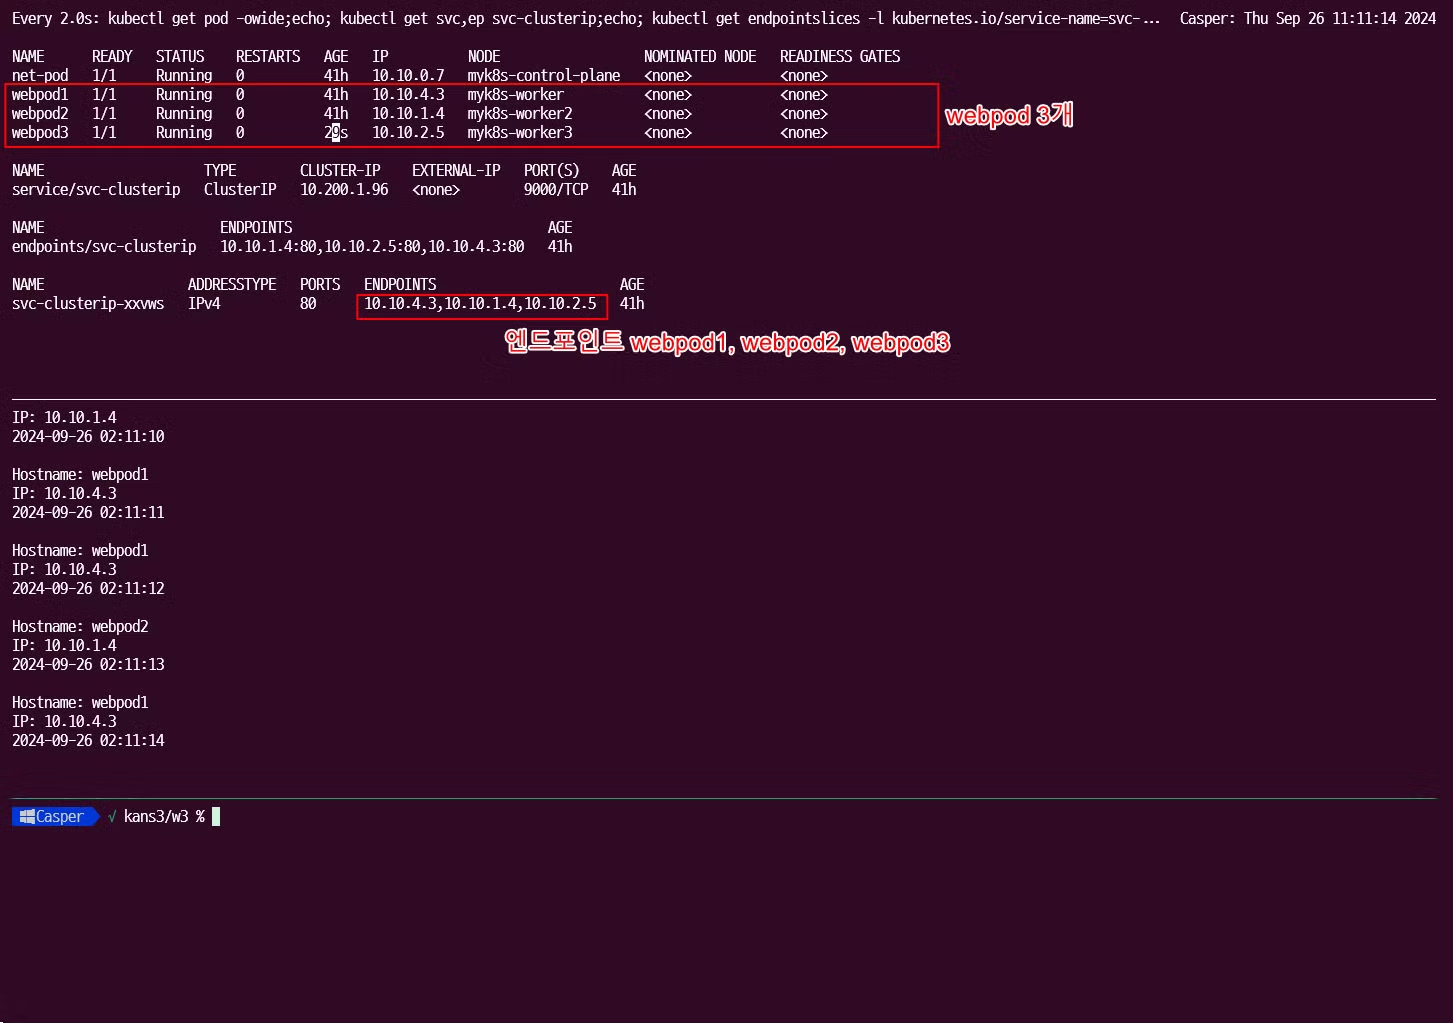
  # 모니터링
  $ **watch -d 'kubectl get pod -owide ;echo; kubectl get svc,ep svc-clusterip'**

  # 생성
  $ kubectl apply -f 3pod.yml,netpod.yml,svc-clusterip.yml
  # => pod/webpod1 created
  #    pod/webpod2 created
  #    pod/webpod3 created
  #    pod/net-pod created
  #    service/svc-clusterip created

  # 파드와 서비스 사용 네트워크 대역 정보 확인
  $ kubectl cluster-info dump | grep -m 2 -E "cluster-cidr|service-cluster-ip-range"
  # => "--service-cluster-ip-range=10.200.1.0/24",
  #    "--cluster-cidr=10.10.0.0/16",

  # 확인
  $ kubectl get pod -owide
  # => NAME      READY   STATUS    RESTARTS   AGE    IP          NODE                  NOMINATED NODE   READINESS GATES
  #    net-pod   1/1     Running   0          2m8s   10.10.0.7   myk8s-control-plane   <none>           <none>
  #    webpod1   1/1     Running   0          2m8s   10.10.4.3   myk8s-worker          <none>           <none>
  #    webpod2   1/1     Running   0          2m8s   10.10.1.4   myk8s-worker2         <none>           <none>
  #    webpod3   1/1     Running   0          2m8s   10.10.2.3   myk8s-worker3         <none>           <none>
  $ kubectl get svc svc-clusterip
  # => NAME            TYPE        CLUSTER-IP    EXTERNAL-IP   PORT(S)    AGE
  #    svc-clusterip   ClusterIP   10.200.1.96   <none>        9000/TCP   2m15s

  # spec.ports.port 와 spec.ports.targetPort 가 어떤 의미인지 꼭 이해하자!
  $ kubectl describe svc svc-clusterip
  # => Name:              svc-clusterip
  #    Namespace:         default
  #    Labels:            <none>
  #    Annotations:       <none>
  #    Selector:          app=webpod
  #    Type:              ClusterIP
  #    IP Family Policy:  SingleStack
  #    IP Families:       IPv4
  #    IP:                10.200.1.96
  #    IPs:               10.200.1.96
  #    Port:              svc-webport  9000/TCP                    # service의 listening port
  #    TargetPort:        80/TCP                                   # pod의 실제 port
  #    Endpoints:         10.10.1.4:80,10.10.2.3:80,10.10.4.3:80   # pod의 ip:port 목록
  #    Session Affinity:  None
  #    Events:            <none>

  # 서비스 생성 시 엔드포인트를 자동으로 생성, 물론 수동으로 설정 생성도 가능
  $ kubectl get endpoints svc-clusterip
  # => NAME            ENDPOINTS                                AGE
  #    svc-clusterip   10.10.1.4:80,10.10.2.3:80,10.10.4.3:80   3m32s
  $ kubectl get endpointslices -l kubernetes.io/service-name=svc-clusterip
  # => NAME                  ADDRESSTYPE   PORTS   ENDPOINTS                       AGE
  #    svc-clusterip-xxvws   IPv4          80      10.10.4.3,10.10.1.4,10.10.2.3   3m39s
-
- 서비스 (ClusterIP) 접속 확인
-
클라이언트 (TestPod)의 Shell 에 접속하여 서비스(ClusterIP) 부하분산 접속 확인
# webpod 파드의 IP 를 출력 $ kubectl get pod -l app=webpod -o jsonpath="{.items[*].status.podIP}" # => 10.10.4.3 10.10.1.4 10.10.2.3 # webpod 파드의 IP를 변수에 지정 $ WEBPOD1=$(kubectl get pod webpod1 -o jsonpath={.status.podIP}) $ WEBPOD2=$(kubectl get pod webpod2 -o jsonpath={.status.podIP}) $ WEBPOD3=$(kubectl get pod webpod3 -o jsonpath={.status.podIP}) $ echo $WEBPOD1 $WEBPOD2 $WEBPOD3 # => 10.10.4.3 10.10.1.4 10.10.2.3 # net-pod 파드에서 webpod 파드의 IP로 직접 curl 로 반복 접속 $ for pod in $WEBPOD1 $WEBPOD2 $WEBPOD3; do kubectl exec -it net-pod -- curl -s $pod; done # => Hostname: webpod1 # IP: 10.10.4.3 # RemoteAddr: 10.10.0.7:56374 # GET / HTTP/1.1 # Host: 10.10.4.3 # User-Agent: curl/8.7.1 # Accept: */* # # Hostname: webpod2 # ... # Hostname: webpod3 # ... $ for pod in $WEBPOD1 $WEBPOD2 $WEBPOD3; do kubectl exec -it net-pod -- curl -s $pod | grep Hostname; done # => Hostname: webpod1 # Hostname: webpod2 # Hostname: webpod3 $ for pod in $WEBPOD1 $WEBPOD2 $WEBPOD3; do kubectl exec -it net-pod -- curl -s $pod | grep Host; done # => Hostname: webpod1 # Host: 10.10.4.3 # Hostname: webpod2 # Host: 10.10.1.4 # Hostname: webpod3 # Host: 10.10.2.3 $ for pod in $WEBPOD1 $WEBPOD2 $WEBPOD3; do kubectl exec -it net-pod -- curl -s $pod | egrep 'Host|RemoteAddr'; done # => Hostname: webpod1 # RemoteAddr: 10.10.0.7:36382 # Host: 10.10.4.3 # Hostname: webpod2 # RemoteAddr: 10.10.0.7:52122 # Host: 10.10.1.4 # Hostname: webpod3 # RemoteAddr: 10.10.0.7:55962 # Host: 10.10.2.3 # 서비스 IP 변수 지정 : svc-clusterip 의 ClusterIP주소 $ SVC1=$(kubectl get svc svc-clusterip -o jsonpath={.spec.clusterIP}) $ echo $SVC1 # => 10.200.1.96 # 위 서비스 생성 시 kube-proxy 에 의해서 iptables 규칙이 모든 노드에 추가됨 $ docker exec -it myk8s-control-plane iptables -t nat -S | grep $SVC1 # => -A KUBE-SERVICES -d 10.200.1.96/32 -p tcp -m comment --comment "default/svc-clusterip:svc-webport cluster IP" -m tcp --dport 9000 -j KUBE-SVC-KBDEBIL6IU6WL7RF # -A KUBE-SVC-KBDEBIL6IU6WL7RF ! -s 10.10.0.0/16 -d 10.200.1.96/32 -p tcp -m comment --comment "default/svc-clusterip:svc-webport cluster IP" -m tcp --dport 9000 -j KUBE-MARK-MASQ $ for i in control-plane worker worker2 worker3; do echo ">> node myk8s-$i <<"; docker exec -it myk8s-$i iptables -t nat -S | grep $SVC1; echo; done # => >> node myk8s-control-plane << # -A KUBE-SERVICES -d 10.200.1.96/32 -p tcp -m comment --comment "default/svc-clusterip:svc-webport cluster IP" -m tcp --dport 9000 -j KUBE-SVC-KBDEBIL6IU6WL7RF # -A KUBE-SVC-KBDEBIL6IU6WL7RF ! -s 10.10.0.0/16 -d 10.200.1.96/32 -p tcp -m comment --comment "default/svc-clusterip:svc-webport cluster IP" -m tcp --dport 9000 -j KUBE-MARK-MASQ # # >> node myk8s-worker << # -A KUBE-SERVICES -d 10.200.1.96/32 -p tcp -m comment --comment "default/svc-clusterip:svc-webport cluster IP" -m tcp --dport 9000 -j KUBE-SVC-KBDEBIL6IU6WL7RF # -A KUBE-SVC-KBDEBIL6IU6WL7RF ! -s 10.10.0.0/16 -d 10.200.1.96/32 -p tcp -m comment --comment "default/svc-clusterip:svc-webport cluster IP" -m tcp --dport 9000 -j KUBE-MARK-MASQ # # >> node myk8s-worker2 << # -A KUBE-SERVICES -d 10.200.1.96/32 -p tcp -m comment --comment "default/svc-clusterip:svc-webport cluster IP" -m tcp --dport 9000 -j KUBE-SVC-KBDEBIL6IU6WL7RF # -A KUBE-SVC-KBDEBIL6IU6WL7RF ! -s 10.10.0.0/16 -d 10.200.1.96/32 -p tcp -m comment --comment "default/svc-clusterip:svc-webport cluster IP" -m tcp --dport 9000 -j KUBE-MARK-MASQ # # >> node myk8s-worker3 << # -A KUBE-SERVICES -d 10.200.1.96/32 -p tcp -m comment --comment "default/svc-clusterip:svc-webport cluster IP" -m tcp --dport 9000 -j KUBE-SVC-KBDEBIL6IU6WL7RF # -A KUBE-SVC-KBDEBIL6IU6WL7RF ! -s 10.10.0.0/16 -d 10.200.1.96/32 -p tcp -m comment --comment "default/svc-clusterip:svc-webport cluster IP" -m tcp --dport 9000 -j KUBE-MARK-MASQ ## (참고) ss 툴로 tcp listen 정보에는 없음 , 별도 /32 host 라우팅 추가 없음 -> 즉, iptables rule 에 의해서 처리됨을 확인 $ docker exec -it myk8s-control-plane ss -tnlp $ docker exec -it myk8s-control-plane ip -c route # TCP 80,9000 포트별 접속 확인 : 출력 정보 의미 확인 $ kubectl exec -it net-pod -- curl -s --connect-timeout 1 $SVC1:80 # => (공백) $ kubectl exec -it net-pod -- curl -s --connect-timeout 1 $SVC1:9000 # => Hostname: webpod2 # ... $ kubectl exec -it net-pod -- curl -s --connect-timeout 1 $SVC1:9000 | grep Hostname # => Hostname: webpod3 $ kubectl exec -it net-pod -- curl -s --connect-timeout 1 $SVC1:9000 | grep Hostname # => Hostname: webpod1 # curl로 접속했을때 컨테이너의 포트인 targetPort 80으로는 접속이 안 되고 port 9000로는 접속이 됩니다. # 또한 접속시마다 각 pod에 부하가 분산되어 HostName: 이 변경됨을 확인할 수 있습니다. # 서비스(ClusterIP) 부하분산 접속 확인 ## for 문을 이용하여 SVC1 IP 로 100번 접속을 시도 후 출력되는 내용 중 반복되는 내용의 갯수 출력 ## 반복해서 실행을 해보면, SVC1 IP로 curl 접속 시 3개의 파드로 대략 33% 정도로 부하분산 접속됨을 확인 $ kubectl exec -it net-pod -- zsh -c "for i in {1..10}; do curl -s $SVC1:9000 | grep Hostname; done | sort | uniq -c | sort -nr" # => 4 Hostname: webpod3 # 4 Hostname: webpod2 # 2 Hostname: webpod1 $ kubectl exec -it net-pod -- zsh -c "for i in {1..100}; do curl -s $SVC1:9000 | grep Hostname; done | sort | uniq -c | sort -nr" # => 38 Hostname: webpod3 # 35 Hostname: webpod1 # 27 Hostname: webpod2 $ kubectl exec -it net-pod -- zsh -c "for i in {1..1000}; do curl -s $SVC1:9000 | grep Hostname; done | sort | uniq -c | sort -nr" # => 346 Hostname: webpod2 # 336 Hostname: webpod1 # 318 Hostname: webpod3 # 혹은 $ kubectl exec -it net-pod -- zsh -c "for i in {1..100}; do curl -s $SVC1:9000 | grep Hostname; sleep 1; done" $ kubectl exec -it net-pod -- zsh -c "for i in {1..100}; do curl -s $SVC1:9000 | grep Hostname; sleep 0.1; done" $ kubectl exec -it net-pod -- zsh -c "for i in {1..10000}; do curl -s $SVC1:9000 | grep Hostname; sleep 0.01; done" # conntrack 확인 $ docker exec -it myk8s-control-plane bash ---------------------------------------- $ conntrack -h $ conntrack -E # => [NEW] tcp 6 120 SYN_SENT src=172.23.0.2 dst=172.23.0.2 sport=45466 dport=6443 [UNREPLIED] src=172.23.0.2 dst=172.23.0.2 sport=6443 dport=45466 # [UPDATE] tcp 6 60 SYN_RECV src=172.23.0.2 dst=172.23.0.2 sport=45466 dport=6443 src=172.23.0.2 dst=172.23.0.2 sport=6443 dport=45466 $ conntrack -C # => 2763 $ conntrack -S # => cpu=0 found=0 invalid=0 insert=0 insert_failed=0 drop=0 early_drop=0 error=0 search_restart=3 clash_resolve=0 chaintoolong=0 # cpu=1 found=0 invalid=0 insert=0 insert_failed=0 drop=0 early_drop=0 error=0 search_restart=0 clash_resolve=0 chaintoolong=0 $ conntrack -L --src 10.200.0.7 # net-pod IP # => tcp 6 93 TIME_WAIT src=10.10.0.7 dst=10.200.1.96 sport=37008 dport=9000 src=10.10.2.3 dst=10.10.0.7 sport=80 dport=37008 [ASSURED] mark=0 use=1 # tcp 6 93 TIME_WAIT src=10.10.0.7 dst=10.200.1.96 sport=36584 dport=9000 src=10.10.2.3 dst=10.10.0.7 sport=80 dport=36584 [ASSURED] mark=0 use=1 $ SVC1=$(kubectl get svc svc-clusterip -o jsonpath={.spec.clusterIP}) $ conntrack -L --dst $SVC1 # service ClusterIP # => tcp 6 31 TIME_WAIT src=10.10.0.7 dst=10.200.1.96 sport=37008 dport=9000 src=10.10.2.3 dst=10.10.0.7 sport=80 dport=37008 [ASSURED] mark=0 use=1 # tcp 6 31 TIME_WAIT src=10.10.0.7 dst=10.200.1.96 sport=36584 dport=9000 src=10.10.2.3 dst=10.10.0.7 sport=80 dport=36584 [ASSURED] mark=0 use=1 $ exit ---------------------------------------- # (참고) Link layer 에서 동작하는 ebtables $ ebtables -L # => Bridge table: filter # Bridge chain: INPUT, entries: 0, policy: ACCEPT # Bridge chain: FORWARD, entries: 0, policy: ACCEPT # Bridge chain: OUTPUT, entries: 0, policy: ACCEPT -
각 워커 노드에서 패킷 덤프 확인
# 방안1 : 1대 혹은 3대 bash 진입 후 tcpdump 해둘 것 $ docker exec -it myk8s-worker bash $ docker exec -it myk8s-worker2 bash $ docker exec -it myk8s-worker3 bash ---------------------------------- # nic 정보 확인 $ ip -c link # => <<myk8s-worker>> # 3: veth9a888981@if2: <BROADCAST,MULTICAST,UP,LOWER_UP> mtu 1500 qdisc noqueue state UP mode DEFAULT group default # link/ether 26:a5:d2:44:f4:b4 brd ff:ff:ff:ff:ff:ff link-netns cni-0b7e59c3-3920-ce1f-874a-9e228adf3b72 # 134: eth0@if135: <BROADCAST,MULTICAST,UP,LOWER_UP> mtu 1500 qdisc noqueue state UP mode DEFAULT group default # link/ether 02:42:ac:17:00:04 brd ff:ff:ff:ff:ff:ff link-netnsid 0 # # <<myk8s-worker2>> # 4: veth570fce87@if2: <BROADCAST,MULTICAST,UP,LOWER_UP> mtu 1500 qdisc noqueue state UP mode DEFAULT group default # link/ether a6:8a:d8:a3:f4:ac brd ff:ff:ff:ff:ff:ff link-netns cni-8dcb2d16-f339-2571-03d2-d6b0f850878d # 136: eth0@if137: <BROADCAST,MULTICAST,UP,LOWER_UP> mtu 1500 qdisc noqueue state UP mode DEFAULT group default # link/ether 02:42:ac:17:00:05 brd ff:ff:ff:ff:ff:ff link-netnsid 0 # # <<myk8s-worker3>> # 3: veth2e19df47@if2: <BROADCAST,MULTICAST,UP,LOWER_UP> mtu 1500 qdisc noqueue state UP mode DEFAULT group default # link/ether da:5e:a5:14:62:7b brd ff:ff:ff:ff:ff:ff link-netns cni-1f44bebd-9ebf-6af4-7888-945649a2b5c8 # 132: eth0@if133: <BROADCAST,MULTICAST,UP,LOWER_UP> mtu 1500 qdisc noqueue state UP mode DEFAULT group default # link/ether 02:42:ac:17:00:03 brd ff:ff:ff:ff:ff:ff link-netnsid 0 $ ip -c route # => <<myk8s-worker>> # default via 172.23.0.1 dev eth0 # 10.10.0.0/24 via 172.23.0.2 dev eth0 # 10.10.1.0/24 via 172.23.0.5 dev eth0 # 10.10.2.0/24 via 172.23.0.3 dev eth0 # 10.10.4.3 dev veth9a888981 scope host # 172.23.0.0/16 dev eth0 proto kernel scope link src 172.23.0.4 # # <<myk8s-worker2>> # default via 172.23.0.1 dev eth0 # 10.10.0.0/24 via 172.23.0.2 dev eth0 # 10.10.1.4 dev veth570fce87 scope host # 10.10.2.0/24 via 172.23.0.3 dev eth0 # 10.10.4.0/24 via 172.23.0.4 dev eth0 # 172.23.0.0/16 dev eth0 proto kernel scope link src 172.23.0.5 # # <<myk8s-worker3>> # default via 172.23.0.1 dev eth0 # 10.10.0.0/24 via 172.23.0.2 dev eth0 # 10.10.1.0/24 via 172.23.0.5 dev eth0 # 10.10.2.3 dev veth2e19df47 scope host # 10.10.4.0/24 via 172.23.0.4 dev eth0 # 172.23.0.0/16 dev eth0 proto kernel scope link src 172.23.0.3 $ ip -c addr # => <<myk8s-worker>> # 3: veth9a888981@if2: <BROADCAST,MULTICAST,UP,LOWER_UP> mtu 1500 qdisc noqueue state UP group default # link/ether 26:a5:d2:44:f4:b4 brd ff:ff:ff:ff:ff:ff link-netns cni-0b7e59c3-3920-ce1f-874a-9e228adf3b72 # inet 10.10.4.1/32 scope global veth9a888981 # valid_lft forever preferred_lft forever # 134: eth0@if135: <BROADCAST,MULTICAST,UP,LOWER_UP> mtu 1500 qdisc noqueue state UP group default # link/ether 02:42:ac:17:00:04 brd ff:ff:ff:ff:ff:ff link-netnsid 0 # inet 172.23.0.4/16 brd 172.23.255.255 scope global eth0 # valid_lft forever preferred_lft forever # # <<myk8s-worker2>> # 4: veth570fce87@if2: <BROADCAST,MULTICAST,UP,LOWER_UP> mtu 1500 qdisc noqueue state UP group default # link/ether a6:8a:d8:a3:f4:ac brd ff:ff:ff:ff:ff:ff link-netns cni-8dcb2d16-f339-2571-03d2-d6b0f850878d # inet 10.10.1.1/32 scope global veth570fce87 # valid_lft forever preferred_lft forever # 136: eth0@if137: <BROADCAST,MULTICAST,UP,LOWER_UP> mtu 1500 qdisc noqueue state UP group default # link/ether 02:42:ac:17:00:05 brd ff:ff:ff:ff:ff:ff link-netnsid 0 # inet 172.23.0.5/16 brd 172.23.255.255 scope global eth0 # valid_lft forever preferred_lft forever # # <<myk8s-worker3>> # 3: veth2e19df47@if2: <BROADCAST,MULTICAST,UP,LOWER_UP> mtu 1500 qdisc noqueue state UP group default # link/ether da:5e:a5:14:62:7b brd ff:ff:ff:ff:ff:ff link-netns cni-1f44bebd-9ebf-6af4-7888-945649a2b5c8 # inet 10.10.2.1/32 scope global veth2e19df47 # valid_lft forever preferred_lft forever # 132: eth0@if133: <BROADCAST,MULTICAST,UP,LOWER_UP> mtu 1500 qdisc noqueue state UP group default # link/ether 02:42:ac:17:00:03 brd ff:ff:ff:ff:ff:ff link-netnsid 0 # inet 172.23.0.3/16 brd 172.23.255.255 scope global eth0 # valid_lft forever preferred_lft forever # tcpdump/ngrep : eth0 >> tcp 9000 포트 트래픽은 왜 없을까? iptables rule 동작 그림을 한번 더 확인하고 이해해보자 ## ngrep 네트워크 패킷 분석기 활용해보기 : 특정 url 호출에 대해서만 필터 등 깔끔하게 볼 수 있음 - 링크 $ tcpdump -i eth0 tcp port 80 -nnq $ tcpdump -i eth0 tcp port 80 -w /root/svc1-1.pcap $ tcpdump -i eth0 tcp port 9000 -nnq $ ngrep -tW byline -d eth0 '' 'tcp port 80' # tcpdump/ngrep : vethX # $ VETH1=<각자 자신의 veth 이름> $ VETH1=veth9a888981 $ tcpdump -i $VETH1 tcp port 80 -nn $ tcpdump -i $VETH1 tcp port 80 -w /root/svc1-2.pcap $ tcpdump -i $VETH1 tcp port 9000 -nn $ ngrep -tW byline -d $VETH1 '' 'tcp port 80' $ exit ---------------------------------- # 방안2 : kind 노드 컨테이너 bash 직접 접속하지 않고 호스트에서 tcpdump 하기 $ docker exec -it myk8s-worker tcpdump -i eth0 tcp port 80 -nnq $ VETH1=<각자 자신의 veth 이름> docker exec -it myk8s-worker ip -c route $ docker exec -it myk8s-worker tcpdump -i $VETH1 tcp port 80 -nnq # 호스트PC에 pcap 파일 복사 >> wireshark 에서 분석 $ docker cp myk8s-worker:/root/svc1-1.pcap . $ docker cp myk8s-worker:/root/svc1-2.pcap . -
net-pod 포드에 접속 후 10개 curl 요청
$ kubectl exec -it net-pod -- zsh ---------------------------------- $ for i in {1..10}; do curl -s $SVC1:9000 | grep Hostname; done | sort | uniq -c | sort -nr # => 4 Hostname: webpod3 # 3 Hostname: webpod2 # 3 Hostname: webpod1 $ exit ---------------------------------- -
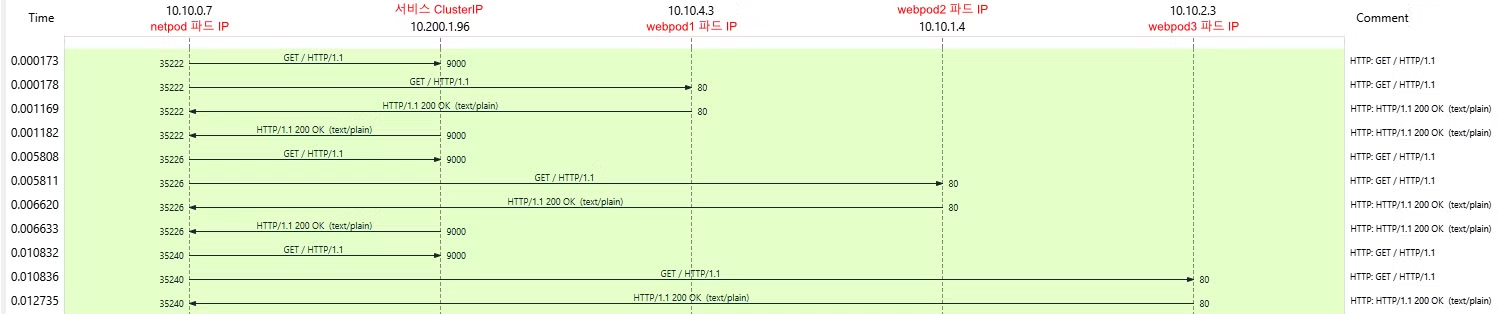
각각 net-pod와 워커 노드들의 패킷캡쳐파일(*.pcap)를 받아서 와이어샤크로 확인해보겠습니다.
-
net-pod(10.10.0.7)에서 서비스:9000 (IP:10.200.1.96)으로 요청된 패킷이 DNAT 되어 k8s-worker의 webpod1:80 (IP:10.10.4.3)으로 전달되고, 응답은 그 반대로 전달 되는 것을 확인 할 수 있습니다.

-
또한 Stastics 메뉴의→ Flow Graph 기능을 통해 패킷의 흐름을 확인할 수 있었습니다.
-
-
- iptables 정책 확인
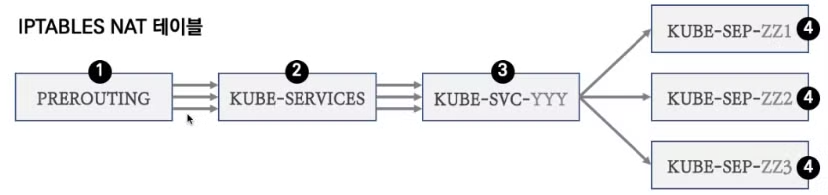
- kubernetes에서 service는 다음의 iptables 과정을 거칩니다.
- (1) PREROUTING ⇒ (2) KUBE-SERVICES ⇒ (3) KUBE-SVC-YYY ⇒ (4) KUBE-SEP-#파드1, KUBE-SEP-#파드2, KUBE-SEP-#파드3
- 그림으로 나타내면 다음과 같습니다.
-
각각에 대하여 iptables 룰을 확인해보겠습니다.
  # 컨트롤플레인에서 확인하겠습니다.
  $ docker exec -it myk8s-control-plane bash
  ----------------------------------------

  # iptables 확인
  $ iptables -t filter -S
  $ iptables -t nat -S
  $ iptables -t nat -S | wc -l
  # => 97
  $ iptables -t mangle -S

  # iptables 상세 확인 - 매칭 패킷 카운트, 인터페이스 정보 등 포함
  $ iptables -nvL -t filter
  $ iptables -nvL -t nat
  $ iptables -nvL -t mangle

  # rule 갯수 확인
  $ iptables -nvL -t filter | wc -l
  # => 47
  $ iptables -nvL -t nat | wc -l
  # => 158

  # 규칙 패킷 바이트 카운트 초기화
  $ iptables -t filter --zero; iptables -t nat --zero; iptables -t mangle --zero

  # 정책 확인 : 아래 정책 내용은 핵심적인 룰(rule)만 표시했습니다!
  $ iptables -t nat -nvL
  # => Chain PREROUTING (policy ACCEPT 121 packets, 7260 bytes) <<1. PREROUTING>>
  #     pkts bytes target     prot opt in     out     source               destination
  #      121  7260 KUBE-SERVICES  0    --  *      *       0.0.0.0/0            0.0.0.0/0            /* kubernetes service portals */
  #    ...
  #
  #    Chain INPUT (policy ACCEPT 121 packets, 7260 bytes)
  #
  #    Chain OUTPUT (policy ACCEPT 392 packets, 23520 bytes)
  #     pkts bytes target     prot opt in     out     source               destination
  #      392 23520 KUBE-SERVICES  0    --  *      *       0.0.0.0/0            0.0.0.0/0            /* kubernetes service portals */
  #    ...
  #
  #    Chain KUBE-MARK-MASQ (18 references)
  #     pkts bytes target     prot opt in     out     source               destination
  #        0     0 MARK       0    --  *      *       0.0.0.0/0            0.0.0.0/0            MARK or 0x4000
  #
  #    Chain KUBE-SERVICES (2 references) <<2. SERVICES>>
  #     pkts bytes target     prot opt in     out     source               destination
  #        0     0 KUBE-SVC-KBDEBIL6IU6WL7RF  6    --  *      *       0.0.0.0/0            10.200.1.96          /* default/svc-clusterip:svc-webport cluster IP */ tcp dpt:9000
  #    ...
  #
  #    Chain KUBE-SVC-KBDEBIL6IU6WL7RF (1 references) <<3. KUBE-SVC-YYY>>
  #     pkts bytes target     prot opt in     out     source               destination
  #        0     0 KUBE-MARK-MASQ  6    --  *      *      !10.10.0.0/16         10.200.1.96          /* default/svc-clusterip:svc-webport cluster IP */ tcp dpt:9000
  #        0     0 KUBE-SEP-T7YVH2JOMUTQFUDU  0    --  *      *       0.0.0.0/0            0.0.0.0/0            /* default/svc-clusterip:svc-webport -> 10.10.1.4:80 */ statistic mode random probability 0.33333333349
  #        0     0 KUBE-SEP-SZHENXPAXVOCHRDA  0    --  *      *       0.0.0.0/0            0.0.0.0/0            /* default/svc-clusterip:svc-webport -> 10.10.2.3:80 */ statistic mode random probability 0.50000000000
  #        0     0 KUBE-SEP-X47GKN7LA32LZ4H7  0    --  *      *       0.0.0.0/0            0.0.0.0/0            /* default/svc-clusterip:svc-webport -> 10.10.4.3:80 */
  #
  #    Chain KUBE-SEP-X47GKN7LA32LZ4H7 (1 references) <<4. KUBE-SEP-#WEBPOD1>>
  #     pkts bytes target     prot opt in     out     source               destination
  #        0     0 KUBE-MARK-MASQ  0    --  *      *       10.10.4.3            0.0.0.0/0            /* default/svc-clusterip:svc-webport */
  #        0     0 DNAT       6    --  *      *       0.0.0.0/0            0.0.0.0/0            /* default/svc-clusterip:svc-webport */ tcp to:10.10.4.3:80
  #
  #    Chain KUBE-SEP-T7YVH2JOMUTQFUDU (1 references) <<4. KUBE-SEP-#WEBPOD2>>
  #     pkts bytes target     prot opt in     out     source               destination
  #        0     0 KUBE-MARK-MASQ  0    --  *      *       10.10.1.4            0.0.0.0/0            /* default/svc-clusterip:svc-webport */
  #        0     0 DNAT       6    --  *      *       0.0.0.0/0            0.0.0.0/0            /* default/svc-clusterip:svc-webport */ tcp to:10.10.1.4:80
  #
  #    Chain KUBE-SEP-SZHENXPAXVOCHRDA (1 references) <<4. KUBE-SEP-#WEBPOD3>>
  #     pkts bytes target     prot opt in     out     source               destination
  #        0     0 KUBE-MARK-MASQ  0    --  *      *       10.10.2.3            0.0.0.0/0            /* default/svc-clusterip:svc-webport */
  #        0     0 DNAT       6    --  *      *       0.0.0.0/0            0.0.0.0/0            /* default/svc-clusterip:svc-webport */ tcp to:10.10.2.3:80

  $ iptables -v --numeric --table nat --list PREROUTING | column -t
  # => Chain  PREROUTING  (policy        ACCEPT  777  packets,  46620  bytes)
  #    pkts   bytes       target         prot    opt  in        out    source     destination
  #    777    46620       KUBE-SERVICES  0       --   *         *      0.0.0.0/0  0.0.0.0/0    /*  kubernetes  service  portals  */
  #    0      0           DOCKER_OUTPUT  0       --   *         *      0.0.0.0/0  172.23.0.1

  $ iptables -v --numeric --table nat --list KUBE-SERVICES | column
  # 바로 아래 룰(rule)에 의해서 서비스(ClusterIP)를 인지하고 처리를 합니다
  # => Chain  KUBE-SERVICES  (2                         references)
  #    pkts   bytes          target                     prot         opt  in  out  source     destination
  #    0      0              KUBE-SVC-KBDEBIL6IU6WL7RF  6            --   *   *    0.0.0.0/0  10.200.1.96   /*  default/svc-clusterip:svc-webport  cluster  IP          */     tcp   dpt:9000

  $ iptables -v --numeric --table nat --list KUBE-SVC-KBDEBIL6IU6WL7RF | column
  # => Chain  KUBE-SVC-KBDEBIL6IU6WL7RF  (1                         references)
  #    pkts   bytes                      target                     prot         opt  in  out  source         destination
  #    0      0                          KUBE-SEP-T7YVH2JOMUTQFUDU  0            --   *   *    0.0.0.0/0      0.0.0.0/0    /*  default/svc-clusterip:svc-webport  ->       10.10.1.4:80  */  statistic  mode      random  probability  0.33333333349
  #    0      0                          KUBE-SEP-SZHENXPAXVOCHRDA  0            --   *   *    0.0.0.0/0      0.0.0.0/0    /*  default/svc-clusterip:svc-webport  ->       10.10.2.3:80  */  statistic  mode      random  probability  0.50000000000
  #    0      0                          KUBE-SEP-X47GKN7LA32LZ4H7  0            --   *   *    0.0.0.0/0      0.0.0.0/0    /*  default/svc-clusterip:svc-webport  ->       10.10.4.3:80  */

  # 패킷 전달 수를 확인 하기 위해 watch를 겁니다.
  $ watch -d 'iptables -v --numeric --table nat --list KUBE-SVC-KBDEBIL6IU6WL7RF'

  # control-plane 에서 테스트 패킷을 보냅니다.
  $ SVC1=$(kubectl get svc svc-clusterip -o jsonpath={.spec.clusterIP})
  $ kubectl exec -it net-pod -- zsh -c "for i in {1..100};   do curl -s $SVC1:9000 | grep Hostname; sleep 1; done"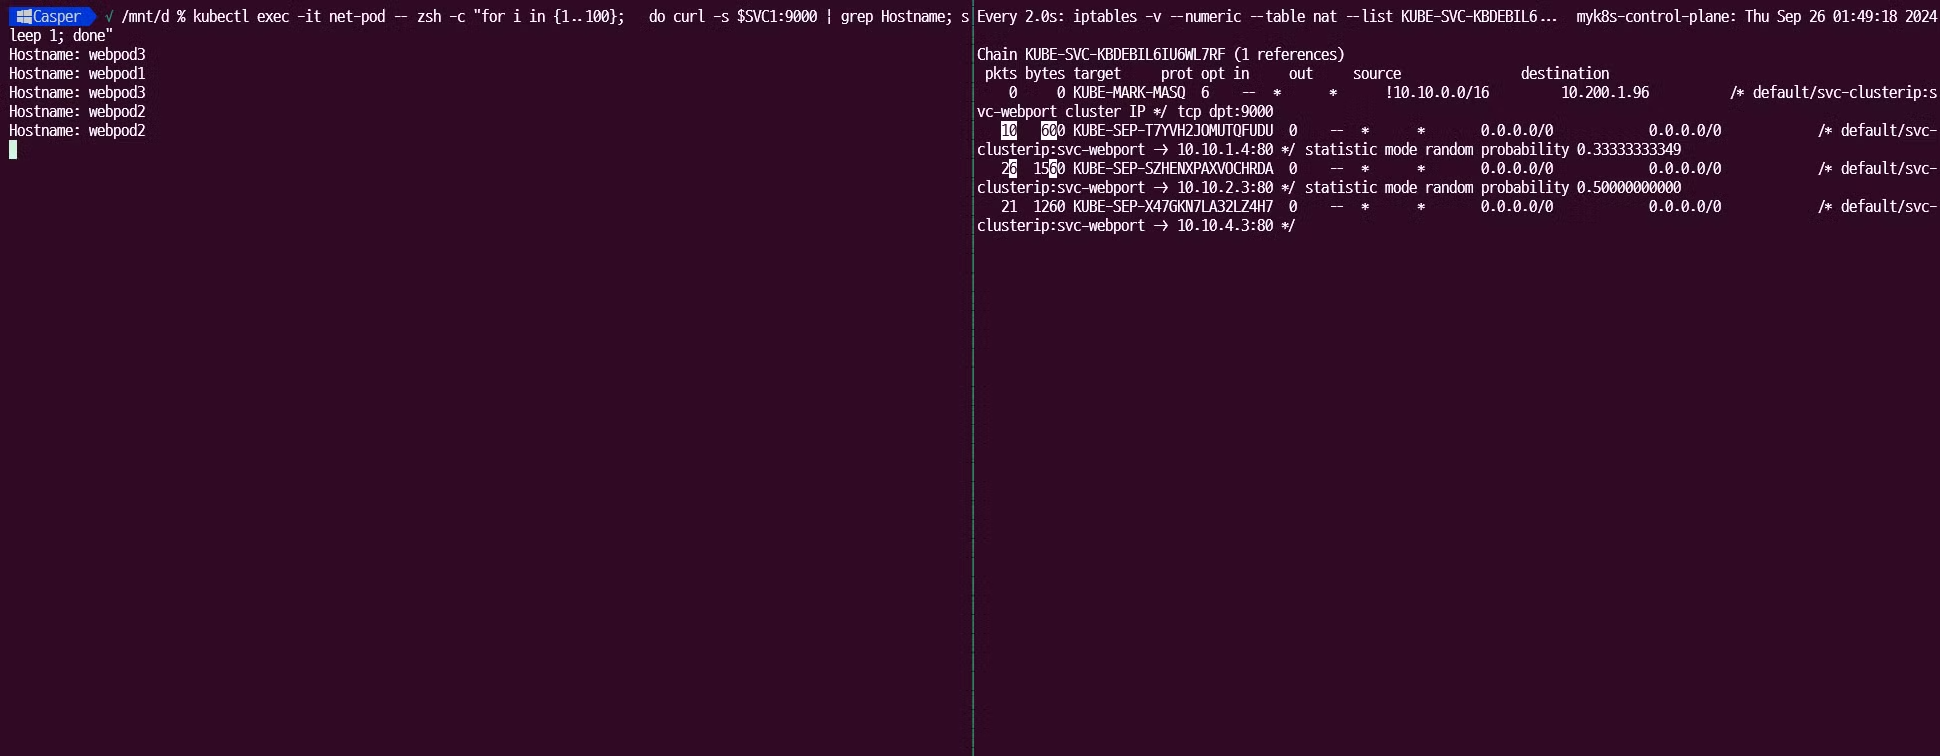
-
iptables에서 카운트가 증가함을 확인 할 수 있습니다.
# SVC-### 에서 랜덤 확률(대략 33%)로 SEP(Service EndPoint)인 각각 파드 IP로 DNAT 됩니다! ## 첫번째 룰에 일치 확률은 33% 이고, 매칭되지 않을 경우 아래 2개 남을때는 룰 일치 확률은 50%가 됩니다. 이것도 매칭되지 않으면 마지막 룰로 100% 일치됩니다 # Chain KUBE-SVC-KBDEBIL6IU6WL7RF (1 references) # pkts bytes target prot opt in out source destination # 0 0 KUBE-MARK-MASQ 6 -- * * !10.10.0.0/16 10.200.1.96 /* default/svc-clusterip:svc-webport cluster IP */ tcp dpt:9000 # 41 2460 KUBE-SEP-T7YVH2JOMUTQFUDU 0 -- * * 0.0.0.0/0 0.0.0.0/0 /* default/svc-clusterip:svc-webport -> 10.10.1.4:80 */ statistic mode random probability 0.33333333349 # 47 2820 KUBE-SEP-SZHENXPAXVOCHRDA 0 -- * * 0.0.0.0/0 0.0.0.0/0 /* default/svc-clusterip:svc-webport -> 10.10.2.3:80 */ statistic mode random probability 0.50000000000 # 45 2700 KUBE-SEP-X47GKN7LA32LZ4H7 0 -- * * 0.0.0.0/0 0.0.0.0/0 /* default/svc-clusterip:svc-webport -> 10.10.4.3:80 */ # $ iptables -v --numeric --table nat --list KUBE-SEP-<각자 값 입력> $ iptables -v --numeric --table nat --list KUBE-SEP-T7YVH2JOMUTQFUDU # => Chain KUBE-SEP-T7YVH2JOMUTQFUDU (1 references) # pkts bytes target prot opt in out source destination # 49 2940 DNAT 6 -- * * 0.0.0.0/0 0.0.0.0/0 /* default/svc-clusterip:svc-webport */ tcp to:10.10.1.4:80 $ iptables -v --numeric --table nat --list KUBE-SEP-SZHENXPAXVOCHRDA | column -t # => Chain KUBE-SEP-SZHENXPAXVOCHRDA (1 references) # pkts bytes target prot opt in out source destination # 0 0 KUBE-MARK-MASQ 0 -- * * 10.10.2.3 0.0.0.0/0 /* default/svc-clusterip:svc-webport */ # 56 3360 DNAT 6 -- * * 0.0.0.0/0 0.0.0.0/0 /* default/svc-clusterip:svc-webport */ tcp to:10.10.2.3:80 $ iptables -v --numeric --table nat --list KUBE-SEP-X47GKN7LA32LZ4H7 | column -t # => Chain KUBE-SEP-X47GKN7LA32LZ4H7 (1 references) # pkts bytes target prot opt in out source destination # 0 0 KUBE-MARK-MASQ 0 -- * * 10.10.4.3 0.0.0.0/0 /* default/svc-clusterip:svc-webport */ # 48 2880 DNAT 6 -- * * 0.0.0.0/0 0.0.0.0/0 /* default/svc-clusterip:svc-webport */ tcp to:10.10.4.3:80 $ iptables -t nat --zero $ iptables -v --numeric --table nat --list POSTROUTING | column; echo ; iptables -v --numeric --table nat --list KUBE-POSTROUTING | column $ watch -d 'iptables -v --numeric --table nat --list POSTROUTING; echo ; iptables -v --numeric --table nat --list KUBE-POSTROUTING' # POSTROUTE(nat) : 0x4000 마킹 되어 있지 않으니 RETURN 되고 그냥 빠져나가서 SNAT 되지 않는다! # => Chain POSTROUTING (policy ACCEPT 0 packets, 0 bytes) # pkts bytes target prot opt in out source destination # 0 0 KUBE-POSTROUTING 0 -- * * 0.0.0.0/0 0.0.0.0/0 /* kubernetes postrouting rules */ # 0 0 DOCKER_POSTROUTING 0 -- * * 0.0.0.0/0 172.23.0.1 # 0 0 KIND-MASQ-AGENT 0 -- * * 0.0.0.0/0 0.0.0.0/0 ADDRTYPE match dst-type !LOCAL /* kind-masq-agent: ensure nat POSTROUTING directs all non-LOCAL destination traffic to our custom KIND-MASQ-AGENT chain */ # => Chain KUBE-POSTROUTING (1 references) # pkts bytes target prot opt in out source destination # 0 0 RETURN 0 -- * * 0.0.0.0/0 0.0.0.0/0 mark match ! 0x4000/0x4000 # 0 0 MARK 0 -- * * 0.0.0.0/0 0.0.0.0/0 MARK xor 0x4000 # 0 0 MASQUERADE 0 -- * * 0.0.0.0/0 0.0.0.0/0 /* kubernetes service traffic requiring SNAT */ random-fully $ iptables -t nat -S | grep KUBE-POSTROUTING # => -N KUBE-POSTROUTING # -A POSTROUTING -m comment --comment "kubernetes postrouting rules" -j KUBE-POSTROUTING # -A KUBE-POSTROUTING -m mark ! --mark 0x4000/0x4000 -j RETURN # -A KUBE-POSTROUTING -j MARK --set-xmark 0x4000/0x0 # -A KUBE-POSTROUTING -m comment --comment "kubernetes service traffic requiring SNAT" -j MASQUERADE --random-fully $ exit ---------------------------------------- # 위 서비스 생성 시 kube-proxy 에 의해서 iptables 규칙이 모든 노드에 추가됨을 한번 더 확인 $ docker exec -it myk8s-control-plane iptables -v --numeric --table nat --list KUBE-SVC-KBDEBIL6IU6WL7RF # => Chain KUBE-SVC-KBDEBIL6IU6WL7RF (1 references) # pkts bytes target prot opt in out source destination # 0 0 KUBE-MARK-MASQ 6 -- * * !10.10.0.0/16 10.200.1.96 /* default/svc-clusterip:svc-webport cluster IP */ tcp dpt:9000 # 0 0 KUBE-SEP-T7YVH2JOMUTQFUDU 0 -- * * 0.0.0.0/0 0.0.0.0/0 /* default/svc-clusterip:svc-webport -> 10.10.1.4:80 */ statistic mode random probability 0.33333333349 # 0 0 KUBE-SEP-SZHENXPAXVOCHRDA 0 -- * * 0.0.0.0/0 0.0.0.0/0 /* default/svc-clusterip:svc-webport -> 10.10.2.3:80 */ statistic mode random probability 0.50000000000 # 0 0 KUBE-SEP-X47GKN7LA32LZ4H7 0 -- * * 0.0.0.0/0 0.0.0.0/0 /* default/svc-clusterip:svc-webport -> 10.10.4.3:80 */ $ for i in control-plane worker worker2 worker3; do echo ">> node myk8s-$i <<"; docker exec -it myk8s-$i iptables -v --numeric --table nat --list KUBE-SVC-KBDEBIL6IU6WL7RF; echo; done # => >> node myk8s-control-plane << # Chain KUBE-SVC-KBDEBIL6IU6WL7RF (1 references) # pkts bytes target prot opt in out source destination # 0 0 KUBE-MARK-MASQ 6 -- * * !10.10.0.0/16 10.200.1.96 /* default/svc-clusterip:svc-webport cluster IP */ tcp dpt:9000 # 0 0 KUBE-SEP-T7YVH2JOMUTQFUDU 0 -- * * 0.0.0.0/0 0.0.0.0/0 /* default/svc-clusterip:svc-webport -> 10.10.1.4:80 */ statistic mode random probability 0.33333333349 # 0 0 KUBE-SEP-SZHENXPAXVOCHRDA 0 -- * * 0.0.0.0/0 0.0.0.0/0 /* default/svc-clusterip:svc-webport -> 10.10.2.3:80 */ statistic mode random probability 0.50000000000 # 0 0 KUBE-SEP-X47GKN7LA32LZ4H7 0 -- * * 0.0.0.0/0 0.0.0.0/0 /* default/svc-clusterip:svc-webport -> 10.10.4.3:80 */ # # >> node myk8s-worker << # Chain KUBE-SVC-KBDEBIL6IU6WL7RF (1 references) # pkts bytes target prot opt in out source destination # 0 0 KUBE-MARK-MASQ 6 -- * * !10.10.0.0/16 10.200.1.96 /* default/svc-clusterip:svc-webport cluster IP */ tcp dpt:9000 # 0 0 KUBE-SEP-T7YVH2JOMUTQFUDU 0 -- * * 0.0.0.0/0 0.0.0.0/0 /* default/svc-clusterip:svc-webport -> 10.10.1.4:80 */ statistic mode random probability 0.33333333349 # 0 0 KUBE-SEP-SZHENXPAXVOCHRDA 0 -- * * 0.0.0.0/0 0.0.0.0/0 /* default/svc-clusterip:svc-webport -> 10.10.2.3:80 */ statistic mode random probability 0.50000000000 # 0 0 KUBE-SEP-X47GKN7LA32LZ4H7 0 -- * * 0.0.0.0/0 0.0.0.0/0 /* default/svc-clusterip:svc-webport -> 10.10.4.3:80 */ # # >> node myk8s-worker2 << # Chain KUBE-SVC-KBDEBIL6IU6WL7RF (1 references) # pkts bytes target prot opt in out source destination # 0 0 KUBE-MARK-MASQ 6 -- * * !10.10.0.0/16 10.200.1.96 /* default/svc-clusterip:svc-webport cluster IP */ tcp dpt:9000 # 0 0 KUBE-SEP-T7YVH2JOMUTQFUDU 0 -- * * 0.0.0.0/0 0.0.0.0/0 /* default/svc-clusterip:svc-webport -> 10.10.1.4:80 */ statistic mode random probability 0.33333333349 # 0 0 KUBE-SEP-SZHENXPAXVOCHRDA 0 -- * * 0.0.0.0/0 0.0.0.0/0 /* default/svc-clusterip:svc-webport -> 10.10.2.3:80 */ statistic mode random probability 0.50000000000 # 0 0 KUBE-SEP-X47GKN7LA32LZ4H7 0 -- * * 0.0.0.0/0 0.0.0.0/0 /* default/svc-clusterip:svc-webport -> 10.10.4.3:80 */ # # >> node myk8s-worker3 << # Chain KUBE-SVC-KBDEBIL6IU6WL7RF (1 references) # pkts bytes target prot opt in out source destination # 0 0 KUBE-MARK-MASQ 6 -- * * !10.10.0.0/16 10.200.1.96 /* default/svc-clusterip:svc-webport cluster IP */ tcp dpt:9000 # 0 0 KUBE-SEP-T7YVH2JOMUTQFUDU 0 -- * * 0.0.0.0/0 0.0.0.0/0 /* default/svc-clusterip:svc-webport -> 10.10.1.4:80 */ statistic mode random probability 0.33333333349 # 0 0 KUBE-SEP-SZHENXPAXVOCHRDA 0 -- * * 0.0.0.0/0 0.0.0.0/0 /* default/svc-clusterip:svc-webport -> 10.10.2.3:80 */ statistic mode random probability 0.50000000000 # 0 0 KUBE-SEP-X47GKN7LA32LZ4H7 0 -- * * 0.0.0.0/0 0.0.0.0/0 /* default/svc-clusterip:svc-webport -> 10.10.4.3:80 */ -
동일한 iptables 룰이 각 노드에 있는 것을 확인할 수 있습니다.
- 파드 1개에 장애를 발생시켜서 장애시 동작을 확인해보겠습니다.
-
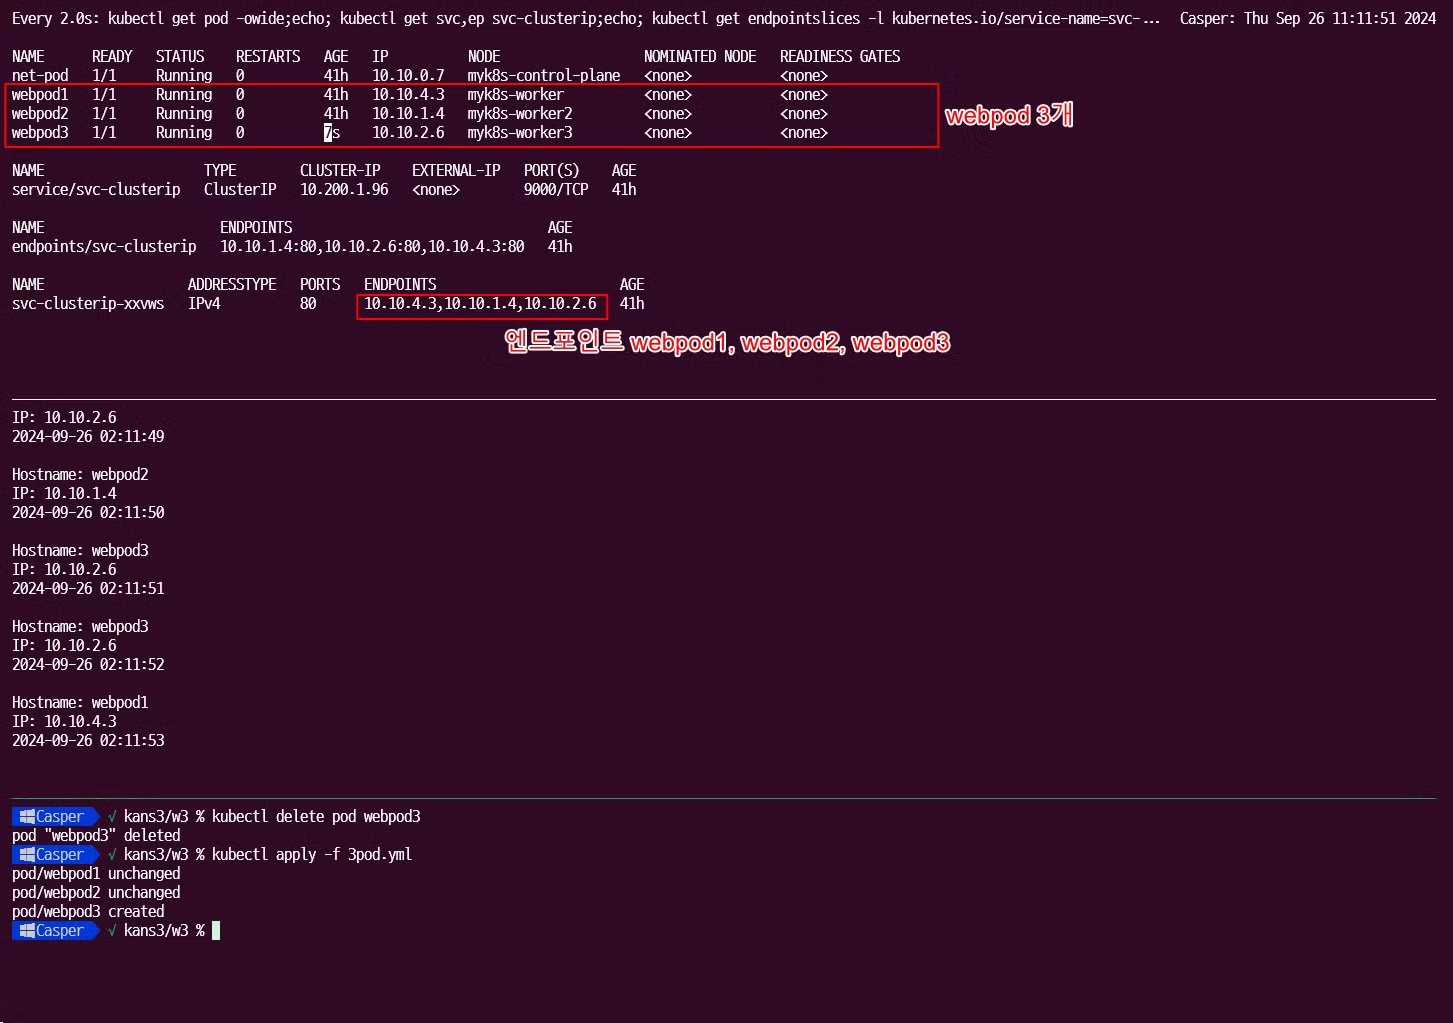
동작 확인을 위한 모니터링
# 터미널1 >> ENDPOINTS 변화를 잘 확인해보자! $ watch -d 'kubectl get pod -owide;echo; kubectl get svc,ep svc-clusterip;echo; kubectl get endpointslices -l kubernetes.io/service-name=svc-clusterip' # 터미널2 $ SVC1=$(kubectl get svc svc-clusterip -o jsonpath={.spec.clusterIP}) $ kubectl exec -it net-pod -- zsh -c "while true; do curl -s --connect-timeout 1 $SVC1:9000 | egrep 'Hostname|IP: 10'; date '+%Y-%m-%d %H:%M:%S' ; echo ; sleep 1; done" # 혹은 $ kubectl exec -it net-pod -- zsh -c "for i in {1..100}; do curl -s $SVC1:9000 | grep Hostname; done | sort | uniq -c | sort -nr" -
파드 1개 삭제 후 확인
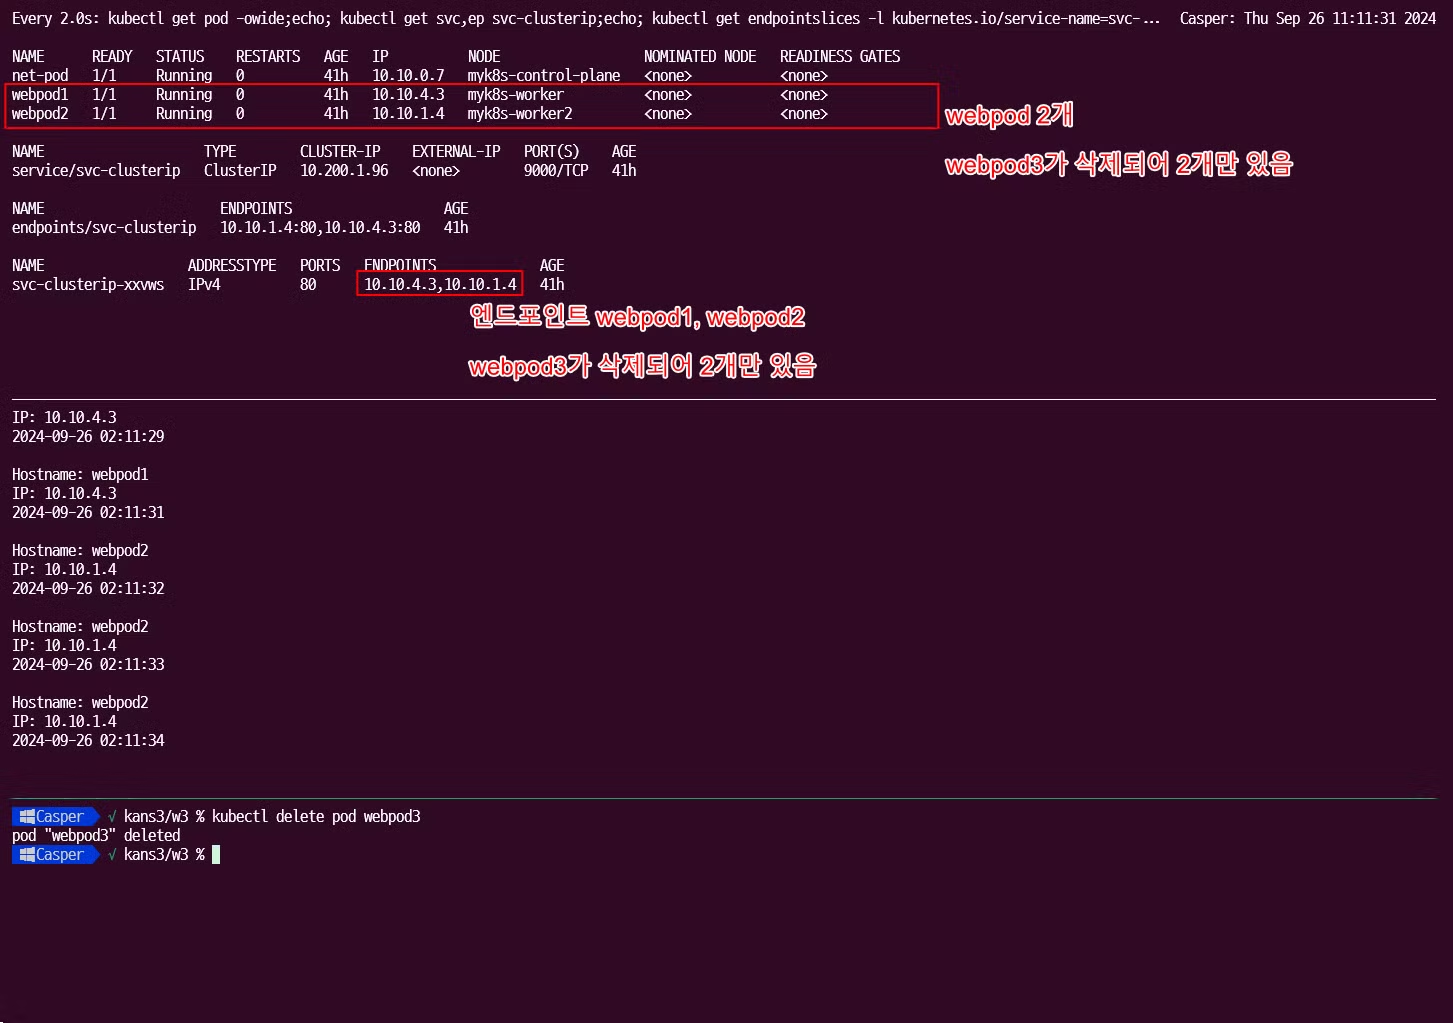
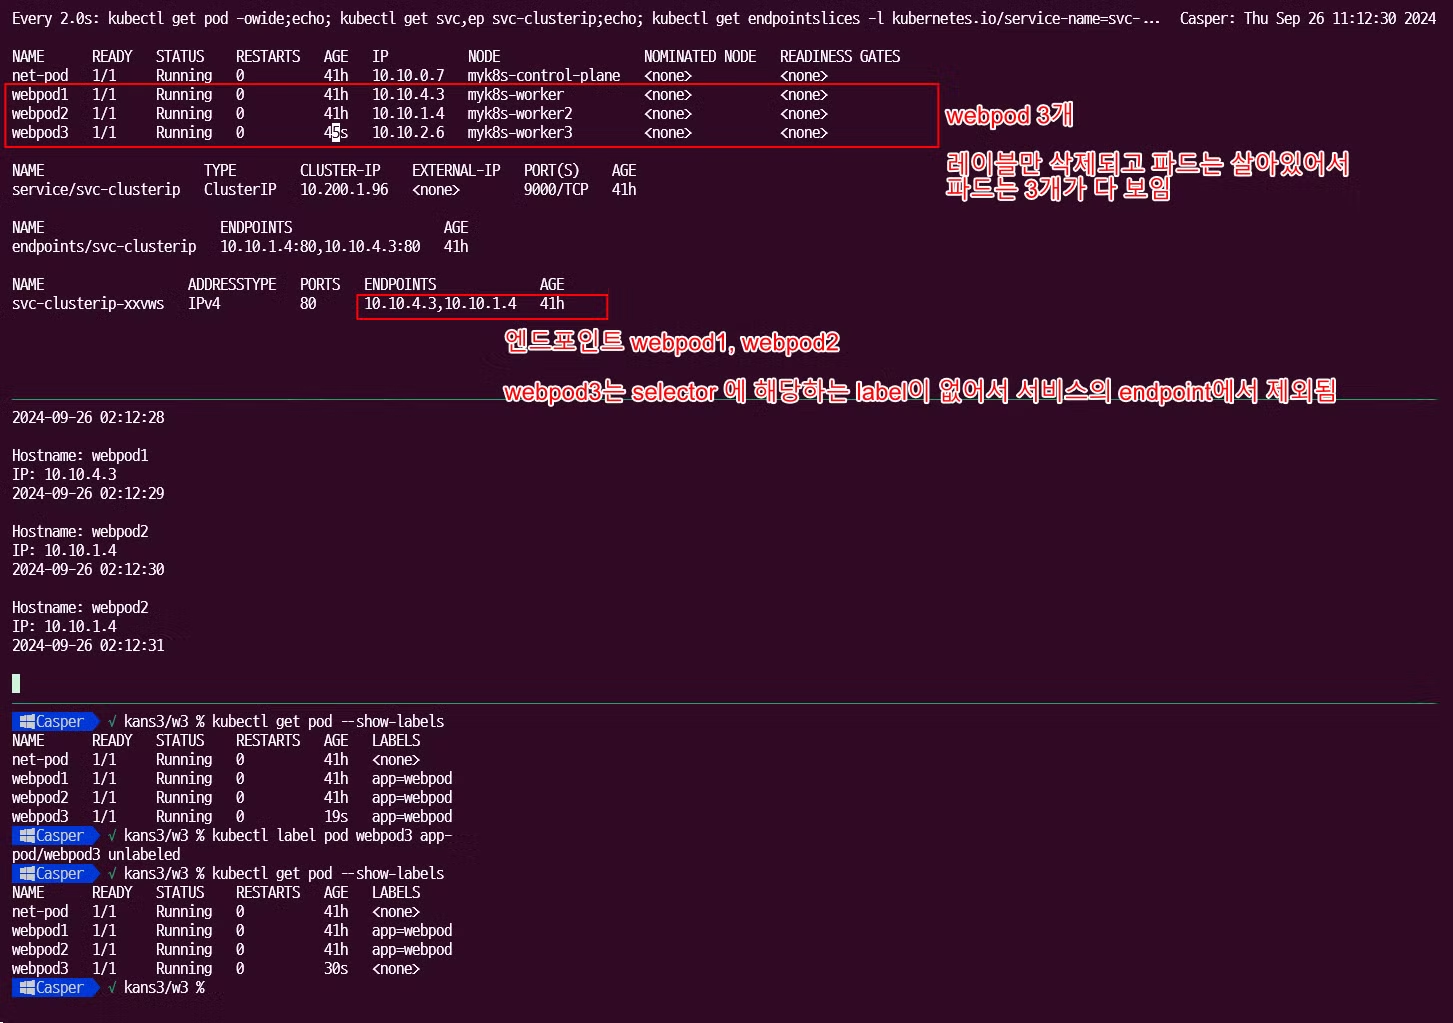
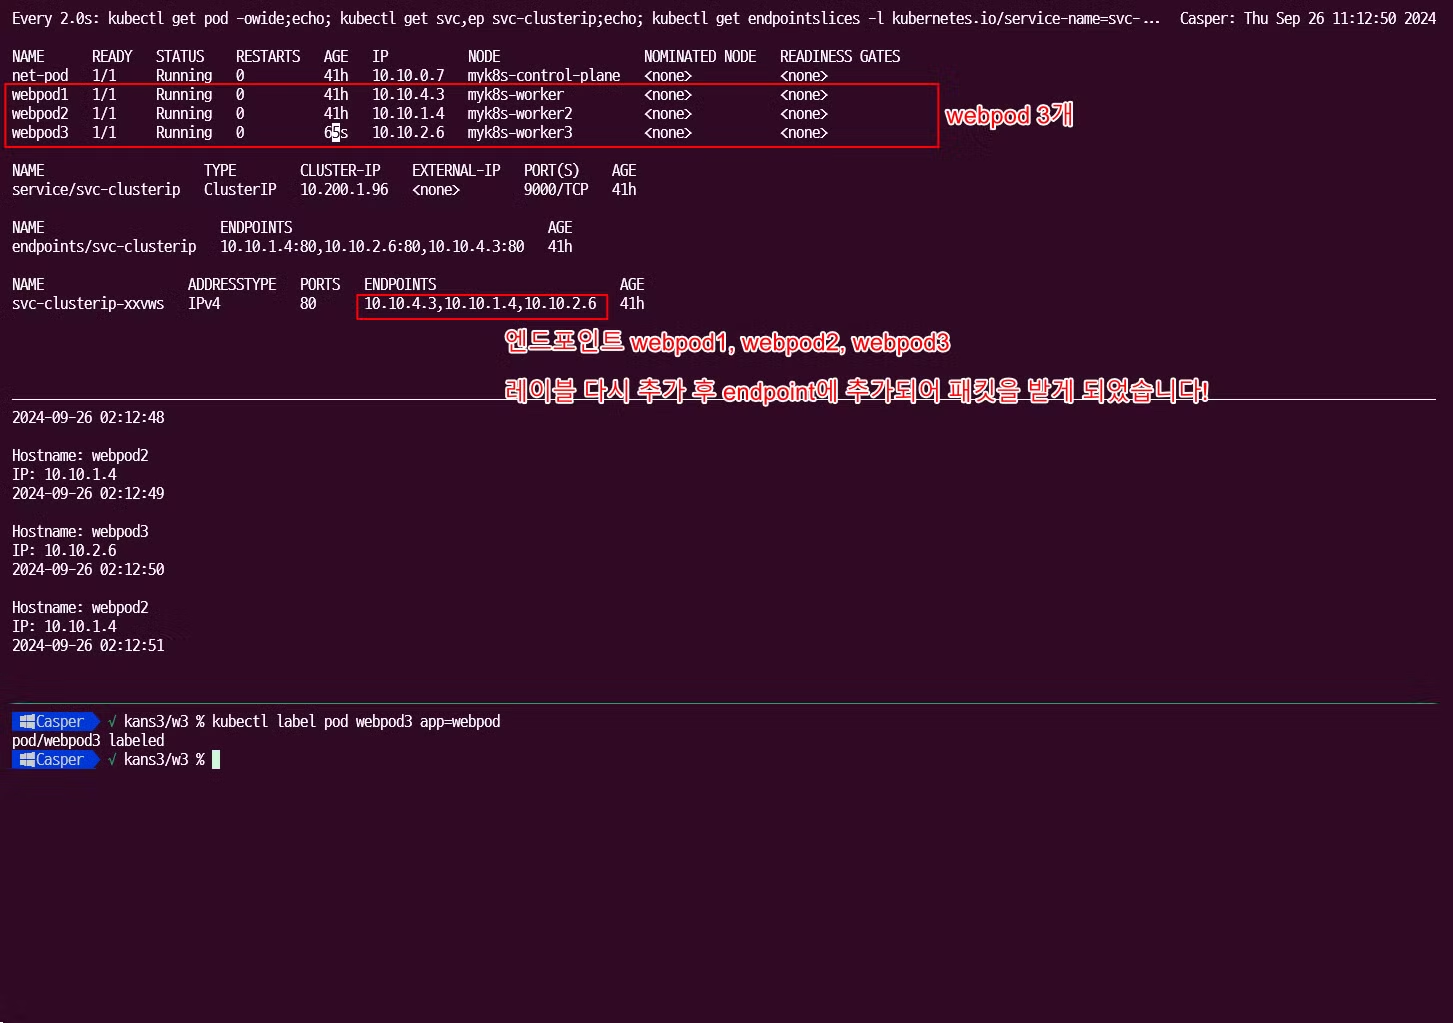
# (방안1) 파드3번 삭제 >> 서비스의 엔드포인트가 어떻게 변경되는지 확인 하자!, 지속적인 curl 접속 결과 확인!, for 문 실행 시 결과 확인!, 절체 시간(순단) 확인! $ kubectl delete pod webpod3 # (방안1) 결과 확인 후 다시 파드 3번 생성 >> 서비스 디스커버리! $ kubectl apply -f 3pod.yaml --------------------------------- # (방안2) 파드3번에 레이블 삭제 $ kubectl get pod --show-labels ## 레이블(라벨)의 키값 바로 뒤에 하이픈(-) 입력 시 해당 레이블 삭제됨! >> 레이블과 셀렉터는 쿠버네티스 환경에서 매우 많이 활용된다! $ kubectl label pod webpod3 app- $ kubectl get pod --show-labels # (방안2) 결과 확인 후 파드3번에 다시 레이블 생성 $ kubectl label pod webpod3 app=webpod-
파드 삭제 전
-
파드 삭제 후
-
파드 다시 생성 후
-
레이블 삭제 후
-
레이블 복구 후
-
-
파드가 삭제되고 복구 됨에 따라 서비스 엔드포인트에서 삭제되고, label selector 에 따라서도 엔드포인트에서 삭제되고 복구됨을 확인할 수 있었습니다.
-
- sessionAffinity: ClientIP
-
sessionAffinity: ClientIP: 클라이언트가 접속한 목적지(파드)에 고정적인 접속을 지원하게 할 수 있습니다. -
기본적으로 서비스는 파드에 랜덤으로 부하를 분산하지만
sessionAffinity: ClientIP를 통해 동일한 파드에 접속하도록 강제 할 수 있습니다.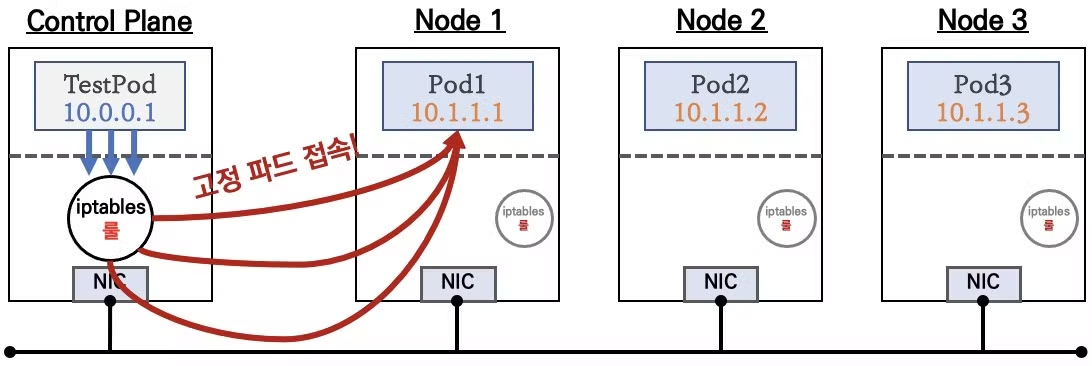
-
설정 및 파드 접속 확인
# 기본 정보 확인 $ kubectl get svc svc-clusterip -o yaml $ kubectl get svc svc-clusterip -o yaml | grep sessionAffinity # => sessionAffinity: None # 반복 접속 $ kubectl exec -it net-pod -- zsh -c "while true; do curl -s --connect-timeout 1 $SVC1:9000 | egrep 'Hostname|IP: 10|Remote'; date '+%Y-%m-%d %H:%M:%S' ; echo ; sleep 1; done" # => Hostname: webpod2 # IP: 10.10.1.4 # RemoteAddr: 10.10.0.7:57246 # 2024-09-01 12:25:49 # # Hostname: webpod1 # IP: 10.10.4.3 # RemoteAddr: 10.10.0.7:57250 # 2024-09-01 12:25:50 # # Hostname: webpod3 # IP: 10.10.2.6 # RemoteAddr: 10.10.0.7:57252 # 2024-09-01 12:25:51 # 현재는 랜덤으로 접속 됩니다. # sessionAffinity: ClientIP 설정 변경 $ kubectl patch svc svc-clusterip -p '{"spec":{"sessionAffinity":"ClientIP"}}' # => service/svc-clusterip patched # 혹은 ## $ kubectl get svc svc-clusterip -o yaml | sed -e "s/sessionAffinity: None/sessionAffinity: ClientIP/" | kubectl apply -f - # $ kubectl get svc svc-clusterip -o yaml # => ... # sessionAffinity: ClientIP # sessionAffinityConfig: # clientIP: # timeoutSeconds: 10800 # ... # 클라이언트(TestPod) Shell 실행 $ kubectl exec -it net-pod -- zsh -c "for i in {1..100}; do curl -s $SVC1:9000 | grep Hostname; done | sort | uniq -c | sort -nr" # => 100 Hostname: webpod2 $ kubectl exec -it net-pod -- zsh -c "for i in {1..1000}; do curl -s $SVC1:9000 | grep Hostname; done | sort | uniq -c | sort -nr" # => 1000 Hostname: webpod2- sessionAffinity: ClientIP를 하면 spec.sessionAffinityConfig.clientIP.timeoutSeconds 시간동안 서비스를 통해 접속 되는 파드가 고정됨을 확인할 수 있었습니다.
-
- kubernetes에서 service는 다음의 iptables 과정을 거칩니다.
- 이상과 같이 ClusterIP 타입의 서비스를 확인해보았습니다.
- ClusterIP 타입의 서비스는 다음과 같은 단점이 있다고 합니다.
- 클러스터 외부에서는 서비스(ClusterIP)로 접속이 불가능합니다. ⇒ NodePort 타입으로 외부에서 접속 가능
- IPtables 는 파드에 대한 헬스체크 기능이 없어서 문제 있는 파드에 연결이 되는 경우가 있습니다. ⇒ 서비스 사용, 파드에 Readiness Probe 설정으로 파드 문제 시 서비스의 엔드포인트에서 제거되게 하자! ← 이 정도면 충분한가? 혹시 부족한 점이 없을까?
- 서비스에 연동된 파드 갯수 퍼센트(%)로 랜덤 분산 방식, 세션어피니티 이외에 다른 분산 방식 불가능합니다. ⇒ IPVS 경우 다양한 분산 방식(알고리즘) 가능
- 목적지 파드 다수가 있는 환경에서, 출발지 파드와 목적지 파드가 동일한 노드에 배치되어 있어도, 랜덤 분산으로 다른 노드에 목적지 파드로 연결 가능
NodePort 실습
- NodePort는 ClusterIP와 다르게 클러스터 외부에서도 접속 할 수 있습니다.
- 컨트롤플레인을 포함한 모든 노드에 iptables rule이 적용되므로, 모든 노드에 NodePort로 접속시 iptables rule에 의해서 분산 접속이 됩니다.
- Node의 모든 Local IP (loopback을 포함한 각 호스트의 interface의 IP) 사용 가능하고 Local IP 지정도 가능합니다.
- 쿠버네티스의 NodePort는 기본 30000~32767 포트에서 랜덤으로 지정됩니다.
-
랜덤 포트 범위를 바꾸려면 다음과 같이
/etc/kubernetes/manifests/kube-apiserver.yaml파일을 수정하여 kube-apiserver 의 파라메터에--service-node-port-range=시작포트-종료포트를 변경하면됩니다. 참고# /etc/kubernetes/manifests/kube-apiserver.yaml ... spec: containers: - command: - kube-apiserver - --authorization-mode=Node,RBAC ... - --service-node-port-range=30000-50000 ...
-
- 실습 구성
-
목적지(backend) 디플로이먼트 파일 생성 : echo-deploy.yml
apiVersion: apps/v1 kind: Deployment metadata: name: deploy-echo spec: replicas: 3 selector: matchLabels: app: deploy-websrv template: metadata: labels: app: deploy-websrv spec: terminationGracePeriodSeconds: 0 containers: - name: kans-websrv image: mendhak/http-https-echo ports: - containerPort: 8080 -
서비스(NodePort) 파일 생성 : svc-nodeport.yml
apiVersion: v1 kind: **Service** metadata: name: svc-nodeport spec: ports: - name: svc-webport port: 9000 # 서비스 ClusterIP 에 접속 시 사용하는 포트 port 를 의미 targetPort: 8080 # 타킷 targetPort 는 서비스를 통해서 목적지 파드로 접속 시 해당 파드로 접속하는 포트를 의미 selector: app: deploy-websrv **type: NodePort** -
생성 및 확인
  # 생성
  $ kubectl apply -f echo-deploy.yml,svc-nodeport.yml
  # => deployment.apps/deploy-echo created
  #    service/svc-nodeport created

  # 모니터링
  $ watch -d 'kubectl get pod -owide;echo; kubectl get svc,ep svc-nodeport'

  # 확인
  $ kubectl get deploy,pod -o wide
  # => NAME                          READY   UP-TO-DATE   AVAILABLE   AGE   CONTAINERS    IMAGES                    SELECTOR
  #    deployment.apps/deploy-echo   3/3     3            3           49s   kans-websrv   mendhak/http-https-echo   app=deploy-websrv
  #
  #    NAME                               READY   STATUS    RESTARTS   AGE    IP          NODE                  NOMINATED NODE   READINESS GATES
  #    pod/deploy-echo-5c689d5454-dxf2t   1/1     Running   0          49s    10.10.4.4   myk8s-worker          <none>           <none>
  #    pod/deploy-echo-5c689d5454-rbgcp   1/1     Running   0          49s    10.10.1.5   myk8s-worker2         <none>           <none>
  #    pod/deploy-echo-5c689d5454-wppr8   1/1     Running   0          49s    10.10.2.7   myk8s-worker3         <none>           <none>

  # 아래 31791은 서비스(NodePort) 정보!
  $ kubectl get svc svc-nodeport
  # => NAME           TYPE       CLUSTER-IP     EXTERNAL-IP   PORT(S)          AGE
  #    svc-nodeport   NodePort   10.200.1.169   <none>        9000:31791/TCP   69s

  $ kubectl get endpoints svc-nodeport
  # => NAME           ENDPOINTS                                      AGE
  #    svc-nodeport   10.10.1.5:8080,10.10.2.7:8080,10.10.4.4:8080   85s

  # Port , TargetPort , NodePort 각각의 차이점의 의미를 알자!
  $ kubectl describe svc svc-nodeport
  # => Name:                     svc-nodeport
  #    Namespace:                default
  #    Labels:                   <none>
  #    Annotations:              <none>
  #    Selector:                 app=deploy-websrv
  #    Type:                     NodePort
  #    IP Family Policy:         SingleStack
  #    IP Families:              IPv4
  #    IP:                       10.200.1.169
  #    IPs:                      10.200.1.169
  #    Port:                     svc-webport  9000/TCP     <<ClusterIP와 동일하게 동작하는 클러스터 내부에서 사용하는 포트>>
  #    TargetPort:               8080/TCP                  <<파드의 컨테이너의 포트>>
  #    NodePort:                 svc-webport  31791/TCP    <<각 Node에서 Listening 하는 nodePort>>
  #    Endpoints:                10.10.1.5:8080,10.10.2.7:8080,10.10.4.4:8080    <<Port Forwarding 대상이 되는 파드의 엔드포인트 파드IP:파드Port>>
  #    Session Affinity:         None
  #    External Traffic Policy:  Cluster <<부하 분산방식>>
  #    Events:                   <none>
-
- 2.3. 서비스 접속 확인
-
NodePort의 서비스 접속을 통한 통신의 흐름
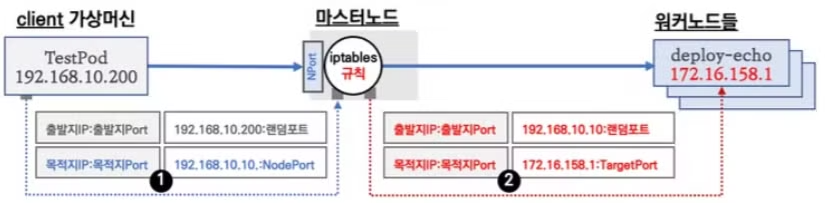
- Client 가상 머신(192.168.10.200)에서 컨트롤 플레인 IP(192.168.10.10)의 nodePort 접속을 시도합니다.
- nodePort는 서비스(NodePort) 생성시에 할당된 랜덤포트가 사용 됩니다.
- 컨트롤 플레인의 iptables의 NAT 테이블의 규칙과 매칭되어 목적지 IP와 목적지 Port는 변환 됩니다. 목적지 IP는 app=deploy-websrv 레이블을 가지고 있는 파드 3개가 대상이 되며, 랜덤 부하분산이 선택됩니다.
-
실습을 통해 위의 과정을 확인해보겠습니다. 단 현재 실습환경에서는 컨트롤 플레인에는 파드가 없으므로 위의 설명과는 다르게 워커노드의 파드를 접속하는것으로 실습하겠습니다.
# NodePort 확인 : 아래 NodePort 는 범위내 랜덤 할당으로 실습 환경마다 다릅니다 $ kubectl get service svc-nodeport -o jsonpath='{.spec.ports[0].nodePort}' # => 31791 # NodePort 를 변수에 지정 $ NPORT=$(kubectl get service svc-nodeport -o jsonpath='{.spec.ports[0].nodePort}') $ echo $NPORT # => 31791 # 현재 k8s 버전에서는 포트 Listen 되지 않고, iptables rules 처리됨 $ for i in control-plane worker worker2 worker3; do echo ">> node myk8s-$i <<"; docker exec -it myk8s-$i ss -tlnp; echo; done # => >> node myk8s-control-plane << # State Recv-Q Send-Q Local Address:Port Peer Address:PortProcess # LISTEN 0 4096 127.0.0.1:2381 0.0.0.0:* users:(("etcd",pid=710,fd=15)) # ... nodePort인 31791를 LISTEN하는 건이 없음 # # >> node myk8s-worker << # State Recv-Q Send-Q Local Address:Port Peer Address:PortProcess # LISTEN 0 4096 127.0.0.11:35033 0.0.0.0:* # ... nodePort인 31791를 LISTEN하는 건이 없음 # # >> node myk8s-worker2 << # State Recv-Q Send-Q Local Address:Port Peer Address:PortProcess # LISTEN 0 4096 127.0.0.11:45927 0.0.0.0:* # ... nodePort인 31791를 LISTEN하는 건이 없음 # # >> node myk8s-worker3 << # State Recv-Q Send-Q Local Address:Port Peer Address:PortProcess # LISTEN 0 4096 127.0.0.1:10248 0.0.0.0:* users:(("kubelet",pid=262,fd=19)) # ... nodePort인 31791를 LISTEN하는 건이 없음 ## (참고) 아래처럼 예전 k8s 환경에서 Service(NodePort) 생성 시, TCP Port Listen 되었었음 # $ root@k8s-m:~# ss -4tlnp | egrep "(Process|$NPORT)" # State Recv-Q Send-Q Local Address:Port Peer Address:Port Process # LISTEN 0 4096 0.0.0.0:30466 0.0.0.0:* users:(("kube-proxy",pid=8661,fd=10)) # 파드 로그 실시간 확인 (웹 파드에 접속자의 IP가 출력) $ kubectl logs -l app=deploy-websrv -f # => Listening on ports 8080 for http, and 8443 for https. # ... # ::ffff:172.23.0.2 - - [26/Sep/2024:04:35:00 +0000] "GET / HTTP/1.1" 200 396 "-" "curl/7.88.1" # ... # 외부 클라이언트(mypc 컨테이너)에서 접속 시도를 해보자 # 노드의 IP와 NodePort를 변수에 지정 ## CNODE=<컨트롤플레인노드의 IP주소> ## NODE1=<노드1의 IP주소> ## NODE2=<노드2의 IP주소> ## NODE3=<노드3의 IP주소> $ CNODE=172.23.0.2 $ NODE1=172.23.0.4 $ NODE2=172.23.0.5 $ NODE3=172.23.0.3 $ NPORT=$(kubectl get service svc-nodeport -o jsonpath='{.spec.ports[0].nodePort}') $ echo $NPORT # 서비스(NodePort) 부하분산 접속 확인 $ docker exec -it mypc curl -s $CNODE:$NPORT | jq # headers.host 주소는 왜 그런거죠? # => { # "path": "/", # "headers": { # "host": "172.23.0.2:31791", <<여기의 headers.host는 요청하는 url의 주소인데, 우리가 $CNODE(컨트롤플레인의 IP)의 url로 접속했기 때문입니다.>> # "user-agent": "curl/8.7.1", # "accept": "*/*" # }, # "method": "GET", # "body": "", # "fresh": false, # "hostname": "172.23.0.2", <<이 hostname과>> # "ip": "::ffff:172.23.0.2", <<이 ip는 접속하는 클라이언트의 ip인데 부하분산 과정에서 목적지가 Local Pod가 아닌 경우 Node IP로 POSTROUTING(SNAT) 되기 때문입니다.>> # "ips": [], # "protocol": "http", # "query": {}, # "subdomains": [], # "xhr": false, # "os": { # "hostname": "deploy-echo-5c689d5454-dxf2t" # }, # "connection": {} # } $ for i in $CNODE $NODE1 $NODE2 $NODE3 ; do echo ">> node $i <<"; docker exec -it mypc curl -s $i:$NPORT; echo; done # => >> node 172.23.0.2 << # { # "headers": { # "host": "172.23.0.2:31791", # ... # }, # ... # "hostname": "172.23.0.2", # "ip": "::ffff:172.23.0.2", # ... # "os": { # "hostname": "deploy-echo-5c689d5454-dxf2t" # } # } # >> node 172.23.0.4 << # { # "headers": { # "host": "172.23.0.4:31791", # ... # }, # ... # "hostname": "172.23.0.4", # "ip": "::ffff:10.10.4.1", # ... # "os": { # "hostname": "deploy-echo-5c689d5454-dxf2t" # } # } # >> node 172.23.0.5 << # { # "headers": { # "host": "172.23.0.5:31791", # ... # }, # ... # "hostname": "172.23.0.5", # "ip": "::ffff:10.10.1.1", # ... # "os": { # "hostname": "deploy-echo-5c689d5454-rbgcp" # } # } # >> node 172.23.0.3 << # { # "headers": { # "host": "172.23.0.3:31791", # ... # }, # ... # "hostname": "172.23.0.3", # "ip": "::ffff:10.10.2.1", # ... # "os": { # "hostname": "deploy-echo-5c689d5454-wppr8" # } # } # 컨트롤플레인 노드에는 목적지 파드가 없는데도, 접속을 받아줍니다! 이유는 서비스(nodePort)의 endpoint로 로드밸런싱 되기 때문입니다. $ docker exec -it mypc zsh -c "for i in {1..100}; do curl -s $CNODE:$NPORT | grep hostname; done | sort | uniq -c | sort -nr" # => 100 "hostname": "172.23.0.2", # 37 "hostname": "deploy-echo-5c689d5454-wppr8" # 33 "hostname": "deploy-echo-5c689d5454-rbgcp" # 30 "hostname": "deploy-echo-5c689d5454-dxf2t" $ docker exec -it mypc zsh -c "for i in {1..100}; do curl -s $NODE1:$NPORT | grep hostname; done | sort | uniq -c | sort -nr" # => 100 "hostname": "172.23.0.4", # 40 "hostname": "deploy-echo-5c689d5454-wppr8" # 32 "hostname": "deploy-echo-5c689d5454-dxf2t" # 28 "hostname": "deploy-echo-5c689d5454-rbgcp"$ docker exec -it mypc zsh -c "for i in {1..100}; do curl -s $NODE2:$NPORT | grep hostname; done | sort | uniq -c | sort -nr" $ docker exec -it mypc zsh -c "for i in {1..100}; do curl -s $NODE3:$NPORT | grep hostname; done | sort | uniq -c | sort -nr" # => 100 "hostname": "172.23.0.3", # 43 "hostname": "deploy-echo-5c689d5454-wppr8" # 34 "hostname": "deploy-echo-5c689d5454-dxf2t" # 23 "hostname": "deploy-echo-5c689d5454-rbgcp" # 아래 반복 접속 실행 해두자 $ docker exec -it mypc zsh -c "while true; do curl -s --connect-timeout 1 $CNODE:$NPORT | grep hostname; date '+%Y-%m-%d %H:%M:%S' ; echo ; sleep 1; done" # NodePort 서비스는 ClusterIP 를 포함 # CLUSTER-IP:PORT 로 접속 가능! <- 컨트롤노드에서 아래 실행 해보자 $ kubectl get svc svc-nodeport # => NAME TYPE CLUSTER-IP EXTERNAL-IP PORT(S) AGE # svc-nodeport NodePort 10.200.1.169 <none> 9000:31791/TCP 51m $ CIP=$(kubectl get service svc-nodeport -o jsonpath="{.spec.clusterIP}") $ CIPPORT=$(kubectl get service svc-nodeport -o jsonpath="{.spec.ports[0].port}") $ echo $CIP $CIPPORT # => 10.200.1.169 9000 $ docker exec -it myk8s-control-plane curl -s $CIP:$CIPPORT | jq # => { # "path": "/", # "headers": { # "host": "10.200.1.169:9000", # "user-agent": "curl/7.88.1", # "accept": "*/*" # }, # "method": "GET", # "body": "", # "fresh": false, # "hostname": "10.200.1.169", # "ip": "::ffff:172.23.0.2", # "ips": [], # "protocol": "http", # "query": {}, # "subdomains": [], # "xhr": false, # "os": { # "hostname": "deploy-echo-5c689d5454-rbgcp" # }, # "connection": {} # } # mypc에서 CLUSTER-IP:PORT 로 접속 가능할까? $ docker exec -it mypc curl -s $CIP:$CIPPORT # => (에러) # mypc에서 cluster ip port로의 접속은 불가능합니다. mypc는 kubernetes 클러스터 내부에 있지 않기 때문입니다. # (옵션) 노드에서 Network Connection $ conntrack -E # => [NEW] tcp 6 120 SYN_SENT src=172.23.0.2 dst=10.10.4.4 sport=36907 dport=8080 [UNREPLIED] src=10.10.4.4 dst=172.23.0.2 sport=8080 dport=36907 # [UPDATE] tcp 6 60 SYN_RECV src=172.23.0.2 dst=10.10.4.4 sport=36907 dport=8080 src=10.10.4.4 dst=172.23.0.2 sport=8080 dport=36907 # [UPDATE] tcp 6 86400 ESTABLISHED src=172.23.0.2 dst=10.10.4.4 sport=36907 dport=8080 src=10.10.4.4 dst=172.23.0.2 sport=8080 dport=36907 [ASSURED] # [UPDATE] tcp 6 120 FIN_WAIT src=172.23.0.2 dst=10.10.4.4 sport=36907 dport=8080 src=10.10.4.4 dst=172.23.0.2 sport=8080 dport=36907 [ASSURED] # [UPDATE] tcp 6 30 LAST_ACK src=172.23.0.2 dst=10.10.4.4 sport=36907 dport=8080 src=10.10.4.4 dst=172.23.0.2 sport=8080 dport=36907 [ASSURED] # [UPDATE] tcp 6 120 TIME_WAIT src=172.23.0.2 dst=10.10.4.4 sport=36907 dport=8080 src=10.10.4.4 dst=172.23.0.2 sport=8080 dport=36907 [ASSURED] # ... # SNAT나 빠른 iptables 룰 처리등을 위해 접속 정보가 추적됨을 알 수 있습니다. $ conntrack -L --any-nat - 파드에서 바라본 클라이언트의 주소가 실제 클라이언트가 아닌 node의 ip로 표시되는데 그 이유를 살펴보겠습니다.
-
컨트롤 플레인에서 iptables의 nat 테이블의 KUBE-POSTROUTING 룰을 확인하면 다음과 같습니다.
  $ iptables -v --numeric --table nat --list
  # => Chain POSTROUTING (policy ACCEPT 5813 packets, 349K bytes)
  #     pkts bytes target     prot opt in     out     source               destination
  #    37925 2276K KUBE-POSTROUTING  0    --  *      *       0.0.0.0/0            0.0.0.0/0            /* kubernetes postrouting rules */
  #    ...
  #    Chain KUBE-POSTROUTING (1 references)
  #     pkts bytes target     prot opt in     out     source               destination
  #     5343  321K RETURN     0    --  *      *       0.0.0.0/0            0.0.0.0/0            mark match ! 0x4000/0x4000
  #     1265 75900 MARK       0    --  *      *       0.0.0.0/0            0.0.0.0/0            MARK xor 0x4000
  #     1265 75900 MASQUERADE  0    --  *      *       0.0.0.0/0            0.0.0.0/0            /* kubernetes service traffic requiring SNAT */ random-fully
확인 결과 POSTROUTING시 KUBE-POSTROUTING을 통해 SNAT 되고 있음을 알 수 있습니다.
-
-
외부 클라이언트 → 서비스(NodePort) 접속 시 : 3개의 목적지(backend) 파드로 랜덤 부하 분산 접속됨을 확인해보겠습니다.
$ for i in {1..100}; do curl -s $CNODE:$NPORT | grep hostname; done | sort | uniq -c | sort -nr # => 100 "hostname": "172.23.0.2", # 42 "hostname": "deploy-echo-5c689d5454-wppr8" # 31 "hostname": "deploy-echo-5c689d5454-dxf2t" # 27 "hostname": "deploy-echo-5c689d5454-rbgcp" $ for i in {1..100}; do curl -s $NODE1:$NPORT | grep hostname; done | sort | uniq -c | sort -nr # => 100 "hostname": "172.23.0.4", # 37 "hostname": "deploy-echo-5c689d5454-dxf2t" # 34 "hostname": "deploy-echo-5c689d5454-rbgcp" # 29 "hostname": "deploy-echo-5c689d5454-wppr8" $ for i in {1..100}; do curl -s $NODE2:$NPORT | grep hostname; done | sort | uniq -c | sort -nr # => 100 "hostname": "172.23.0.5", # 41 "hostname": "deploy-echo-5c689d5454-wppr8" # 32 "hostname": "deploy-echo-5c689d5454-rbgcp" # 27 "hostname": "deploy-echo-5c689d5454-dxf2t" $ for i in {1..100}; do curl -s $NODE3:$NPORT | grep hostname; done | sort | uniq -c | sort -nr # => 100 "hostname": "172.23.0.3", # 39 "hostname": "deploy-echo-5c689d5454-dxf2t" # 34 "hostname": "deploy-echo-5c689d5454-wppr8" # 27 "hostname": "deploy-echo-5c689d5454-rbgcp" -
웹 파드에서 log를 통해 접속자의 IP 확인시 외부 클라이언트 IP가 아닌, 노드의 IP로 SNAT 되어서 접속됨을 확인할 수 있습니다.
  $ kubectl logs -f deploy-echo-5c689d5454-dxf2t | grep HTTP
  # => ::ffff:172.23.0.3 - - [01/Sep/2024:05:28:36 +0000] "GET / HTTP/1.1" 200 398 "-" "curl/7.88.1"
  #    ::ffff:172.23.0.3 - - [01/Sep/2024:05:28:36 +0000] "GET / HTTP/1.1" 200 398 "-" "curl/7.88.1"
  #    ::ffff:172.23.0.3 - - [01/Sep/2024:05:28:36 +0000] "GET / HTTP/1.1" 200 398 "-" "curl/7.88.1"
  #    ::ffff:172.23.0.3 - - [01/Sep/2024:05:28:36 +0000] "GET / HTTP/1.1" 200 398 "-" "curl/7.88.1"
-
- 2.4. IPTABLES 정책 확인
-
iptables 정책 적용 순서는 다음과 같습니다.
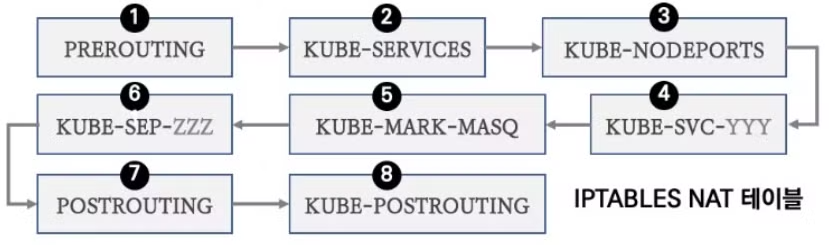
- PREROUTING → KUBE-SERVICES → KUBE-NODEPORTS → KUBE-EXT-#(MARK) → KUBE-SVC-# → KUBE-SEP-# ⇒ KUBE-POSTROUTING (MASQUERADE) **
-
KUBE-EXT-#(MARK)규칙 과정이 추가됨을 확인할 수 있습니다.
- 기본 규칙은 ClusterIP 서비스 동작 규칙과 거의 같으며 차이점은 KUBE-NODEPORTS, KUBE-MARK-MASK, KUBE-POSTROUTING 체인이 다릅니다. 핵심 내용은 NodePort에 매칭시 마킹 후 출발지 IP를 해당 노드에 있는 네트워크 IP로 변환(MASQUERADE : SNAT)하여 목적지 파드로 전달합니다.
-
실습을 통해 iptables 정책에 대해 확인해보겠습니다. 컨트롤플레인에서 실습을 진행하겠습니다.
$ docker exec -it myk8s-control-plane bash ---------------------------------------- # 패킷 카운트 초기화 $ iptables -t nat --zero # PREROUTING 정보 확인 $ iptables -t nat -S | grep PREROUTING # => -P PREROUTING ACCEPT # -A PREROUTING -m comment --comment "kubernetes service portals" -j KUBE-SERVICES # -A PREROUTING -d 172.23.0.1/32 -j DOCKER_OUTPUT # 외부 클라이언트가 노드IP:NodePort 로 접속하기 때문에 --dst-type LOCAL 에 매칭되어서 -j KUBE-NODEPORTS 로 점프! $ iptables -t nat -S | grep KUBE-SERVICES # => ... # -A KUBE-SERVICES -m comment --comment "kubernetes service nodeports; NOTE: this must be the last rule in this chain" -m addrtype --dst-type LOCAL -j KUBE-NODEPORTS # KUBE-NODEPORTS 에서 KUBE-EXT-# 로 점프! ## -m nfacct --nfacct-name localhost_nps_accepted_pkts 추가됨 : 패킷 flow 카운팅 - 카운트 이름 지정 $ NPORT=$(kubectl get service svc-nodeport -o jsonpath='{.spec.ports[0].nodePort}') $ echo $NPORT # => 31791 # $ iptables -t nat -S | grep KUBE-NODEPORTS | grep <NodePort> $ iptables -t nat -S | grep KUBE-NODEPORTS | grep $NPORT # => -A KUBE-NODEPORTS -p tcp -m comment --comment "default/svc-nodeport:svc-webport" -m tcp --dport 31791 -j KUBE-EXT-VTR7MTHHNMFZ3OFS # (참고) nfacct 확인 $ nfacct list ## nfacct flush # 초기화 ## KUBE-EXT-# 에서 'KUBE-MARK-MASQ -j MARK --set-xmark 0x4000/0x4000' 마킹 및 KUBE-SVC-# 로 점프! # docker exec -it mypc zsh -c "while true; do curl -s --connect-timeout 1 $CNODE:$NPORT | grep hostname; date '+%Y-%m-%d %H:%M:%S' ; echo ; sleep 1; done" 반복 접속 후 아래 확인 $ watch -d 'iptables -v --numeric --table nat --list KUBE-EXT-VTR7MTHHNMFZ3OFS' $ iptables -t nat -S | grep "A KUBE-EXT-VTR7MTHHNMFZ3OFS" # => -A KUBE-EXT-VTR7MTHHNMFZ3OFS -m comment --comment "masquerade traffic for default/svc-nodeport:svc-webport external destinations" -j KUBE-MARK-MASQ # -A KUBE-EXT-VTR7MTHHNMFZ3OFS -j KUBE-SVC-VTR7MTHHNMFZ3OFS # iptables -t nat -S | grep "A KUBE-MARK-MASQ" | sed -e 's/^/# /' -e '1s/^# /# => /' # => -A KUBE-MARK-MASQ -j MARK --set-xmark 0x4000/0x4000 # 0x4000/0x4000으로 마킹하는 룰 # KUBE-SVC-# 이후 과정은 Cluster-IP 와 동일! : 3개의 파드로 DNAT 되어서 전달 $ iptables -t nat -S | grep "A KUBE-SVC-VTR7MTHHNMFZ3OFS -" # => -A KUBE-SVC-VTR7MTHHNMFZ3OFS -m comment --comment "default/svc-nodeport:svc-webport -> 10.10.1.5:8080" -m statistic --mode random --probability 0.33333333349 -j KUBE-SEP-SESYGQFRQSLJQZ6Q # -A KUBE-SVC-VTR7MTHHNMFZ3OFS -m comment --comment "default/svc-nodeport:svc-webport -> 10.10.2.7:8080" -m statistic --mode random --probability 0.50000000000 -j KUBE-SEP-FBJG45W6XHLV2NA6 # -A KUBE-SVC-VTR7MTHHNMFZ3OFS -m comment --comment "default/svc-nodeport:svc-webport -> 10.10.4.4:8080" -j KUBE-SEP-GEQNJ6BO5AOHB6LH # POSTROUTING 정보 확인 # 마킹되어 있어서 출발지IP를 접속한 노드의 IP 로 SNAT(MASQUERADE) 처리함! , 최초 출발지Port는 랜덤Port 로 변경 $ iptables -t nat -S | grep "A KUBE-POSTROUTING" # => -A KUBE-POSTROUTING -m mark ! --mark 0x4000/0x4000 -j RETURN # 0x4000/0x4000 되어 있으니 여기에 매칭되지 않고 아래 Rule로 내려감 # -A KUBE-POSTROUTING -j MARK --set-xmark 0x4000/0x0 # -A KUBE-POSTROUTING -m comment --comment "kubernetes service traffic requiring SNAT" -j MASQUERADE --random-fully # docker exec -it mypc zsh -c "while true; do curl -s --connect-timeout 1 $CNODE:$NPORT | grep hostname; date '+%Y-%m-%d %H:%M:%S' ; echo ; sleep 1; done" 반복 접속 후 아래 확인 $ watch -d 'iptables -v --numeric --table nat --list KUBE-POSTROUTING;echo;iptables -v --numeric --table nat --list POSTROUTING' $ exit ---------------------------------------- -
서비스 (NodePort) 생성 시 kube-proxy에 의해서 iptables 규칙이 모든 노드에 추가되는지 확인해보겠습니다.
# $ NPORT=$(kubectl get service svc-nodeport -o jsonpath='{.spec.ports[0].nodePort}') $ echo $NPORT # => 31791 $ docker exec -it myk8s-control-plane iptables -t nat -S | grep KUBE-NODEPORTS | grep $NPORT # => -A KUBE-NODEPORTS -p tcp -m comment --comment "default/svc-nodeport:svc-webport" -m tcp --dport 31791 -j KUBE-EXT-VTR7MTHHNMFZ3OFS $ for i in control-plane worker worker2 worker3; do echo ">> node myk8s-$i <<"; docker exec -it myk8s-$i iptables -t nat -S | grep KUBE-NODEPORTS | grep $NPORT; echo; done # => >> node myk8s-control-plane << # -A KUBE-NODEPORTS -p tcp -m comment --comment "default/svc-nodeport:svc-webport" -m tcp --dport 31791 -j KUBE-EXT-VTR7MTHHNMFZ3OFS # # >> node myk8s-worker << # -A KUBE-NODEPORTS -p tcp -m comment --comment "default/svc-nodeport:svc-webport" -m tcp --dport 31791 -j KUBE-EXT-VTR7MTHHNMFZ3OFS # # >> node myk8s-worker2 << # -A KUBE-NODEPORTS -p tcp -m comment --comment "default/svc-nodeport:svc-webport" -m tcp --dport 31791 -j KUBE-EXT-VTR7MTHHNMFZ3OFS # # >> node myk8s-worker3 << # -A KUBE-NODEPORTS -p tcp -m comment --comment "default/svc-nodeport:svc-webport" -m tcp --dport 31791 -j KUBE-EXT-VTR7MTHHNMFZ3OFS - iptables 룰이 모든 노드에 추가되어있음을 확인 할 수 있습니다.
-
- 2.5. externalTrafficPolicy 설정
-
externalTrafficPolicy: Local: 앞에서 실습한 바와같이 서비스가 바라보는 파드에 접속시 클라이언트 IP가 node의 IP로 접속됩니다. 이때externalTrafficPolicy: Local를 하면 해당 노드에 배치된 파드로만 접속되면서, SNAT가 되지않아 외부 클라이언트 IP가 보존됩니다.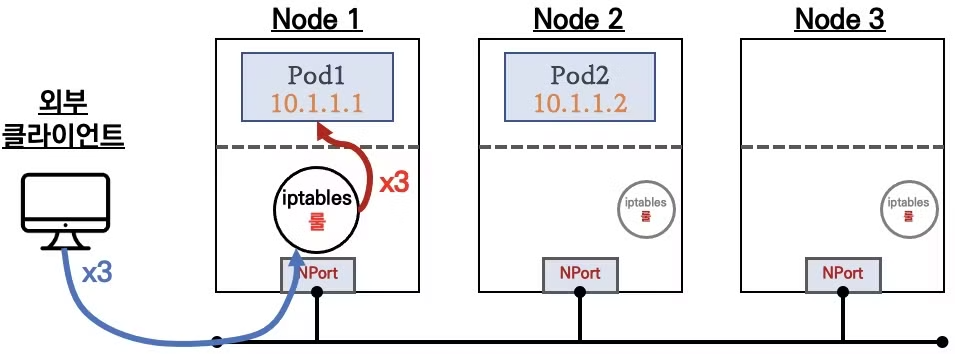
- 이전까지는 같은 iptables 룰이 모든 노드에 적용 되었지만, 노드 자신의 파드로만 가는 룰만 있어서 각각 조금씩 다른 룰이 적용되게 됩니다.
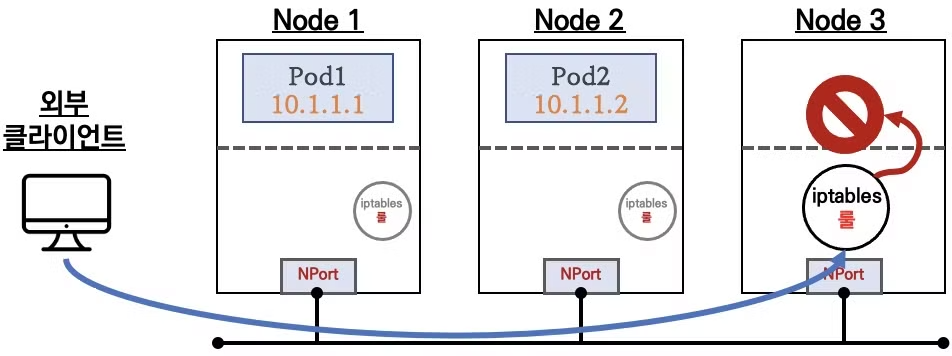
- 만약 노드에 해당하는 파드가 없으면 위의 그림과 같이 연결이 실패하게되니 사용에 주의가 필요합니다.
-
externalTrafficPolicy: Local설정 시의 통신 흐름을 좀 더 자세히 알아보겠습니다.
- 클라이언트에서 파드가 배포되어있는 워커노드1에 NodePort로 접속합니다.
- 워커노드1의 IPTABLES의 nat 테이블 규칙과 매칭되어 목적지 IP와 목적지 Port는 변환 되지만, SNAT 되지 않고 바로 파드로 전달되므로 클라이언트의 IP가 파드에 그대로 전달 됩니다.
-
설정 및 파드 접속 확인
  # 기본 정보 확인
  $ kubectl get svc svc-nodeport -o json | grep 'TrafficPolicy"'
  # =>         "externalTrafficPolicy": "Cluster",
  #            "internalTrafficPolicy": "Cluster",

  # 기존 통신 연결 정보(conntrack) 제거 후 아래 실습 진행하자! : (모든 노드에서) conntrack -F
  $ for i in control-plane worker worker2 worker3; do echo ">> node myk8s-$i <<"; docker exec -it myk8s-$i conntrack -F; echo; done
  # => >> node myk8s-control-plane <<
  #    conntrack v1.4.7 (conntrack-tools): connection tracking table has been emptied.
  #
  #    >> node myk8s-worker <<
  #    conntrack v1.4.7 (conntrack-tools): connection tracking table has been emptied.
  #
  #    >> node myk8s-worker2 <<
  #    conntrack v1.4.7 (conntrack-tools): connection tracking table has been emptied.
  #
  #    >> node myk8s-worker3 <<
  #    conntrack v1.4.7 (conntrack-tools): connection tracking table has been emptied.
  #
  $ kubectl delete -f svc-nodeport.yml
  # => service "svc-nodeport" deleted
  $ kubectl apply -f svc-nodeport.yml
  # => service/svc-nodeport created

  # externalTrafficPolicy: local 설정 변경
  $ kubectl patch svc svc-nodeport -p '{"spec":{"externalTrafficPolicy": "Local"}}'
  # => service/svc-nodeport patched
  $ kubectl get svc svc-nodeport -o json | grep 'TrafficPolicy"'
  # =>         "externalTrafficPolicy": "Local",
  #            "internalTrafficPolicy": "Cluster",

  # 파드 3개를 2개로 줄입니다.
  $ kubectl scale deployment deploy-echo --replicas=2
  # => deployment.apps/deploy-echo scaled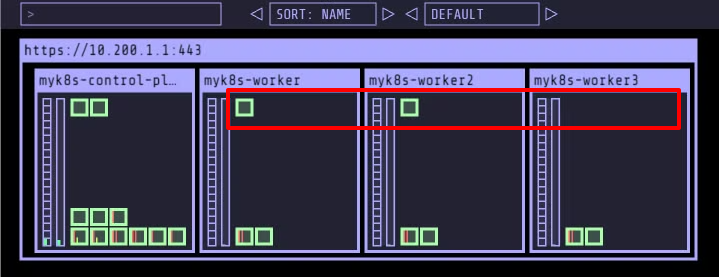
# 파드 존재하는 노드 정보 확인 $ kubectl get pod -owide # => NAME READY STATUS RESTARTS AGE IP NODE NOMINATED NODE READINESS GATES # deploy-echo-5c689d5454-24cql 1/1 Running 0 30s 10.10.4.5 myk8s-worker <none> <none> # deploy-echo-5c689d5454-2kgfj 1/1 Running 0 30s 10.10.1.6 myk8s-worker2 <none> <none> # net-pod 1/1 Running 0 46h 10.10.0.7 myk8s-control-plane <none> <none> # 파드 로그 실시간 확인 (웹 파드에 접속자의 IP가 출력) $ kubectl logs -l app=deploy-websrv -f # 외부 클라이언트(mypc)에서 접속 시도 # 노드의 IP와 NodePort를 변수에 지정 ## CNODE=<컨트롤플레인노드의 IP주소> ## NODE1=<노드1의 IP주소> ## NODE2=<노드2의 IP주소> ## NODE3=<노드3의 IP주소> $ CNODE=172.23.0.2 $ NODE1=172.23.0.4 $ NODE2=172.23.0.5 $ NODE3=172.23.0.3 ## NodePort 를 변수에 지정 $ NPORT=$(kubectl get service svc-nodeport -o jsonpath='{.spec.ports[0].nodePort}') $ echo $NPORT # => 31177 # 서비스(NodePort) 부하분산 접속 확인 : 파드가 존재하지 않는 노드로는 접속 실패!, 파드가 존재하는 노드는 접속 성공 및 클라이언트 IP 확인! $ docker exec -it mypc curl -s --connect-timeout 1 $CNODE:$NPORT | jq # => (공백) # 컨트롤 플레인에는 파드가 없으므로 결과가 없습니다. $ for i in $CNODE $NODE1 $NODE2 $NODE3 ; do echo ">> node $i <<"; docker exec -it mypc curl -s --connect-timeout 1 $i:$NPORT; echo; done # => >> node 172.23.0.2 << # # >> node 172.23.0.4 << # { # "path": "/", # "headers": { # "host": "172.23.0.4:31177", # ... # }, # ... # "hostname": "172.23.0.4", # "ip": "::ffff:172.23.0.6", # ... # "os": { # "hostname": "deploy-echo-5c689d5454-24cql" # } # } # >> node 172.23.0.5 << # { # "headers": { # "host": "172.23.0.5:31177", # ... # }, # "hostname": "172.23.0.5", # "ip": "::ffff:172.23.0.6", # ... # "os": { # "hostname": "deploy-echo-5c689d5454-2kgfj" # } # } # >> node 172.23.0.3 << # # 목적지 파드가 배치되지 않은 노드는 접속이 어떻게? 왜 그런가? $ docker exec -it mypc zsh -c "for i in {1..100}; do curl -s $CNODE:$NPORT | grep hostname; done | sort | uniq -c | sort -nr" # => $ docker exec -it mypc zsh -c "for i in {1..100}; do curl -s $NODE1:$NPORT | grep hostname; done | sort | uniq -c | sort -nr" # => 100 "hostname": "172.23.0.4", # 100 "hostname": "deploy-echo-5c689d5454-24cql" $ docker exec -it mypc zsh -c "for i in {1..100}; do curl -s $NODE2:$NPORT | grep hostname; done | sort | uniq -c | sort -nr" # => 100 "hostname": "172.23.0.5", # 100 "hostname": "deploy-echo-5c689d5454-2kgfj" $ docker exec -it mypc zsh -c "for i in {1..100}; do curl -s $NODE3:$NPORT | grep hostname; done | sort | uniq -c | sort -nr" # => # 목적지 파드가 배치되지 않은 노드는 응답이 없어 타임아웃이 됩니다. 그 이유는 externalTrafficPolicy: Local여서 노드포트로 온 패킷이, local pod로 전달하려고 하는데 # local pod가 없기 때문입니다. # 아래 반복 접속 실행 해두자 $ docker exec -it mypc zsh -c "while true; do curl -s --connect-timeout 1 $NODE2:$NPORT | grep hostname; date '+%Y-%m-%d %H:%M:%S' ; echo ; sleep 1; done" # (옵션) 노드에서 Network Connection $ conntrack -E $ conntrack -L --any-nat -
외부 클라이언트 → 각각 워커 노드 1,2 접속시 각각 노드의 파드로만 접속 됩니다.
# 호스트에서 실행 $ for i in $CNODE $NODE1 $NODE2 $NODE3 ; do echo ">> node $i <<"; curl -s --connect-timeout 1 $i:$NPORT; echo; done # => >> node 172.23.0.2 << # # >> node 172.23.0.4 << # { # "headers": { # "host": "172.23.0.4:31177", # }, # "hostname": "172.23.0.4", # "ip": "::ffff:172.23.0.1", # "os": { # "hostname": "deploy-echo-5c689d5454-24cql" # } # } # >> node 172.23.0.5 << # { # "headers": { # "host": "172.23.0.5:31177", # }, # "hostname": "172.23.0.5", # "ip": "::ffff:172.23.0.1", # "os": { # "hostname": "deploy-echo-5c689d5454-2kgfj" # } # } # >> node 172.23.0.3 << # 다른 터미널에서 로그 표시 $ kubectl logs -l app=deploy-websrv -f | grep HTTP ::ffff:172.23.0.1 - - [26/Sep/2024:07:33:09 +0000] "GET / HTTP/1.1" 200 397 "-" "curl/8.7.1" ::ffff:172.23.0.1 - - [26/Sep/2024:07:33:10 +0000] "GET / HTTP/1.1" 200 397 "-" "curl/8.7.1" ::ffff:172.23.0.1 - - [26/Sep/2024:07:33:26 +0000] "GET / HTTP/1.1" 200 397 "-" "curl/8.7.1" ::ffff:172.23.0.1 - - [26/Sep/2024:07:33:26 +0000] "GET / HTTP/1.1" 200 397 "-" "curl/8.7.1"-
kubectl logs -l app=deploy-websrv -f로 확인시 외부 클라이언트인 172.23.0.1이 보존되는 것을 확인 할 수 있습니다.
-
- 이렇게 동작하는 이유를 iptables 룰을 통해 확인해보겠습니다.
# 컨트롤플레인 노드 - iptables 분석 << 정책 확인 : 아래 정책 내용은 핵심적인 룰(rule)만 표시했습니다! # (예시) 파드가 배포되어 있는 노드1에서 확인했습니다 $ docker exec -it myk8s-worker bash --------------------------------------- $ iptables -t nat -S # $ iptables -t nat -S | grep <NodePort> $ iptables -t nat -S | grep 31177 # => -A KUBE-NODEPORTS -p tcp -m comment --comment "default/svc-nodeport:svc-webport" -m tcp --dport 31177 -j KUBE-EXT-VTR7MTHHNMFZ3OFS $ iptables -t nat -S | grep 'A KUBE-EXT-VTR7MTHHNMFZ3OFS' # => -A KUBE-EXT-VTR7MTHHNMFZ3OFS -s 10.10.0.0/16 -m comment --comment "pod traffic for default/svc-nodeport:svc-webport external destinations" -j KUBE-SVC-VTR7MTHHNMFZ3OFS # -A KUBE-EXT-VTR7MTHHNMFZ3OFS -m comment --comment "masquerade LOCAL traffic for default/svc-nodeport:svc-webport external destinations" -m addrtype --src-type LOCAL -j KUBE-MARK-MASQ # -A KUBE-EXT-VTR7MTHHNMFZ3OFS -m comment --comment "route LOCAL traffic for default/svc-nodeport:svc-webport external destinations" -m addrtype --src-type LOCAL -j KUBE-SVC-VTR7MTHHNMFZ3OFS # -A KUBE-EXT-VTR7MTHHNMFZ3OFS -j KUBE-SVL-VTR7MTHHNMFZ3OFS # 실습 환경에서는 아래처럼 2개의 파드 중 자신의 노드에 생성된 파드 1개만 DNAT 연결됨 $ iptables -t nat -S | grep 'A KUBE-SVL-VTR7MTHHNMFZ3OFS' # => -A KUBE-SVL-VTR7MTHHNMFZ3OFS -m comment --comment "default/svc-nodeport:svc-webport -> 10.10.4.5:8080" -j KUBE-SEP-COBCKEECYTEF2ZXK $ iptables -t nat -S | grep 'A KUBE-SEP-COBCKEECYTEF2ZXK' # => -A KUBE-SEP-COBCKEECYTEF2ZXK -s 10.10.4.5/32 -m comment --comment "default/svc-nodeport:svc-webport" -j KUBE-MARK-MASQ # -A KUBE-SEP-COBCKEECYTEF2ZXK -p tcp -m comment --comment "default/svc-nodeport:svc-webport" -m tcp -j DNAT --to-destination 10.10.4.5:8080 $ exit # ---------------------------------------- 정책을 확인해보면
externalTrafficPolicy: Local설정 전에는 MASQUERADE로 SNAT 되었지만, 설정 후에는 DNAT으로 바로 전달되는 것을 확인할 수 있습니다. - SNAT 되지 않았기 때문에 클라이언트의 IP가 그대로 전달되어 파드에서 확인할 수 있습니다.
- 정책을 확인해보면
- 서비스(NodePort, externalTrafficPolicy: Local) 생성 시 iptables 규칙(KUBE-SVL-#)이 모든 노드에 추가되는지 확인해보겠습니다.
# 컨트롤 플레인에는 파드가 없으므로 결과가 없습니다. $ docker exec -it myk8s-control-plane iptables -t nat -S | grep 'A KUBE-SVL-VTR7MTHHNMFZ3OFS' # => (공백) # 각 노드에 확인해보겠습니다. $ for i in control-plane worker worker2 worker3; do echo ">> node myk8s-$i <<"; docker exec -it myk8s-$i iptables -t nat -S | grep 'A KUBE-SVL-VTR7MTHHNMFZ3OFS'; echo; done # => >> node myk8s-control-plane << # # >> node myk8s-worker << # -A KUBE-SVL-VTR7MTHHNMFZ3OFS -m comment --comment "default/svc-nodeport:svc-webport -> 10.10.4.5:8080" -j KUBE-SEP-COBCKEECYTEF2ZXK # # >> node myk8s-worker2 << # -A KUBE-SVL-VTR7MTHHNMFZ3OFS -m comment --comment "default/svc-nodeport:svc-webport -> 10.10.1.6:8080" -j KUBE-SEP-ABUS75FNO53OAK6G # # >> node myk8s-worker3 <<- 파드가 있는 worker, worker2 노드에만 iptables 규칙이 추가되어 있음을 확인할 수 있습니다.
- NodePort의 부족한 점
- 외부에서 노드의 IP와 포트로 직접 접속이 필요합니다.
- 따라서 내부망이 외부에 공개(라우팅 가능)되어 보안에 취약합니다.
- => LoadBalancer 서비스 타입으로 외부 공개 최소화 가능
- 클라이언트 IP 보존을 위해서,
externalTrafficPolicy: local를 사용하면 파드가 없는 노드 IP로 NodePort 접속 시 실패하게 됩니다.- => LoadBalancer 서비스에서 헬스체크(Probe) 로 대응 가능
-
파드간 속도 측정
- 이번 실습에서는 iperf3를 사용해서 파드간 속도를 측정해보겠습니다.
- iperf3는 네트워크 대역폭을 측정하는 도구로, 서버와 클라이언트로 나뉘어 서버는 대역폭을 제공하고 클라이언트는 대역폭을 측정합니다. TCP와 UDP, SCTP를 지원합니다.
- iperf3의 기본 사용법을 살펴 보겠습니다.
# iperf3 설치 # macOS 인 경우 $ brew install iperf3 # ubuntu 등 debian 계열인 경우 $ sudo apt install iperf3 -y # iperf3 테스트 1 : TCP 5201, 측정시간 10초 $ iperf3 -s # 서버모드 실행 # => ----------------------------------------------------------- # Server listening on 5201 # ----------------------------------------------------------- # Accepted connection from 127.0.0.1, port 40142 # [ 5] local 127.0.0.1 port 5201 connected to 127.0.0.1 port 40154 # [ ID] Interval Transfer Bitrate # [ 5] 0.00-1.00 sec 7.11 GBytes 61.1 Gbits/sec # [ 5] 1.00-2.00 sec 8.03 GBytes 68.9 Gbits/sec # [ 5] 2.00-3.00 sec 7.53 GBytes 64.7 Gbits/sec # [ 5] 3.00-4.00 sec 7.73 GBytes 66.4 Gbits/sec # [ 5] 4.00-5.00 sec 7.64 GBytes 65.6 Gbits/sec # [ 5] 5.00-6.00 sec 7.89 GBytes 67.8 Gbits/sec # [ 5] 6.00-7.00 sec 7.95 GBytes 68.3 Gbits/sec # [ 5] 7.00-8.00 sec 7.78 GBytes 66.9 Gbits/sec # [ 5] 8.00-9.00 sec 7.91 GBytes 67.9 Gbits/sec # [ 5] 9.00-10.00 sec 7.64 GBytes 65.6 Gbits/sec # [ 5] 10.00-10.05 sec 384 MBytes 66.0 Gbits/sec # - - - - - - - - - - - - - - - - - - - - - - - - - # [ ID] Interval Transfer Bitrate # [ 5] 0.00-10.05 sec 77.6 GBytes 66.3 Gbits/sec receiver $ iperf3 -c 127.0.0.1 # 다른 터미널에서 클라이언트모드 실행 # => Connecting to host 127.0.0.1, port 5201 # [ 5] local 127.0.0.1 port 40154 connected to 127.0.0.1 port 5201 # [ ID] Interval Transfer Bitrate Retr Cwnd # [ 5] 0.00-1.00 sec 7.48 GBytes 64.2 Gbits/sec 8 2.69 MBytes # ... # [ 5] 9.00-10.00 sec 7.72 GBytes 66.3 Gbits/sec 1 3.06 MBytes # - - - - - - - - - - - - - - - - - - - - - - - - - # [ ID] Interval Transfer Bitrate Retr # [ 5] 0.00-10.00 sec 77.6 GBytes 66.6 Gbits/sec 53 sender # [ 5] 0.00-10.05 sec 77.6 GBytes 66.3 Gbits/sec receiver # iperf3 테스트 2 : TCP 80, 측정시간 5초 $ iperf3 -s -p 80 $ iperf3 -c 127.0.0.1 -p 80 -t 5 # iperf3 테스트 3 : UDP 사용, 역방향 모드(-R) $ iperf3 -s $ iperf3 -c 127.0.0.1 -u -b 100G # iperf3 테스트 4 : 역방향 모드(-R) => 서버에서 클라이언트로 전송할때 속도를 측정합니다. $ iperf3 -s $ iperf3 -c 127.0.0.1 -R # iperf3 테스트 5 : 쌍방향 모드(-R) $ iperf3 -s $ iperf3 -c 127.0.0.1 --bidir # iperf3 테스트 6 : TCP 다중 스트림(30개), -P(number of parallel client streams to run) $ iperf3 -s $ iperf3 -c 127.0.0.1 -P 2 -t 30 - 쿠버네티스 환경에서 속도 측정 테스트해보겠습니다.
- 테스트 환경 배포
# 배포 $ kubectl apply -f https://raw.githubusercontent.com/gasida/PKOS/main/aews/k8s-iperf3.yaml # 확인 : 서버와 클라이언트가 다른 워커노드에 배포되었는지 확인 $ kubectl get deploy,svc,pod -owide # => NAME READY UP-TO-DATE AVAILABLE AGE CONTAINERS IMAGES SELECTOR # deployment.apps/iperf3-client 0/1 1 0 5s iperf3-client networkstatic/iperf3 app=iperf3-client # deployment.apps/iperf3-server 0/1 1 0 5s iperf3-server networkstatic/iperf3 app=iperf3-server # # NAME TYPE CLUSTER-IP EXTERNAL-IP PORT(S) AGE SELECTOR # service/iperf3-server ClusterIP 10.200.1.166 <none> 5201/TCP,5201/UDP 5s app=iperf3-server # # NAME READY STATUS RESTARTS AGE IP NODE NOMINATED NODE READINESS GATES # pod/iperf3-client-598b85fd6b-tq5xg 0/1 ContainerCreating 0 5s <none> myk8s-worker3 <none> <none> # pod/iperf3-server-688df6d56f-hlhrm 0/1 ContainerCreating 0 5s <none> myk8s-worker <none> <none> # 서버 파드 로그 확인 : 기본 5201 포트 Listen $ kubectl logs -l app=iperf3-server -f - TCP 5201, 측정시간 5초
# 클라이언트 파드에서 아래 명령 실행 $ kubectl exec -it deploy/iperf3-client -- iperf3 -c iperf3-server -t 5 # => Connecting to host iperf3-server, port 5201 # [ 5] local 10.10.2.9 port 54972 connected to 10.200.1.166 port 5201 # [ ID] Interval Transfer Bitrate Retr Cwnd # [ 5] 0.00-1.00 sec 4.68 GBytes 40.2 Gbits/sec 3333 1.07 MBytes # [ 5] 1.00-2.00 sec 4.87 GBytes 41.8 Gbits/sec 1293 1.09 MBytes # [ 5] 2.00-3.00 sec 4.86 GBytes 41.8 Gbits/sec 1020 1.11 MBytes # [ 5] 3.00-4.00 sec 4.85 GBytes 41.7 Gbits/sec 590 1.21 MBytes # [ 5] 4.00-5.00 sec 4.93 GBytes 42.4 Gbits/sec 988 1.27 MBytes # - - - - - - - - - - - - - - - - - - - - - - - - - # [ ID] Interval Transfer Bitrate Retr # [ 5] 0.00-5.00 sec 24.2 GBytes 41.6 Gbits/sec 7224 sender # [ 5] 0.00-5.00 sec 24.2 GBytes 41.6 Gbits/sec receiver # 서버 파드 로그 확인 : 기본 5201 포트 Listen $ kubectl logs -l app=iperf3-server -f # => ----------------------------------------------------------- # Server listening on 5201 (test #1) # ----------------------------------------------------------- # Accepted connection from 10.10.2.9, port 54962 # [ 5] local 10.10.4.6 port 5201 connected to 10.10.2.9 port 54972 # [ ID] Interval Transfer Bitrate # [ 5] 0.00-1.00 sec 4.67 GBytes 40.1 Gbits/sec # [ 5] 1.00-2.00 sec 4.87 GBytes 41.8 Gbits/sec # [ 5] 2.00-3.00 sec 4.86 GBytes 41.8 Gbits/sec # [ 5] 3.00-4.00 sec 4.85 GBytes 41.7 Gbits/sec # [ 5] 4.00-5.00 sec 4.93 GBytes 42.4 Gbits/sec # [ 5] 5.00-5.00 sec 384 KBytes 41.4 Gbits/sec # - - - - - - - - - - - - - - - - - - - - - - - - - # [ ID] Interval Transfer Bitrate # [ 5] 0.00-5.00 sec 24.2 GBytes 41.6 Gbits/sec receiver - UDP 사용, 역방향 모드(-R)
# 클라이언트 파드에서 아래 명령 실행 $ kubectl exec -it deploy/iperf3-client -- iperf3 -c iperf3-server -u -b 20G # => Connecting to host iperf3-server, port 5201 # [ 5] local 10.10.2.9 port 41928 connected to 10.200.1.166 port 5201 # [ ID] Interval Transfer Bitrate Total Datagrams # [ 5] 0.00-1.00 sec 161 MBytes 1.35 Gbits/sec 116453 # [ 5] 1.00-2.00 sec 187 MBytes 1.57 Gbits/sec 135745 # [ 5] 2.00-3.00 sec 163 MBytes 1.36 Gbits/sec 117693 # [ 5] 3.00-4.00 sec 220 MBytes 1.84 Gbits/sec 159109 # [ 5] 4.00-5.00 sec 168 MBytes 1.41 Gbits/sec 121705 # [ 5] 5.00-6.00 sec 183 MBytes 1.54 Gbits/sec 132730 # [ 5] 6.00-7.00 sec 184 MBytes 1.54 Gbits/sec 133267 # [ 5] 7.00-8.00 sec 158 MBytes 1.32 Gbits/sec 114073 # [ 5] 8.00-9.00 sec 171 MBytes 1.44 Gbits/sec 124005 # [ 5] 9.00-10.00 sec 160 MBytes 1.35 Gbits/sec 116175 # - - - - - - - - - - - - - - - - - - - - - - - - - # [ ID] Interval Transfer Bitrate Jitter Lost/Total Datagrams # [ 5] 0.00-10.00 sec 1.71 GBytes 1.47 Gbits/sec 0.000 ms 0/1270955 (0%) sender # [ 5] 0.00-10.00 sec 1.68 GBytes 1.44 Gbits/sec 0.008 ms 28438/1270955 (2.2%) receiver # 서버 파드 로그 확인 : 기본 5201 포트 Listen $ kubectl logs -l app=iperf3-server -f # => ----------------------------------------------------------- # Server listening on 5201 (test #3) # ----------------------------------------------------------- # Accepted connection from 10.10.2.9, port 48546 # [ 5] local 10.10.4.6 port 5201 connected to 10.10.2.9 port 41928 # [ ID] Interval Transfer Bitrate Jitter Lost/Total Datagrams # [ 5] 0.00-1.00 sec 158 MBytes 1.33 Gbits/sec 0.011 ms 2000/116449 (1.7%) # [ 5] 1.00-2.00 sec 180 MBytes 1.51 Gbits/sec 0.009 ms 5401/135743 (4%) # [ 5] 2.00-3.00 sec 161 MBytes 1.35 Gbits/sec 0.011 ms 1241/117696 (1.1%) # [ 5] 3.00-4.00 sec 215 MBytes 1.81 Gbits/sec 0.009 ms 3132/159105 (2%) # [ 5] 4.00-5.00 sec 165 MBytes 1.39 Gbits/sec 0.007 ms 2073/121704 (1.7%) # [ 5] 5.00-6.00 sec 179 MBytes 1.51 Gbits/sec 0.008 ms 2758/132731 (2.1%) # [ 5] 6.00-7.00 sec 181 MBytes 1.52 Gbits/sec 0.009 ms 2397/133243 (1.8%) # [ 5] 7.00-8.00 sec 153 MBytes 1.28 Gbits/sec 0.007 ms 3612/114097 (3.2%) # [ 5] 8.00-9.00 sec 166 MBytes 1.39 Gbits/sec 0.009 ms 3707/124005 (3%) # [ 5] 9.00-10.00 sec 158 MBytes 1.32 Gbits/sec 0.009 ms 2117/116179 (1.8%) # [ 5] 10.00-10.00 sec 4.24 KBytes 656 Mbits/sec 0.008 ms 0/3 (0%) # - - - - - - - - - - - - - - - - - - - - - - - - - # [ ID] Interval Transfer Bitrate Jitter Lost/Total Datagrams # [ 5] 0.00-10.00 sec 1.68 GBytes 1.44 Gbits/sec 0.008 ms 28438/1270955 (2.2%) receiver - TCP, 쌍방향 모드(-R)
# 클라이언트 파드에서 아래 명령 실행 $ kubectl exec -it deploy/iperf3-client -- iperf3 -c iperf3-server -t 5 --bidir # => Connecting to host iperf3-server, port 5201 # [ 5] local 10.10.2.9 port 59852 connected to 10.200.1.166 port 5201 # [ 7] local 10.10.2.9 port 59860 connected to 10.200.1.166 port 5201 # [ ID][Role] Interval Transfer Bitrate Retr Cwnd # [ 5][TX-C] 0.00-1.00 sec 3.85 GBytes 33.0 Gbits/sec 2249 1.55 MBytes # [ 7][RX-C] 0.00-1.00 sec 553 MBytes 4.64 Gbits/sec # [ 5][TX-C] 1.00-2.00 sec 1.77 GBytes 15.2 Gbits/sec 3105 1.07 MBytes # [ 7][RX-C] 1.00-2.00 sec 2.73 GBytes 23.4 Gbits/sec # [ 5][TX-C] 2.00-3.00 sec 1.64 GBytes 14.1 Gbits/sec 639 850 KBytes # [ 7][RX-C] 2.00-3.00 sec 2.93 GBytes 25.2 Gbits/sec # [ 5][TX-C] 3.00-4.00 sec 2.07 GBytes 17.8 Gbits/sec 0 853 KBytes # [ 7][RX-C] 3.00-4.00 sec 2.48 GBytes 21.3 Gbits/sec # [ 5][TX-C] 4.00-5.00 sec 1.22 GBytes 10.5 Gbits/sec 2 877 KBytes # [ 7][RX-C] 4.00-5.00 sec 3.25 GBytes 27.9 Gbits/sec # - - - - - - - - - - - - - - - - - - - - - - - - - # [ ID][Role] Interval Transfer Bitrate Retr # [ 5][TX-C] 0.00-5.00 sec 10.5 GBytes 18.1 Gbits/sec 5995 sender # [ 5][TX-C] 0.00-5.00 sec 10.5 GBytes 18.1 Gbits/sec receiver # [ 7][RX-C] 0.00-5.00 sec 11.9 GBytes 20.5 Gbits/sec 9201 sender # [ 7][RX-C] 0.00-5.00 sec 11.9 GBytes 20.5 Gbits/sec receiver # 서버 파드 로그 확인 : 기본 5201 포트 Listen $ kubectl logs -l app=iperf3-server -f # => ----------------------------------------------------------- # Server listening on 5201 (test #2) # ----------------------------------------------------------- # Accepted connection from 10.10.2.9, port 59836 # [ 5] local 10.10.4.6 port 5201 connected to 10.10.2.9 port 59852 # [ 8] local 10.10.4.6 port 5201 connected to 10.10.2.9 port 59860 # [ ID][Role] Interval Transfer Bitrate Retr Cwnd # [ 5][RX-S] 0.00-1.00 sec 3.85 GBytes 33.0 Gbits/sec # [ 8][TX-S] 0.00-1.00 sec 561 MBytes 4.70 Gbits/sec 59 1.02 MBytes # [ 5][RX-S] 1.00-2.00 sec 1.77 GBytes 15.2 Gbits/sec # [ 8][TX-S] 1.00-2.00 sec 2.73 GBytes 23.5 Gbits/sec 2468 1.09 MBytes # [ 5][RX-S] 2.00-3.00 sec 1.63 GBytes 14.0 Gbits/sec # [ 8][TX-S] 2.00-3.00 sec 2.92 GBytes 25.1 Gbits/sec 3327 1.10 MBytes # [ 5][RX-S] 3.00-4.00 sec 2.08 GBytes 17.9 Gbits/sec # [ 8][TX-S] 3.00-4.00 sec 2.49 GBytes 21.4 Gbits/sec 2315 1.13 MBytes # [ 5][RX-S] 4.00-5.00 sec 1.22 GBytes 10.5 Gbits/sec # [ 8][TX-S] 4.00-5.00 sec 3.25 GBytes 27.9 Gbits/sec 1032 1.16 MBytes # [ 5][RX-S] 5.00-5.00 sec 768 KBytes 27.6 Gbits/sec # [ 8][TX-S] 5.00-5.00 sec 1.25 MBytes 41.3 Gbits/sec 0 1.16 MBytes # - - - - - - - - - - - - - - - - - - - - - - - - - # [ ID][Role] Interval Transfer Bitrate Retr # [ 5][RX-S] 0.00-5.00 sec 10.5 GBytes 18.1 Gbits/sec receiver # [ 8][TX-S] 0.00-5.00 sec 11.9 GBytes 20.5 Gbits/sec 9201 sender - TCP 다중 스트림(30개), -P(number of parallel client streams to run)
# 클라이언트 파드에서 아래 명령 실행 $ kubectl exec -it deploy/iperf3-client -- iperf3 -c iperf3-server -t 10 -P 2 # => [ 5] local 10.10.2.9 port 41976 connected to 10.200.1.166 port 5201 # [ 7] local 10.10.2.9 port 41982 connected to 10.200.1.166 port 5201 # [ ID] Interval Transfer Bitrate Retr Cwnd # [ 5] 0.00-1.00 sec 2.87 GBytes 24.7 Gbits/sec 822 570 KBytes # [ 7] 0.00-1.00 sec 2.88 GBytes 24.7 Gbits/sec 159 576 KBytes # [SUM] 0.00-1.00 sec 5.75 GBytes 49.4 Gbits/sec 981 # - - - - - - - - - - - - - - - - - - - - - - - - - # ... # - - - - - - - - - - - - - - - - - - - - - - - - - # [ ID] Interval Transfer Bitrate Retr # [ 5] 0.00-10.00 sec 29.2 GBytes 25.1 Gbits/sec 3825 sender # [ 5] 0.00-10.00 sec 29.2 GBytes 25.1 Gbits/sec receiver # [ 7] 0.00-10.00 sec 29.2 GBytes 25.1 Gbits/sec 2063 sender # [ 7] 0.00-10.00 sec 29.2 GBytes 25.0 Gbits/sec receiver # [SUM] 0.00-10.00 sec 58.3 GBytes 50.1 Gbits/sec 5888 sender # [SUM] 0.00-10.00 sec 58.3 GBytes 50.1 Gbits/sec receiver # 서버 파드 로그 확인 : 기본 5201 포트 Listen $ kubectl logs -l app=iperf3-server -f # => ----------------------------------------------------------- # Server listening on 5201 (test #4) # ----------------------------------------------------------- # Accepted connection from 10.10.2.9, port 41962 # [ 5] local 10.10.4.6 port 5201 connected to 10.10.2.9 port 41976 # [ 8] local 10.10.4.6 port 5201 connected to 10.10.2.9 port 41982 # [ ID] Interval Transfer Bitrate # [ 5] 0.00-1.00 sec 2.87 GBytes 24.6 Gbits/sec # [ 8] 0.00-1.00 sec 2.87 GBytes 24.7 Gbits/sec # [SUM] 0.00-1.00 sec 5.74 GBytes 49.3 Gbits/sec # - - - - - - - - - - - - - - - - - - - - - - - - - # ... # - - - - - - - - - - - - - - - - - - - - - - - - - # [ ID] Interval Transfer Bitrate # [ 5] 0.00-10.00 sec 29.2 GBytes 25.1 Gbits/sec receiver # [ 8] 0.00-10.00 sec 29.2 GBytes 25.0 Gbits/sec receiver # [SUM] 0.00-10.00 sec 58.3 GBytes 50.1 Gbits/sec receiver - 실습결과
iperf3 -c 127.0.0.1 -t 5로 측정하였을때는 호스트에서는 67.1 Gbits/sec 였던것에 반해, 쿠버네티스를 통하면 41.6 Gbits/sec로 측정됩니다.- 쿠버네티스도 로컬호스트에서 docker로 실행되는데 kube-proxy, iptables 포워딩 등의 오버헤드로 인해 발생하는것 같습니다.
- UDP의 경우에도
iperf3 -c 127.0.0.1 -u -b 20G로 측정했을때 호스트에서는 20.0 Gbits/sec가 나오는데, 쿠버네티스를 통하면 1.41 Gbits/sec로 측정됩니다.- UDP는 더 오버헤드가 심한데 원인을 찾아봐야 할것 같습니다.
- 이번 실습을 통해 다양한 네트워크 CNI, 설정등을 변경해가며 최적의 설정을 찾아보는 방법을 배워보았습니다.
- 테스트 환경 배포
마치며
실습을 할수록 점점 더 iptables과 친숙해지는것 같습니다. 눈에 익은게 많아지고는 있지만, nftables라던지 ipvs라던지, eBPF라던지 아직 갈길이 멉니다. 😅
새삼스레 스터디를 진행하시는 가시다님을 비롯해서 조력자 분들도 정말 대단하다는 생각이 듭니다.
그리고 내용들 및 그림들이 가시다님이 집필하신 책에서 많이 가져왔습니다.
책이 출판되면 꼭 구매해서 읽어보겠습니다!
이제 스터디도 중반을 향해 달려가고 있습니다. 남은 날들도 스터디에서 생존할 수 있기를 바랍니다. ![]()