[Cilium] Cilium ServiceMesh
들어가며
이번 포스트에서는 ServiceMesh이란 무엇인가와 등장배경을 알아보고, Cilium에서 제공하는 ServiceMesh의 각 기능들에 대해 실습을 통하여 알아보도록 하겠습니다.
실습 환경 구성
- 이번 실습에서는 다음의 구성으로 실습 환경을 구성합니다.
- 버전 : Kubernetes 1.33.4, Cilium 1.18.1, pwru
-
기본 배포 가상 머신 : k8s-ctr, k8s-w1, router
- k8s-ctr spec : vCPU 4, Mem 2560
- k8s-w1 spec : vCPU 4, Mem 2560
- router : router : 192.168.10.0/24 ↔ 192.168.20.0/24 대역 라우팅 역할, k8s 에 join 되지 않은 서버입니다.
- 실습 동작에 필요한 static routing이 설저된 상태로 배포 됩니다.
실습환경 배포 파일
-
Vagrantfile : 가상머신 정의, 부팅 시 초기 프로비저닝 설정을 포함하는 Vagrantfile입니다.
# Variables K8SV = '1.33.4-1.1' # Kubernetes Version : apt list -a kubelet , ex) 1.32.5-1.1 CONTAINERDV = '1.7.27-1' # Containerd Version : apt list -a containerd.io , ex) 1.6.33-1 CILIUMV = '1.18.1' # Cilium CNI Version : https://github.com/cilium/cilium/tags N = 1 # max number of worker nodes # Base Image https://portal.cloud.hashicorp.com/vagrant/discover/bento/ubuntu-24.04 BOX_IMAGE = "bento/ubuntu-24.04" BOX_VERSION = "202508.03.0" Vagrant.configure("2") do |config| #-ControlPlane Node config.vm.define "k8s-ctr" do |subconfig| subconfig.vm.box = BOX_IMAGE subconfig.vm.box_version = BOX_VERSION subconfig.vm.provider "virtualbox" do |vb| vb.customize ["modifyvm", :id, "--groups", "/Cilium-Lab"] vb.customize ["modifyvm", :id, "--nicpromisc2", "allow-all"] vb.name = "k8s-ctr" vb.cpus = 2 vb.memory = 2560 vb.linked_clone = true end subconfig.vm.host_name = "k8s-ctr" subconfig.vm.network "private_network", ip: "192.168.10.100" subconfig.vm.network "forwarded_port", guest: 22, host: 60000, auto_correct: true, id: "ssh" subconfig.vm.synced_folder "./", "/vagrant", disabled: true subconfig.vm.provision "shell", path: "init_cfg.sh", args: [ K8SV, CONTAINERDV ] subconfig.vm.provision "shell", path: "k8s-ctr.sh", args: [ N, CILIUMV, K8SV ] subconfig.vm.provision "shell", path: "route-add1.sh" end #-Worker Nodes Subnet1 (1..N).each do |i| config.vm.define "k8s-w#{i}" do |subconfig| subconfig.vm.box = BOX_IMAGE subconfig.vm.box_version = BOX_VERSION subconfig.vm.provider "virtualbox" do |vb| vb.customize ["modifyvm", :id, "--groups", "/Cilium-Lab"] vb.customize ["modifyvm", :id, "--nicpromisc2", "allow-all"] vb.name = "k8s-w#{i}" vb.cpus = 2 vb.memory = 1536 vb.linked_clone = true end subconfig.vm.host_name = "k8s-w#{i}" subconfig.vm.network "private_network", ip: "192.168.10.10#{i}" subconfig.vm.network "forwarded_port", guest: 22, host: "6000#{i}", auto_correct: true, id: "ssh" subconfig.vm.synced_folder "./", "/vagrant", disabled: true subconfig.vm.provision "shell", path: "init_cfg.sh", args: [ K8SV, CONTAINERDV] subconfig.vm.provision "shell", path: "k8s-w.sh" subconfig.vm.provision "shell", path: "route-add1.sh" end end #-Router Node config.vm.define "router" do |subconfig| subconfig.vm.box = BOX_IMAGE subconfig.vm.box_version = BOX_VERSION subconfig.vm.provider "virtualbox" do |vb| vb.customize ["modifyvm", :id, "--groups", "/Cilium-Lab"] vb.name = "router" vb.cpus = 1 vb.memory = 768 vb.linked_clone = true end subconfig.vm.host_name = "router" subconfig.vm.network "private_network", ip: "192.168.10.200" subconfig.vm.network "forwarded_port", guest: 22, host: 60009, auto_correct: true, id: "ssh" subconfig.vm.network "private_network", ip: "192.168.20.200", auto_config: false subconfig.vm.synced_folder "./", "/vagrant", disabled: true subconfig.vm.provision "shell", path: "router.sh" end end -
init_cfg.sh : args 참고하여 초기 설정을 수행하는 스크립트입니다. pwru도 설치합니다.
#!/usr/bin/env bash echo ">>>> Initial Config Start <<<<" echo "[TASK 1] Setting Profile & Bashrc" echo 'alias vi=vim' >> /etc/profile echo "sudo su -" >> /home/vagrant/.bashrc ln -sf /usr/share/zoneinfo/Asia/Seoul /etc/localtime # Change Timezone echo "[TASK 2] Disable AppArmor" systemctl stop ufw && systemctl disable ufw >/dev/null 2>&1 systemctl stop apparmor && systemctl disable apparmor >/dev/null 2>&1 echo "[TASK 3] Disable and turn off SWAP" swapoff -a && sed -i '/swap/s/^/#/' /etc/fstab echo "[TASK 4] Install Packages" apt update -qq >/dev/null 2>&1 apt-get install apt-transport-https ca-certificates curl gpg -y -qq >/dev/null 2>&1 # Download the public signing key for the Kubernetes package repositories. mkdir -p -m 755 /etc/apt/keyrings K8SMMV=$(echo $1 | sed -En 's/^([0-9]+\.[0-9]+)\..*/\1/p') curl -fsSL https://pkgs.k8s.io/core:/stable:/v$K8SMMV/deb/Release.key | sudo gpg --dearmor -o /etc/apt/keyrings/kubernetes-apt-keyring.gpg echo "deb [signed-by=/etc/apt/keyrings/kubernetes-apt-keyring.gpg] https://pkgs.k8s.io/core:/stable:/v$K8SMMV/deb/ /" >> /etc/apt/sources.list.d/kubernetes.list curl -fsSL https://download.docker.com/linux/ubuntu/gpg -o /etc/apt/keyrings/docker.asc echo "deb [arch=$(dpkg --print-architecture) signed-by=/etc/apt/keyrings/docker.asc] https://download.docker.com/linux/ubuntu $(. /etc/os-release && echo "$VERSION_CODENAME") stable" | tee /etc/apt/sources.list.d/docker.list > /dev/null # packets traversing the bridge are processed by iptables for filtering echo 1 > /proc/sys/net/ipv4/ip_forward echo "net.ipv4.ip_forward = 1" >> /etc/sysctl.d/k8s.conf # enable br_netfilter for iptables modprobe br_netfilter modprobe overlay echo "br_netfilter" >> /etc/modules-load.d/k8s.conf echo "overlay" >> /etc/modules-load.d/k8s.conf echo "[TASK 5] Install Kubernetes components (kubeadm, kubelet and kubectl)" # Update the apt package index, install kubelet, kubeadm and kubectl, and pin their version apt update >/dev/null 2>&1 # apt list -a kubelet ; apt list -a containerd.io apt-get install -y kubelet=$1 kubectl=$1 kubeadm=$1 containerd.io=$2 >/dev/null 2>&1 apt-mark hold kubelet kubeadm kubectl >/dev/null 2>&1 # containerd configure to default and cgroup managed by systemd containerd config default > /etc/containerd/config.toml sed -i 's/SystemdCgroup = false/SystemdCgroup = true/g' /etc/containerd/config.toml # avoid WARN&ERRO(default endpoints) when crictl run cat <<EOF > /etc/crictl.yaml runtime-endpoint: unix:///run/containerd/containerd.sock image-endpoint: unix:///run/containerd/containerd.sock EOF # ready to install for k8s systemctl restart containerd && systemctl enable containerd systemctl enable --now kubelet echo "[TASK 6] Install Packages & Helm" export DEBIAN_FRONTEND=noninteractive apt-get install -y bridge-utils sshpass net-tools conntrack ngrep tcpdump ipset arping wireguard jq yq tree bash-completion unzip kubecolor termshark >/dev/null 2>&1 curl -s https://raw.githubusercontent.com/helm/helm/master/scripts/get-helm-3 | bash >/dev/null 2>&1 echo "[TASK 7] Install pwru" CLI_ARCH=amd64 if [ "$(uname -m)" = "aarch64" ]; then CLI_ARCH=arm64; fi wget https://github.com/cilium/pwru/releases/download/v1.0.10/pwru-linux-${CLI_ARCH}.tar.gz >/dev/null 2>&1 tar -xvzf pwru-linux-${CLI_ARCH}.tar.gz >/dev/null 2>&1 mv pwru /usr/local/bin/pwru >/dev/null 2>&1 # echo "[TASK 8] Change MTU for eth1" # ip link set dev eth1 mtu 9000 echo ">>>> Initial Config End <<<<" -
k8s-ctr.sh : kubeadm init를 통하여 kubernetes controlplane 노드를 설정하고 Cilium CNI 설치, 편리성 설정(k, kc, k9s)하는 스크립트입니다. local-path-storageclass와 metrics-server도 설치합니다.
#!/usr/bin/env bash echo ">>>> K8S Controlplane config Start <<<<" echo "[TASK 1] Initial Kubernetes" curl --silent -o /root/kubeadm-init-ctr-config.yaml https://raw.githubusercontent.com/gasida/vagrant-lab/refs/heads/main/cilium-study/kubeadm-init-ctr-config.yaml K8SMMV=$(echo $3 | sed -En 's/^([0-9]+\.[0-9]+\.[0-9]+).*/\1/p') sed -i "s/K8S_VERSION_PLACEHOLDER/v${K8SMMV}/g" /root/kubeadm-init-ctr-config.yaml kubeadm init --config="/root/kubeadm-init-ctr-config.yaml" >/dev/null 2>&1 echo "[TASK 2] Setting kube config file" mkdir -p /root/.kube cp -i /etc/kubernetes/admin.conf /root/.kube/config chown $(id -u):$(id -g) /root/.kube/config echo "[TASK 3] Source the completion" echo 'source <(kubectl completion bash)' >> /etc/profile echo 'source <(kubeadm completion bash)' >> /etc/profile echo "[TASK 4] Alias kubectl to k" echo 'alias k=kubectl' >> /etc/profile echo 'alias kc=kubecolor' >> /etc/profile echo 'complete -F __start_kubectl k' >> /etc/profile echo "[TASK 5] Install Kubectx & Kubens" git clone https://github.com/ahmetb/kubectx /opt/kubectx >/dev/null 2>&1 ln -s /opt/kubectx/kubens /usr/local/bin/kubens ln -s /opt/kubectx/kubectx /usr/local/bin/kubectx echo "[TASK 6] Install Kubeps & Setting PS1" git clone https://github.com/jonmosco/kube-ps1.git /root/kube-ps1 >/dev/null 2>&1 cat <<"EOT" >> /root/.bash_profile source /root/kube-ps1/kube-ps1.sh KUBE_PS1_SYMBOL_ENABLE=true function get_cluster_short() { echo "$1" | cut -d . -f1 } KUBE_PS1_CLUSTER_FUNCTION=get_cluster_short KUBE_PS1_SUFFIX=') ' PS1='$(kube_ps1)'$PS1 EOT kubectl config rename-context "kubernetes-admin@kubernetes" "HomeLab" >/dev/null 2>&1 echo "[TASK 7] Install Cilium CNI" NODEIP=$(ip -4 addr show eth1 | grep -oP '(?<=inet\s)\d+(\.\d+){3}') helm repo add cilium https://helm.cilium.io/ >/dev/null 2>&1 helm repo update >/dev/null 2>&1 helm install cilium cilium/cilium --version $2 --namespace kube-system \ --set k8sServiceHost=192.168.10.100 --set k8sServicePort=6443 \ --set ipam.mode="cluster-pool" --set ipam.operator.clusterPoolIPv4PodCIDRList={"172.20.0.0/16"} --set ipv4NativeRoutingCIDR=172.20.0.0/16 \ --set routingMode=native --set autoDirectNodeRoutes=true --set endpointRoutes.enabled=true --set directRoutingSkipUnreachable=true \ --set kubeProxyReplacement=true --set bpf.masquerade=true --set installNoConntrackIptablesRules=true \ --set endpointHealthChecking.enabled=false --set healthChecking=false \ --set hubble.enabled=true --set hubble.relay.enabled=true --set hubble.ui.enabled=true \ --set hubble.ui.service.type=NodePort --set hubble.ui.service.nodePort=30003 \ --set prometheus.enabled=true --set operator.prometheus.enabled=true --set hubble.metrics.enableOpenMetrics=true \ --set hubble.metrics.enabled="{dns,drop,tcp,flow,port-distribution,icmp,httpV2:exemplars=true;labelsContext=source_ip\,source_namespace\,source_workload\,destination_ip\,destination_namespace\,destination_workload\,traffic_direction}" \ --set ingressController.enabled=true --set ingressController.loadbalancerMode=shared --set loadBalancer.l7.backend=envoy \ --set localRedirectPolicy=true --set l2announcements.enabled=true \ --set operator.replicas=1 --set debug.enabled=true >/dev/null 2>&1 echo "[TASK 8] Install Cilium / Hubble CLI" CILIUM_CLI_VERSION=$(curl -s https://raw.githubusercontent.com/cilium/cilium-cli/main/stable.txt) CLI_ARCH=amd64 if [ "$(uname -m)" = "aarch64" ]; then CLI_ARCH=arm64; fi curl -L --fail --remote-name-all https://github.com/cilium/cilium-cli/releases/download/${CILIUM_CLI_VERSION}/cilium-linux-${CLI_ARCH}.tar.gz >/dev/null 2>&1 tar xzvfC cilium-linux-${CLI_ARCH}.tar.gz /usr/local/bin rm cilium-linux-${CLI_ARCH}.tar.gz HUBBLE_VERSION=$(curl -s https://raw.githubusercontent.com/cilium/hubble/master/stable.txt) HUBBLE_ARCH=amd64 if [ "$(uname -m)" = "aarch64" ]; then HUBBLE_ARCH=arm64; fi curl -L --fail --remote-name-all https://github.com/cilium/hubble/releases/download/$HUBBLE_VERSION/hubble-linux-${HUBBLE_ARCH}.tar.gz >/dev/null 2>&1 tar xzvfC hubble-linux-${HUBBLE_ARCH}.tar.gz /usr/local/bin rm hubble-linux-${HUBBLE_ARCH}.tar.gz echo "[TASK 9] Remove node taint" kubectl taint nodes k8s-ctr node-role.kubernetes.io/control-plane- echo "[TASK 10] local DNS with hosts file" echo "192.168.10.100 k8s-ctr" >> /etc/hosts echo "192.168.10.200 router" >> /etc/hosts echo "192.168.20.100 k8s-w0" >> /etc/hosts for (( i=1; i<=$1; i++ )); do echo "192.168.10.10$i k8s-w$i" >> /etc/hosts; done echo "[TASK 11] Dynamically provisioning persistent local storage with Kubernetes" kubectl apply -f https://raw.githubusercontent.com/rancher/local-path-provisioner/v0.0.31/deploy/local-path-storage.yaml >/dev/null 2>&1 kubectl patch storageclass local-path -p '{"metadata": {"annotations":{"storageclass.kubernetes.io/is-default-class":"true"}}}' >/dev/null 2>&1 # echo "[TASK 12] Install Prometheus & Grafana" # kubectl apply -f https://raw.githubusercontent.com/cilium/cilium/1.18.0/examples/kubernetes/addons/prometheus/monitoring-example.yaml >/dev/null 2>&1 # kubectl patch svc -n cilium-monitoring prometheus -p '{"spec": {"type": "NodePort", "ports": [{"port": 9090, "targetPort": 9090, "nodePort": 30001}]}}' >/dev/null 2>&1 # kubectl patch svc -n cilium-monitoring grafana -p '{"spec": {"type": "NodePort", "ports": [{"port": 3000, "targetPort": 3000, "nodePort": 30002}]}}' >/dev/null 2>&1 # echo "[TASK 12] Install Prometheus Stack" # helm repo add prometheus-community https://prometheus-community.github.io/helm-charts >/dev/null 2>&1 # cat <<EOT > monitor-values.yaml # prometheus: # prometheusSpec: # scrapeInterval: "15s" # evaluationInterval: "15s" # service: # type: NodePort # nodePort: 30001 # grafana: # defaultDashboardsTimezone: Asia/Seoul # adminPassword: prom-operator # service: # type: NodePort # nodePort: 30002 # alertmanager: # enabled: false # defaultRules: # create: false # prometheus-windows-exporter: # prometheus: # monitor: # enabled: false # EOT # helm install kube-prometheus-stack prometheus-community/kube-prometheus-stack --version 75.15.1 \ # -f monitor-values.yaml --create-namespace --namespace monitoring >/dev/null 2>&1 echo "[TASK 13] Install Metrics-server" helm repo add metrics-server https://kubernetes-sigs.github.io/metrics-server/ >/dev/null 2>&1 helm upgrade --install metrics-server metrics-server/metrics-server --set 'args[0]=--kubelet-insecure-tls' -n kube-system >/dev/null 2>&1 echo "[TASK 14] Install k9s" CLI_ARCH=amd64 if [ "$(uname -m)" = "aarch64" ]; then CLI_ARCH=arm64; fi wget https://github.com/derailed/k9s/releases/latest/download/k9s_linux_${CLI_ARCH}.deb -O /tmp/k9s_linux_${CLI_ARCH}.deb >/dev/null 2>&1 apt install /tmp/k9s_linux_${CLI_ARCH}.deb >/dev/null 2>&1 echo ">>>> K8S Controlplane Config End <<<<"-
kubeadm-init-ctr-config.yaml
apiVersion: kubeadm.k8s.io/v1beta4
kind: InitConfiguration
bootstrapTokens:
- token: "123456.1234567890123456"
  ttl: "0s"
  usages:
  - signing
  - authentication
localAPIEndpoint:
  advertiseAddress: "192.168.10.100"
nodeRegistration:
  kubeletExtraArgs:
    - name: node-ip
      value: "192.168.10.100"
  criSocket: "unix:///run/containerd/containerd.sock"
---
apiVersion: kubeadm.k8s.io/v1beta4
kind: ClusterConfiguration
kubernetesVersion: "K8S_VERSION_PLACEHOLDER"
networking:
  podSubnet: "10.244.0.0/16"
  serviceSubnet: "10.96.0.0/16"
proxy:
  disabled: true
-
-
k8s-w.sh : kubernetes worker 노드 설정, kubeadm join 등을 수행하는 스크립트입니다.
#!/usr/bin/env bash echo ">>>> K8S Node config Start <<<<" echo "[TASK 1] K8S Controlplane Join" curl --silent -o /root/kubeadm-join-worker-config.yaml https://raw.githubusercontent.com/gasida/vagrant-lab/refs/heads/main/cilium-study/2w/kubeadm-join-worker-config.yaml NODEIP=$(ip -4 addr show eth1 | grep -oP '(?<=inet\s)\d+(\.\d+){3}') sed -i "s/NODE_IP_PLACEHOLDER/${NODEIP}/g" /root/kubeadm-join-worker-config.yaml kubeadm join --config="/root/kubeadm-join-worker-config.yaml" > /dev/null 2>&1 echo ">>>> K8S Node config End <<<<"-
kubeadm-join-worker-config.yaml
apiVersion: kubeadm.k8s.io/v1beta4
kind: JoinConfiguration
discovery:
  bootstrapToken:
    token: "123456.1234567890123456"
    apiServerEndpoint: "192.168.10.100:6443"
    unsafeSkipCAVerification: true
nodeRegistration:
  criSocket: "unix:///run/containerd/containerd.sock"
  kubeletExtraArgs:
    - name: node-ip
      value: "NODE_IP_PLACEHOLDER"
-
-
route-add1.sh : k8s node 들이 내부망과 통신을 위한 route 설정 스크립트입니다.
#!/usr/bin/env bash echo ">>>> Route Add Config Start <<<<" chmod 600 /etc/netplan/01-netcfg.yaml chmod 600 /etc/netplan/50-vagrant.yaml cat <<EOT>> /etc/netplan/50-vagrant.yaml routes: - to: 192.168.20.0/24 via: 192.168.10.200 EOT netplan apply echo ">>>> Route Add Config End <<<<" -
router.sh : router 역할, 간단 웹 서버 역할
#!/usr/bin/env bash

echo ">>>> Initial Config Start <<<<"


echo "[TASK 0] Setting eth2"
chmod 600 /etc/netplan/01-netcfg.yaml
chmod 600 /etc/netplan/50-vagrant.yaml

cat << EOT >> /etc/netplan/50-vagrant.yaml
    eth2:
      addresses:
      - 192.168.20.200/24
EOT

netplan apply


echo "[TASK 1] Setting Profile & Bashrc"
echo 'alias vi=vim' >> /etc/profile
echo "sudo su -" >> /home/vagrant/.bashrc
ln -sf /usr/share/zoneinfo/Asia/Seoul /etc/localtime


echo "[TASK 2] Disable AppArmor"
systemctl stop ufw && systemctl disable ufw >/dev/null 2>&1
systemctl stop apparmor && systemctl disable apparmor >/dev/null 2>&1


echo "[TASK 3] Add Kernel setting - IP Forwarding"
sed -i 's/#net.ipv4.ip_forward=1/net.ipv4.ip_forward=1/g' /etc/sysctl.conf
sysctl -p >/dev/null 2>&1


echo "[TASK 5] Install Packages"
export DEBIAN_FRONTEND=noninteractive
apt update -qq >/dev/null 2>&1
apt-get install net-tools jq yq tree ngrep tcpdump arping termshark -y -qq >/dev/null 2>&1


echo "[TASK 6] Install Apache"
apt install apache2 -y >/dev/null 2>&1
echo -e "<h1>Web Server : $(hostname)</h1>" > /var/www/html/index.html


echo ">>>> Initial Config End <<<<"
실습환경 배포
실습환경 배포
$ vagrant up
기본정보 확인
#
$ cat /etc/hosts
# => ...
#    127.0.2.1 k8s-ctr k8s-ctr
#    192.168.10.100 k8s-ctr
#    192.168.10.200 router
#    192.168.20.100 k8s-w0
#    192.168.10.101 k8s-w1
$ for i in k8s-w1 router ; do echo ">> node : $i <<"; sshpass -p 'vagrant' ssh -o StrictHostKeyChecking=no vagrant@$i hostname; echo; done
# => >> node : k8s-w1 <<
#    k8s-w1
#    >> node : router <<
#    router

# 클러스터 정보 확인
$ kubectl cluster-info
# => Kubernetes control plane is running at https://192.168.10.100:6443
#    CoreDNS is running at https://192.168.10.100:6443/api/v1/namespaces/kube-system/services/kube-dns:dns/proxy
$ kubectl cluster-info dump | grep -m 2 -E "cluster-cidr|service-cluster-ip-range"
# =>                             "--service-cluster-ip-range=10.96.0.0/16",
#                                "--cluster-cidr=10.244.0.0/16",
$ kubectl describe cm -n kube-system kubeadm-config
# => ...
#    networking:
#      dnsDomain: cluster.local
#      podSubnet: 10.244.0.0/16
#      serviceSubnet: 10.96.0.0/16
$ kubectl describe cm -n kube-system kubelet-config

# 노드 정보 : 상태, INTERNAL-IP 확인
$ ifconfig | grep -iEA1 'eth[0-9]:'
# => eth0: flags=4163<UP,BROADCAST,RUNNING,MULTICAST>  mtu 1500
#            inet 10.0.2.15  netmask 255.255.255.0  broadcast 10.0.2.255
#    --
#    eth1: flags=4163<UP,BROADCAST,RUNNING,MULTICAST>  mtu 1500
#            inet 192.168.10.100  netmask 255.255.255.0  broadcast 192.168.10.255
$ kubectl get node -owide
# => NAME      STATUS   ROLES           AGE   VERSION   INTERNAL-IP      EXTERNAL-IP   OS-IMAGE             KERNEL-VERSION     CONTAINER-RUNTIME
#    k8s-ctr   Ready    control-plane   15m   v1.33.4   192.168.10.100   <none>        Ubuntu 24.04.2 LTS   6.8.0-71-generic   containerd://1.7.27
#    k8s-w1    Ready    <none>          12m   v1.33.4   192.168.10.101   <none>        Ubuntu 24.04.2 LTS   6.8.0-71-generic   containerd://1.7.27

# 파드 정보 : 상태, 파드 IP 확인
$ kubectl get nodes -o jsonpath='{range .items[*]}{.metadata.name}{"\t"}{.spec.podCIDR}{"\n"}{end}'
# => k8s-ctr 10.244.0.0/24
#    k8s-w1  10.244.1.0/24
$ kubectl get ciliumnode -o json | grep podCIDRs -A2
# =>                     "podCIDRs": [
#                            "172.20.0.0/24"
#                        ],
#    --
#                        "podCIDRs": [
#                            "172.20.1.0/24"
#                        ],
$ kubectl get pod -A -owide
# => NAMESPACE            NAME                                      READY   STATUS    RESTARTS   AGE   IP               NODE      NOMINATED NODE   READINESS GATES
#    kube-system          cilium-2zkt5                              1/1     Running   0          12m   192.168.10.101   k8s-w1    <none>           <none>
#    kube-system          cilium-8gt4t                              1/1     Running   0          15m   192.168.10.100   k8s-ctr   <none>           <none>
#    kube-system          cilium-envoy-jhcs2                        1/1     Running   0          12m   192.168.10.101   k8s-w1    <none>           <none>
#    kube-system          cilium-envoy-txqxb                        1/1     Running   0          15m   192.168.10.100   k8s-ctr   <none>           <none>
#    kube-system          cilium-operator-7b4884dcdd-j5hnz          1/1     Running   0          15m   192.168.10.100   k8s-ctr   <none>           <none>
#    kube-system          hubble-relay-fdd49b976-wdn8n              1/1     Running   0          15m   172.20.0.78      k8s-ctr   <none>           <none>
#    kube-system          hubble-ui-655f947f96-gv9rw                2/2     Running   0          15m   172.20.0.220     k8s-ctr   <none>           <none>
#    local-path-storage   local-path-provisioner-74f9666bc9-c944v   1/1     Running   0          14m   172.20.0.176     k8s-ctr   <none>           <none>
#    ...
$ kubectl get ciliumendpoints -A
# => NAMESPACE            NAME                                      SECURITY IDENTITY   ENDPOINT STATE   IPV4           IPV6
#    kube-system          coredns-674b8bbfcf-2qlch                  24463               ready            172.20.0.158
#    kube-system          coredns-674b8bbfcf-ltzx4                  24463               ready            172.20.0.157
#    kube-system          hubble-relay-fdd49b976-wdn8n              16977               ready            172.20.0.78
#    kube-system          hubble-ui-655f947f96-gv9rw                40085               ready            172.20.0.220
#    kube-system          metrics-server-5dd7b49d79-9rlxq           931                 ready            172.20.0.4
#    local-path-storage   local-path-provisioner-74f9666bc9-c944v   9074                ready            172.20.0.176

# ipam 모드 확인
$ cilium config view | grep ^ipam
# => ipam                                              cluster-pool
#    ipam-cilium-node-update-rate                      15s

# iptables 확인 : TPROXY 관련 규칙 찾아보자!
$ iptables-save
$ iptables -t nat -S
$ iptables -t filter -S
$ iptables -t mangle -S
$ iptables -t raw -S

# 아래 iptables 룰들은 Pod ↔ Proxy ↔ 외부/내부 서비스 트래픽이 올바르게 프록시를 거치되, 커널 conntrack에 의해 방해받지 않도록 제어 by ChatGPT

$ iptables -t mangle -S | grep -i proxy
# => # "Pod로 가는 트래픽 중 proxy를 거쳐야 하는 경우" 패킷을 식별하기 위해 마킹. 이후 TPROXY 룰에서 이 마크(0x200)를 보고 프록시로 리다이렉션.
#    -A CILIUM_PRE_mangle ! -o lo -m socket --transparent -m mark ! --mark 0xe00/0xf00 -m mark ! --mark 0x800/0xf00 -m comment --comment "cilium: any->pod redirect proxied traffic to host proxy" -j MARK --set-xmark 0x200/0xffffffff
#    # Pod에서 나가는 DNS 요청(UDP/TCP 53) 을 Cilium host proxy(Envoy 기반)로 강제로 보내어[TPROXY로 리다이렉션 → 127.0.0.1:38715 (Cilium DNS egress proxy 포트)] L7 정책 적용 가능하게 만듦.
#    -A CILIUM_PRE_mangle -p tcp -m mark --mark 0xd9800200 -m comment --comment "cilium: TPROXY to host cilium-dns-egress proxy" -j TPROXY --on-port 32985 --on-ip 127.0.0.1 --tproxy-mark 0x200/0xffffffff
#    -A CILIUM_PRE_mangle -p udp -m mark --mark 0xd9800200 -m comment --comment "cilium: TPROXY to host cilium-dns-egress proxy" -j TPROXY --on-port 32985 --on-ip 127.0.0.1 --tproxy-mark 0x200/0xffffffff

$ iptables -t raw -S | grep -i proxy
# => # 프록시에서 나가는 리턴 트래픽은 NAT/conntrack이 꼬이지 않게 conntrack에서 제외. 즉, proxy ↔ pod 간 트래픽은 BPF가 직접 상태 관리.
#    -A CILIUM_OUTPUT_raw -o lxc+ -m mark --mark 0xa00/0xfffffeff -m comment --comment "cilium: NOTRACK for proxy return traffic" -j CT --notrack
#    -A CILIUM_OUTPUT_raw -o cilium_host -m mark --mark 0xa00/0xfffffeff -m comment --comment "cilium: NOTRACK for proxy return traffic" -j CT --notrack
#    # L7 proxy(Envoy) → upstream(원래 목적지) 트래픽도 conntrack에서 제외.
#    # 이유: Proxy는 자체적으로 연결 추적을 수행하므로 커널 conntrack과 이중 관리되면 충돌/성능 저하 발생.
#    -A CILIUM_OUTPUT_raw -o lxc+ -m mark --mark 0x800/0xe00 -m comment --comment "cilium: NOTRACK for L7 proxy upstream traffic" -j CT --notrack
#    -A CILIUM_OUTPUT_raw -o cilium_host -m mark --mark 0x800/0xe00 -m comment --comment "cilium: NOTRACK for L7 proxy upstream traffic" -j CT --notrack
#    # 앞에서 설명한 "proxy로 리다이렉션된 트래픽" 자체도 conntrack에서 제외.
#    # Proxy 앞뒤 트래픽 모두 커널 conntrack 대신 Cilium/BPF/Envoy가 관리.
#    -A CILIUM_PRE_raw -m mark --mark 0x200/0xf00 -m comment --comment "cilium: NOTRACK for proxy traffic" -j CT --notrack
[k8s-ctr] Cilium 설치 정보 확인
# cilium 상태 확인
$ kubectl get cm -n kube-system cilium-config -o json | jq
$ cilium status
$ cilium config view | grep -E '^loadbalancer|l7'
# => enable-l7-proxy                                   true
#    loadbalancer-l7                                   envoy
#    loadbalancer-l7-algorithm                         round_robin
#    loadbalancer-l7-ports

#
$ kubectl exec -n kube-system -c cilium-agent -it ds/cilium -- cilium-dbg status --verbose
$ kubectl exec -n kube-system -c cilium-agent -it ds/cilium -- cilium-dbg metrics list
샘플 애플리케이션 배포 및 통신 문제 확인
샘플 애플리케이션 배포
# 샘플 애플리케이션 배포
$ cat << EOF | kubectl apply -f -
apiVersion: apps/v1
kind: Deployment
metadata:
  name: webpod
spec:
  replicas: 2
  selector:
    matchLabels:
      app: webpod
  template:
    metadata:
      labels:
        app: webpod
    spec:
      affinity:
        podAntiAffinity:
          requiredDuringSchedulingIgnoredDuringExecution:
          - labelSelector:
              matchExpressions:
              - key: app
                operator: In
                values:
                - sample-app
            topologyKey: "kubernetes.io/hostname"
      containers:
      - name: webpod
        image: traefik/whoami
        ports:
        - containerPort: 80
---
apiVersion: v1
kind: Service
metadata:
  name: webpod
  labels:
    app: webpod
spec:
  selector:
    app: webpod
  ports:
  - protocol: TCP
    port: 80
    targetPort: 80
  type: ClusterIP
EOF
# => deployment.apps/webpod created
#    service/webpod created

# k8s-ctr 노드에 curl-pod 파드 배포
$ cat <<EOF | kubectl apply -f -
apiVersion: v1
kind: Pod
metadata:
  name: curl-pod
  labels:
    app: curl
spec:
  nodeName: k8s-ctr
  containers:
  - name: curl
    image: nicolaka/netshoot
    command: ["tail"]
    args: ["-f", "/dev/null"]
  terminationGracePeriodSeconds: 0
EOF
# => pod/curl-pod created
통신 확인
# 배포 확인
$ kubectl get deploy,svc,ep webpod -owide
# => NAME                     READY   UP-TO-DATE   AVAILABLE   AGE   CONTAINERS   IMAGES           SELECTOR
#    deployment.apps/webpod   2/2     2            2           27s   webpod       traefik/whoami   app=webpod
#    NAME             TYPE        CLUSTER-IP     EXTERNAL-IP   PORT(S)   AGE   SELECTOR
#    service/webpod   ClusterIP   10.96.234.83   <none>        80/TCP    27s   app=webpod
#    NAME               ENDPOINTS                         AGE
#    endpoints/webpod   172.20.0.111:80,172.20.1.212:80   27s
$ kubectl get endpointslices -l app=webpod
$ kubectl get ciliumendpoints # IP 확인
# => NAME                      SECURITY IDENTITY   ENDPOINT STATE   IPV4           IPV6
#    curl-pod                  10893               ready            172.20.0.209
#    webpod-697b545f57-gsp8r   11530               ready            172.20.1.212
#    webpod-697b545f57-pwvhp   11530               ready            172.20.0.111

# 통신 문제 확인
$ kubectl exec -it curl-pod -- curl -s --connect-timeout 1 webpod | grep Hostname
$ kubectl exec -it curl-pod -- sh -c 'while true; do curl -s --connect-timeout 1 webpod | grep Hostname; echo "---" ; sleep 1; done'
# => Hostname: webpod-697b545f57-gsp8r
#    ---
#    Hostname: webpod-697b545f57-pwvhp
#    ---
#    Hostname: webpod-697b545f57-pwvhp
#    ...
# <span style="color: green;">👉 통신 문제가 없습니다!</span>

# cilium-dbg, map
$ kubectl exec -n kube-system ds/cilium -- cilium-dbg ip list
$ kubectl exec -n kube-system ds/cilium -- cilium-dbg endpoint list
$ kubectl exec -n kube-system ds/cilium -- cilium-dbg service list
$ kubectl exec -n kube-system ds/cilium -- cilium-dbg bpf lb list
$ kubectl exec -n kube-system ds/cilium -- cilium-dbg bpf nat list
$ kubectl exec -n kube-system ds/cilium -- cilium-dbg map list | grep -v '0             0'
$ kubectl exec -n kube-system ds/cilium -- cilium-dbg map get cilium_lb4_services_v2
$ kubectl exec -n kube-system ds/cilium -- cilium-dbg map get cilium_lb4_backends_v3
$ kubectl exec -n kube-system ds/cilium -- cilium-dbg map get cilium_lb4_reverse_nat
$ kubectl exec -n kube-system ds/cilium -- cilium-dbg map get cilium_ipcache_v2
pwru 간단 실습
- 로우레벨의 정보까지 모니터링 가능한 pwru(Packet, Where Are You)를 통해 차단 이유를 확인해 보는 실습을 진행해보겠습니다.
# 다운로드 https://github.com/cilium/pwru/releases : script 로 다운로드 되어 있음.
$ wget https://github.com/cilium/pwru/releases/download/v1.0.10/pwru-linux-arm64.tar.gz
$ tar -xvzf pwru-linux-arm64.tar.gz
$ mv pwru /usr/bin
$ pwru -h

# 1.1.1.1 목적지 차단 설정
$ iptables -t filter -I OUTPUT 1 -m tcp --proto tcp --dst 1.1.1.1/32 -j DROP

# curl 호출 : 아래 모니터링 후 호출
$ curl 1.1.1.1 -v

# pwru 모니터링 : 차단 이유 확인! SKB_DROP_REASON_NETFILTER_DROP
$ pwru 'dst host 1.1.1.1 and tcp and dst port 80'
# => 2025/08/21 23:45:36 Attaching kprobes (via kprobe)...
#    1667 / 1667 [----------------------------------------------------------] 100.00% 1270 p/s
#    2025/08/21 23:45:38 Attached (ignored 5)
#    2025/08/21 23:45:38 Listening for events..
#    SKB                CPU PROCESS          NETNS      MARK/x        IFACE       PROTO  MTU   LEN   TUPLE FUNC
#    0xffff000004cb58e8 3   ~r/bin/curl:8493 4026531840 0               0         0x0000 1500  60    10.0.2.15:60880->1.1.1.1:80(tcp) __ip_local_out
#    0xffff000004cb58e8 3   ~r/bin/curl:8493 4026531840 0               0         0x0800 1500  60    10.0.2.15:60880->1.1.1.1:80(tcp) nf_hook_slow
#    0xffff000004cb58e8 3   ~r/bin/curl:8493 4026531840 0               0         0x0800 1500  60    10.0.2.15:60880->1.1.1.1:80(tcp)
#       kfree_skb_reason(<span style="color: green;">SKB_DROP_REASON_NETFILTER_DROP</span>)
#       <span style="color: green;">👉 NETFILER에 의해 차단(DROP)됨을 확인할 수 있습니다.</span>
#    0xffff000004cb58e8 3   ~r/bin/curl:8493 4026531840 0               0         0x0800 1500  60    10.0.2.15:60880->1.1.1.1:80(tcp) skb_release_head_state
#    0xffff000004cb58e8 3   ~r/bin/curl:8493 4026531840 0               0         0x0800 0     60    10.0.2.15:60880->1.1.1.1:80(tcp) tcp_wfree
#    0xffff000004cb58e8 3   ~r/bin/curl:8493 4026531840 0               0         0x0800 0     60    10.0.2.15:60880->1.1.1.1:80(tcp) skb_release_data
#    0xffff000004cb58e8 3   ~r/bin/curl:8493 4026531840 0               0         0x0800 0     60    10.0.2.15:60880->1.1.1.1:80(tcp) kfree_skbmem
#    0xffff000004cb58e8 3   <empty>:0        4026531840 0               0         0x0800 0     60    10.0.2.15:60880->1.1.1.1:80(tcp) __skb_clone
#    0xffff000004cb58e8 3   <empty>:0        0          0               0         0x0800 0     60    10.0.2.15:60880->1.1.1.1:80(tcp) __copy_skb_header
#    0xffff000004cb58e8 3   <empty>:0        4026531840 0               0         0x0000 1500  60    10.0.2.15:60880->1.1.1.1:80(tcp) __ip_local_out
#    0xffff000004cb58e8 3   <empty>:0        4026531840 0               0         0x0800 1500  60    10.0.2.15:60880->1.1.1.1:80(tcp) nf_hook_slow
#    0xffff000004cb58e8 3   <empty>:0        4026531840 0               0         0x0800 1500  60    10.0.2.15:60880->1.1.1.1:80(tcp)
#       kfree_skb_reason(<span style="color: green;">SKB_DROP_REASON_NETFILTER_DROP</span>)
#    0xffff000004cb58e8 3   <empty>:0        4026531840 0               0         0x0800 1500  60    10.0.2.15:60880->1.1.1.1:80(tcp) skb_release_head_state
#    0xffff000004cb58e8 3   <empty>:0        4026531840 0               0         0x0800 0     60    10.0.2.15:60880->1.1.1.1:80(tcp) tcp_wfree
#    0xffff000004cb58e8 3   <empty>:0        4026531840 0               0         0x0800 0     60    10.0.2.15:60880->1.1.1.1:80(tcp) skb_release_data
#    0xffff000004cb58e8 3   <empty>:0        4026531840 0               0         0x0800 0     60    10.0.2.15:60880->1.1.1.1:80(tcp) kfree_skbmem
#    0xffff000004cb58e8 3   <empty>:0        4026531840 0               0         0x0800 0     60    10.0.2.15:60880->1.1.1.1:80(tcp) __skb_clone
#    0xffff000004cb58e8 3   <empty>:0        0          0               0         0x0800 0     60    10.0.2.15:60880->1.1.1.1:80(tcp) __copy_skb_header
#    0xffff000004cb58e8 3   <empty>:0        4026531840 0               0         0x0000 1500  60    10.0.2.15:60880->1.1.1.1:80(tcp) __ip_local_out
#    0xffff000004cb58e8 3   <empty>:0        4026531840 0               0         0x0800 1500  60    10.0.2.15:60880->1.1.1.1:80(tcp) nf_hook_slow
#    ^C2025/08/21 23:46:14 Received signal, exiting program..
#    2025/08/21 23:46:14 Detaching kprobes...
#    1662 / 1662 [------------------------------------------------------------------------------------------------------------------------------------------------------] 100.00% 33 p/s
- 통신이 잘 되는것을 확인하였고, 기본적인 점검을 마쳤으니 본격적으로 Cilium의 기능을 살펴보도록 하겠습니다.
Cilium Service Mesh
Service Mesh 소개
- Service Mesh는 마이크로서비스 아키텍처에서 서비스 간의 통신을 관리하고 모니터링하기 위한 인프라 계층입니다. 주로 L7 트래픽 관리, 보안, 모니터링, 로깅 등을 제공합니다.
- 등장 배경
- 기존에 하나의 모놀리식 애플리케이션이나 소수의 큰 서비스로 구성된 시스템에서는 서비스 간의 통신을 관리하기가 상대적으로 쉬웠습니다.
- 하지만 적게는 수십개, 많게는 수천개의 마이크로서비스가 존재하는 Micro Service Architecture 환경에서는 서비스 간의 통신을 관리하고 모니터링하기가 매우 복잡해집니다.
- MSA가 점점 보편화 됨에 따라 서비스 간의 통신을 관리하고 모니터링하기 위해 다음과 같은 기능이 필요하게 되었습니다.
- 서비스 디스커버리 : 서비스가 동적으로 생성되고 삭제되기 때문에, 서비스의 IP 주소나 포트등을 자동으로 찾아주는 기능
- 모니터링 : 서비스 간의 통신을 모니터링하고 성능을 측정하는 기능
- 로깅 : 서비스 간의 통신을 로깅하고 분석
- 트래픽 관리 : 서비스 간의 트래픽을 제어하고 관리하는 기능. Traffic Shifting, Circuit Breaker, Rate Limiting, Fault Injection 등의 기능을 포함
- 보안 : 서비스 간의 통신을 암호화하고 인증하는 기능
- 정책 관리 : 서비스 간의 통신을 제어하고 모니터링하기 위한 정책을 관리하는 기능
- 이러한 기능들을 서비스 단위로 언어별로 구현해야 했기에 복잡도가 증가하고, 코드 중복이 발생하게 됩니다.
- Service Mesh는 이러한 문제를 해결하기 위해 서비스 간의 통신을 관리하고 모니터링하기 위한 인프라 계층을 제공합니다. 이를 통해 개발자는 비즈니스 로직에 집중할 수 있고, 운영자는 서비스 간의 통신을 관리하고 모니터링하기가 쉬워집니다.
- 대표적인 Service Mesh에는 Istio, Linkerd, Consul 등이 있고, Cilium에서도 Cilium Service Mesh로 Service Mesh 기능을 제공합니다.
기본 동작
- 파드간 통신 경로에 프록시를 두고, 트래픽을 모니터링하고 제어하는 방식으로 동작합니다. 따라서 기존 애플리케이션 코드 변경 없이도 Service Mesh 기능을 사용할 수 있습니다.
- 기존 통신 환경

- Proxy를 도입하여, 애플리케이션 수정없이 모든 애플리케이션 통신을 프록시를 거치도록 합니다.
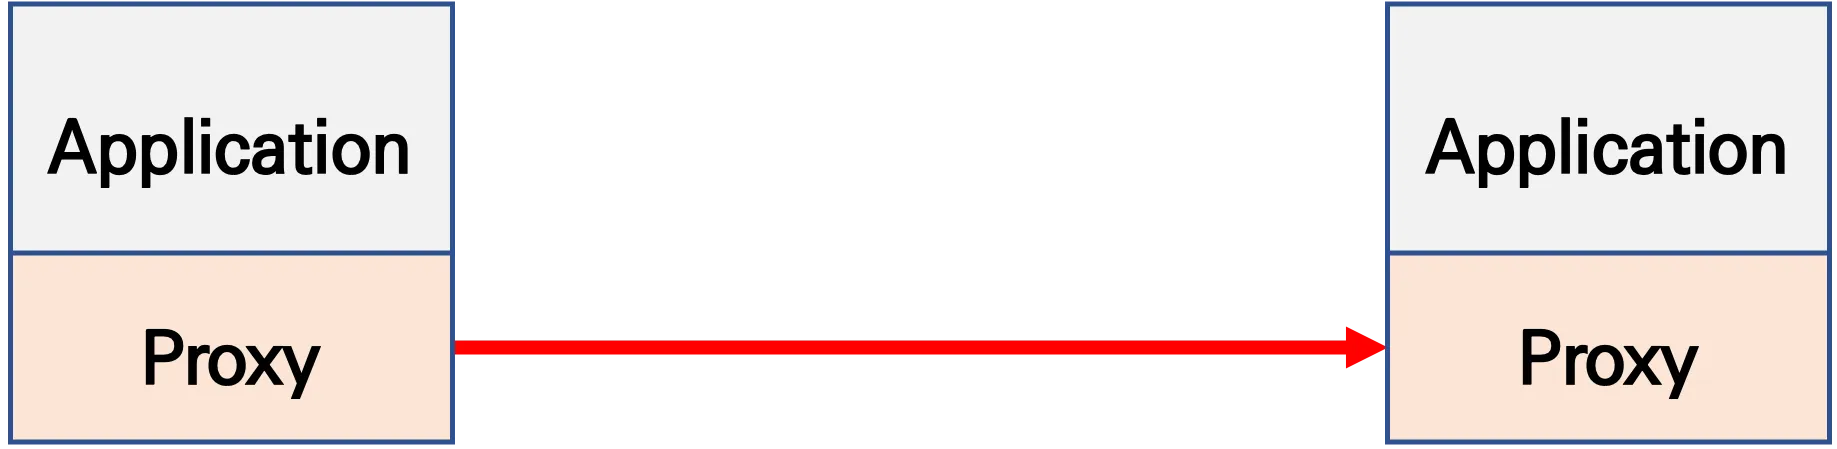
- 파드 내에 사이드카 컨테이너로 주입되어서 동작합니다.
- Proxy 컨테이너가 애플리케이션 트래픽을 가로채고, 이를 처리합니다.
- Proxy는 DataPlane 역할을 하며, 이를 중앙에서 관리하는 ControlPlane을 두고 중앙에서 정책을 관리합니다.
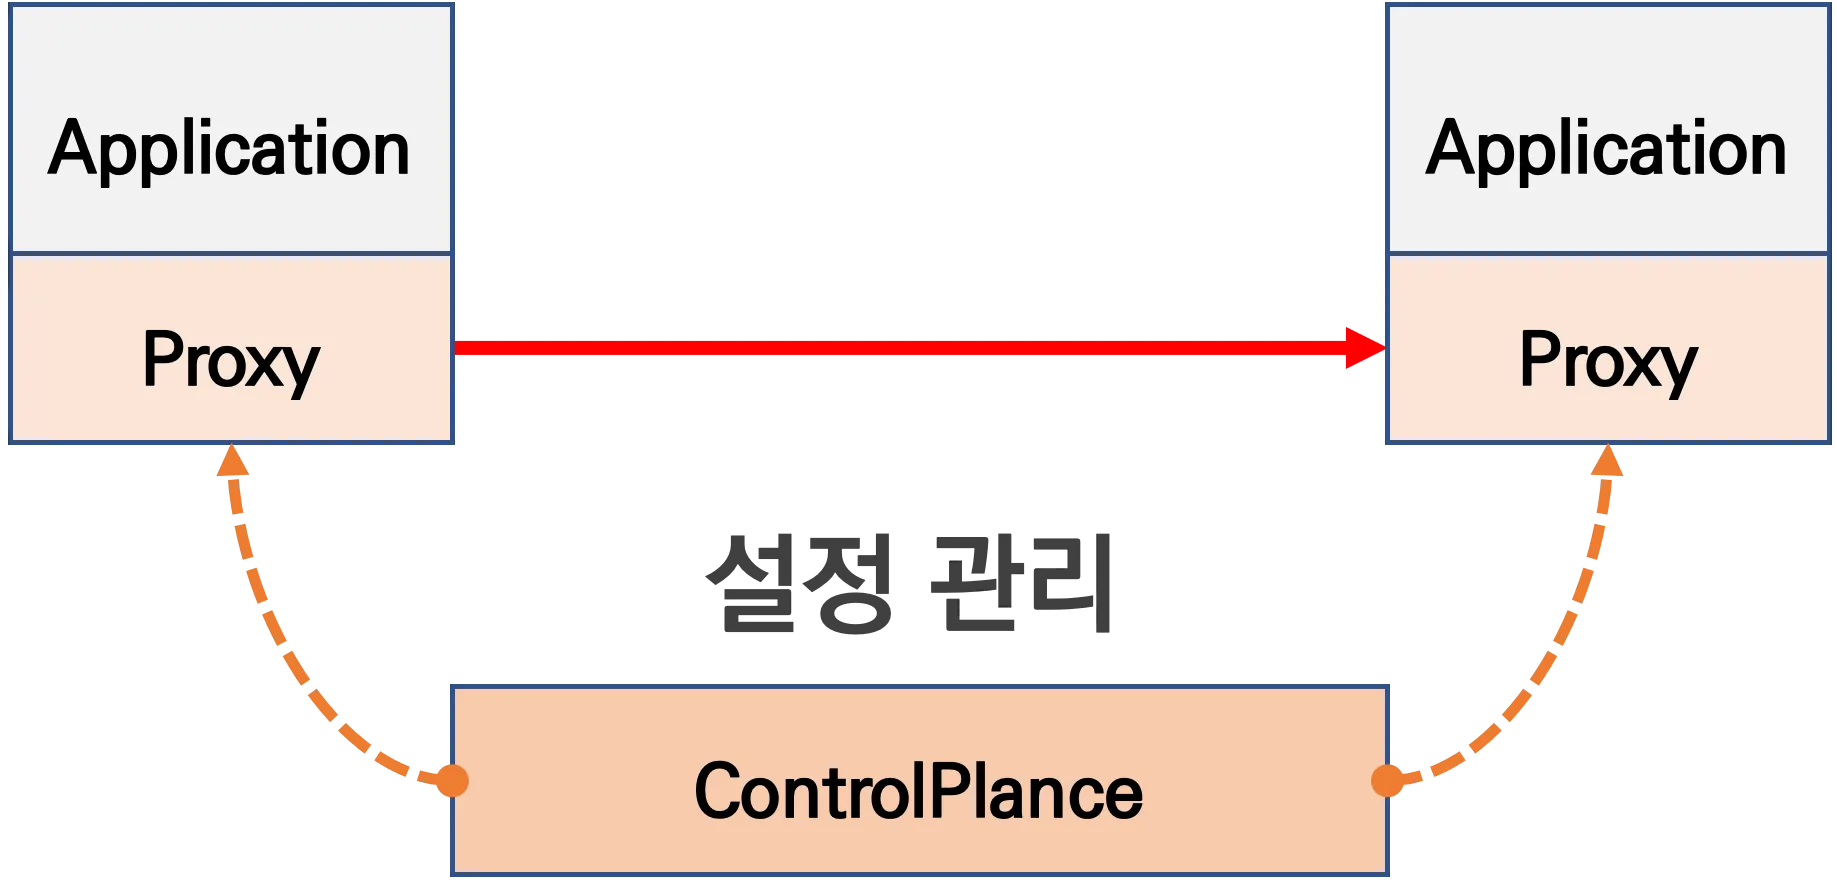
- Proxy는 ControlPlane에서 설정을 관리하며, 설정관리가 유연하고 풍부한 API를 지원합니다.
- 대표적인 Service Mesh의 Proxy로는 Google, Ibm, Lyft가 중심이 되어 개발하고있는 Envoy가 있습니다.
- 네트워크 투명성을 목표로 하며, 다양한 필터체인 (L3/L4, HTTP L7)을 지원하며, 동적 구성 API, API 기반 hot reload를 제공합니다.
- 기존 통신 환경
- 트래픽 모니터링 : 요청의 에러율, 지연(latency), 컨넥션 개수, 요청 개수 등의 메트릭을 모니터링하며, 특정 서비스간 혹은 특정 요청 경로를 필터링해서 모니터링 할 수 있습니다.
-
트래픽 컨트롤
- 트래픽 시프팅(Traffic shifting) : 예시) 99% 기존앱 + 1% 신규앱, 특정 단말/사용자는 신규앱에 전달하여 단계적으로 적용하는 카나리 배포 기능
- 서킷 브레이커(Circuit Breaker) : 목적지 마이크로서비스에 문제가 있을 시 접속을 차단하고 출발지 마이크로서비스에 요청 에러를 반환하여 연쇄 장애, 시스템 전제 장애 예방합니다.
- 폴트 인젝션(Fault Injection) : 의도적으로 요청을 지연 혹은 실패를 구현합니다.
- 속도 제한(Rate Limit) : 요청 개수를 제한하여 서비스가 과부하와 리소스 고갈을 방지합니다.
Cilium Service Mesh 소개
-
Docs, Youtube
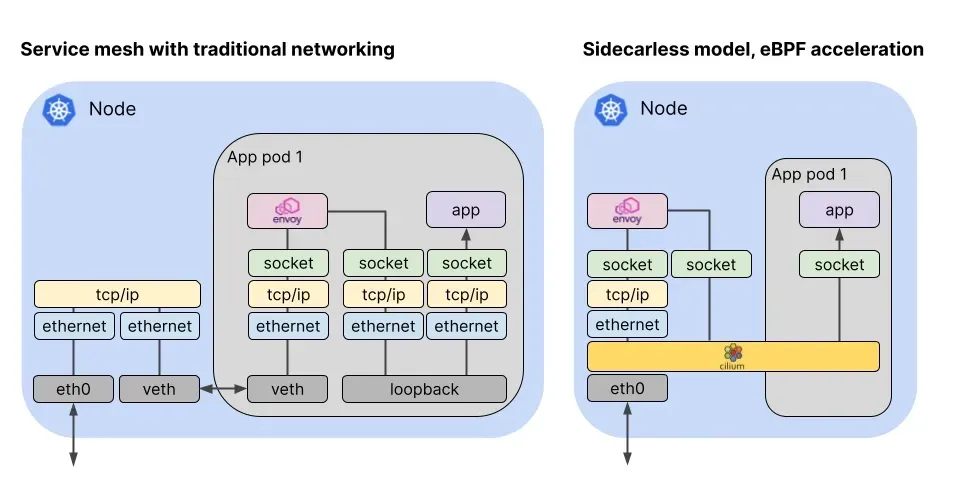
- Cilium Service Mesh는 Cilium의 eBPF 기반 네트워킹(L3/L4 담당)과 Envoy Proxy(L7 담당)를 결합하여 강력하고 유연한 Service Mesh 솔루션을 제공합니다.
-
L3/L4 수준 프로토콜 : eBPF가 수행
- IP, TCP, UDP 등 L3/L4 프로토콜을 지원하며, Cilium의 eBPF 기반 네트워킹 기능을 활용하여 고성능 트래픽 처리를 제공합니다.
- 위의 그림에서 보듯이, 기존의 Service Mesh는 L3/L4 트래픽을 처리하기 위해 iptables를 사용하고, 사이드카와 VETH를 통해서 트래픽을 가로채고 처리합니다. 이렇게 되면 TCP/IP 스택을 파드를 떠나기 전까지만도 3번이나 탐색해야 했습니다.
- Cilium Service Mesh는 eBPF를 통해 Proxy를 Host와 Kernel로 이동하고 사이드카를 제거하여, 트래픽을 가로채고 처리하는데 필요한 오버헤드를 최소화합니다.
-
L7 수준 프로토콜 : Envoy Proxy가 수행
- HTTP, Kafka, gRPC, DNS와 같은 애플리케이션 계층 프로토콜은 Envoy Proxy를 통해 처리됩니다.
- Cilium은 이미 타 Service Mesh에서 사이드카 형태로 사용하는 Envoy를 L7 정책이나 관측성(Observability) 기능을 위해 사용하고 있었습니다.
- 이미 Cilium이 Envoy를 사용하고 있기 때문에 자연스럽게 Service Mesh 기능을 추가할 수 있었습니다.
- 특히 다른 Service Mesh와 달리 Cilium Service Mesh는 Node당 하나의 Envoy Proxy만을 사용합니다.
- istiod의 Ambient 모드와 유사하지만, Cilium의 CNI 기능을 활용하여 더 효율적이고 통합된 구성을 제공합니다.
- HTTP, Kafka, gRPC, DNS와 같은 애플리케이션 계층 프로토콜은 Envoy Proxy를 통해 처리됩니다.
-
제공 기능
- 탄력적인 연결성(Resilient Connectivity): 서비스 간 통신은 클라우드, 클러스터, 온프레미스 등 경계를 넘어 가능해야 하며, 통신은 탄력적이고 장애 허용이 가능해야 합니다.
- L7 트래픽 관리(L7 Traffic Management): 로드 밸런싱, 속도 제한, 장애 복원력 등은 L7(HTTP, REST, gRPC, WebSocket 등)을 인식해야 합니다.
- ID 기반 보안(Identity-based Security): 네트워크 식별자에만 의존하는 보안은 더 이상 충분하지 않으며, 송신 및 수신 서비스 모두 네트워크 식별자가 아닌 ID 기반으로 상호 인증할 수 있어야 합니다.
- 관측성 및 트레이싱(Observability & Tracing): 트레이싱과 메트릭 형태의 관측성은 애플리케이션의 안정성, 성능, 가용성을 이해하고 모니터링하며 문제를 해결하는 데 매우 중요합니다.
- 투명성(Transparency): 이 기능들은 애플리케이션 코드를 변경하지 않고도 투명하게 제공되어야 합니다.
K8S Ingress Support
Cilium K8S Ingress Support 소개
- 관련문서
- Cilium은 Kubernetes Ingress resource definition을 지원하며
ingressClassName을 cilium으로 지정함으로써 사용할 수 있습니다. - 경로 기반 라우팅과 TLS termination을 지원합니다. 하위 호환을 위해서
kubernetes.io/ingress.class을 cilium으로 설정할 수도 있습니다. - Cilium Ingress Controller는 LoadBalancer Type의 Service로 배포되기 때문에, LoadBalancer를 지원하는 환경을 필요로 합니다.
- Cilium은 로드밸런서 모드를 다음 중 하나로 설정할 수 있습니다. 각 모드는 장단점이 있기 때문에 사용 환경에 따라 적절한 모드를 선택해야 합니다.
-
dedicated: 해당 ingress를 위해서 단독 로드밸런서를 사용합니다. 각 ingress마다 별도의 로드밸런서를 사용하기 때문에, 충돌이 발생하지 않습니다. 하지만 자원 낭비가 발생할 수 있습니다. -
shared: 모든 ingress들이 하나의 공통 로드밸런서를 공유합니다. 자원은 절약하지만 path prefix 충돌이 발생할 수 있습니다.
-
- 로드밸런서 모드는 변경이 가능하지만, 변경을 위해서는 LB IP 주소가 변경되어야 합니다. 따라서, 변경시 연결이 종료되며, 다운타임이 발생할 수 있습니다.
필수 조건
- Cilium은
nodePort.enabled=true로 설정되어 NodePort가 활성화되어 있거나kubeProxyReplacement=true를 통해 kube-proxy를 대체하는 경우에만 Ingress를 지원합니다. -
l7Proxy=true로 설정해서 L7 Proxy를 활성화해야 합니다. (기본값) - 기본적으로 LoadBalancer 타입의 Service로 배포되기 때문에, LoadBalancer를 지원하는 환경이 필요합니다. 다른 방법으로는 NodePort를 사용하거나, Cilium 1.16 이상 버전에서는 host network에 L7 Proxy를 배포할 수 있습니다.
Cilium Ingress와 Cilium Gateway API의 다른 Ingress Controller와의 차이점
- CNI와의 밀접한 연결 : 다른 Ingress Controller는 CNI와 독립적으로 동작하지만, Cilium Ingress는 Cilium CNI와 밀접하게 통합되어 있습니다.
-
eBPF와 TPROXY를 사용하여 투명하게 Envoy에 전달 : 다른 Ingress Controller는 iptables를 사용하여 단순 포트포워딩을 통해 트래픽을 가로채지만, Cilium Ingress는 eBPF와 TPROXY를 사용하여 트래픽을 Envoy에 투명하게 전달합니다. 이를 통해 성능과 확장성이 향상됩니다.
- 이를 통해 Client IP Visibility 같은 문제를 해결 할 수 있으며, Cilium의 네트워크 정책 엔진이 Ingress를 통해 들어오는 트래픽에 Cilium Network Policy를 적용할 수 있도록 해줍니다.
- 동작 경로 : - [Client] → [K8s Node:Ingress/Gateway Service Port] → (eBPF Service LB) → (TPROXY) → [Envoy Proxy (Pod)] → (L7 라우팅/정책 처리) → (eBPF) → [Backend Pod]
Cilium Ingress 구성 및 Cilium Network Policy
- 노드별 Envoy Proxy에 NetworkPolicy를 적용할 수 있습니다.
- Cilium을 통해 각 백엔드 서비스로 전송되는 Ingress와 Gateway API 트래픽은 각 노드별 Envoy Proxy를 통해 처리됩니다.
- 노드별 Envoy Proxy는 eBPF 정책 엔진과 상호작용할 수 있는 특수한 코드를 갖고 있으며, 트래픽에 대해 정책을 적용할 수 있습니다. 이를 통해 Envoy는 Ingress와 Gateway API 트래픽, east-west 트래픽에 대해서 Network Policy Enforcement Point로 작동할 수 있습니다.
- Envoy에 도착한 트래픽은 Cilium의 정책 엔진이 부여한 특수 ingress ID를 할당 받습니다.
- 클러스터 외부에서 들어오는 트래픽은 일반적으로 클러스터에 (IP CIDR 정책이 없는 한) world identity가 할당 됩니다.
- 이는 실제로 Cilium Ingress에 두개의 논리적 정책 집행 지점이 있다는것을 의미합니다.
- 즉, ingress identity에 트래픽이 도착하기 전과 노드별 Envoy를 통해 백엔드 서비스로 전달되기 전입니다.
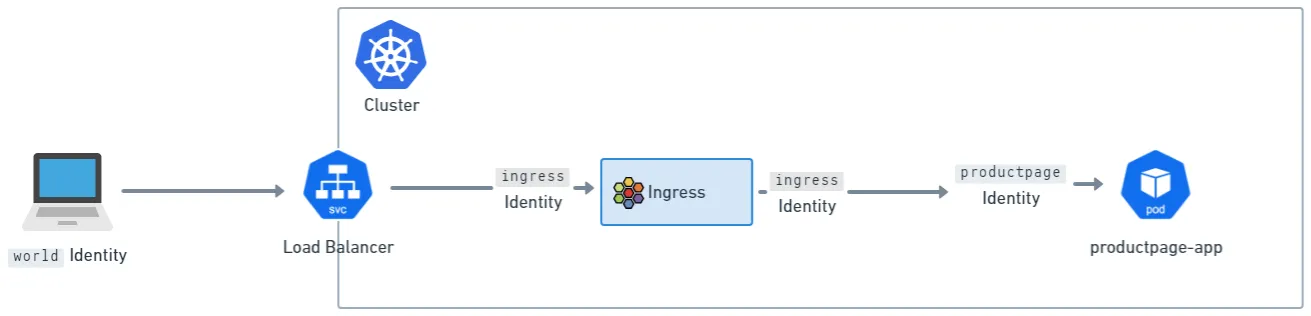
- 이는 네트워크 정책을 클러스터에 적용할때 world에서 ingress로 들어갈때도 허용(allow)하고, ingress에서 클러스터의 identities (위의 그림에서는 productpage identity)로 전달될때도 동시에 허용(allow)해야 한다는 것을 의미합니다. Gateway API에서도 동일합니다.
Source IP Visibility
- 기본값으로 Cilium의 Envoy는 클라이언트의 IP 주소를
X-Forwarded-For헤더에 추가하여 백엔드 서비스로 전달합니다. 이를 통해 백엔드 서비스는 클라이언트의 실제 IP 주소를 알 수 있습니다. -
trusted hops를0을 기본값으로 설정하여, Envoy가X-Forwarded-For헤더의 값을 보는 대신, 연결이 시작된 실제 클라이언트 IP를 사용합니다. - 즉,
trusted hops를 증가 시킴으로써 Envoy가X-Forwarded-For의 오른쪽 부터 수를 세는 n번째 항목을 사용하게 할 수 있습니다. - Envoy는 또한
X-Envoy-External-Address헤더를 사용하여X-Forwarded-For를 기반으로한 신뢰할 수 있는 클라이언트의 주소를 전달합니다.
TLS Passthrough와 Source IP Visibility
- Ingress와 Gateway API는 모두 TLS Passthrough 구성을 지원합니다. (Ingress는 annotation을 통해, Gateway API는
TLSRoute리소스를 통해 지원합니다.) - 이 구성을 통해 여러 TLS Passthrough 백엔드가 Load Balancer에서 동일한 TLS 포트를 공유 할 수 있으며, Envoy는 TLS 핸드셰이크의 서버 이름 표시기(SNI)를 기반으로 백엔드를 선택합니다.
- 동작방식 : TLS 트래픽 -> Envoy에 도착 -> TCP 스트림 종료 -> Envoy가 클라이언트 hello를 검사하여 SNI를 찾고 백엔드 선택 -> ✨새로운 TCP 스트림 시작 -> 다운스트림(외부) 패킷 내부의 TLS 트래픽을 업스트림(백엔드)로 전달
- 하지만 이러한 동작은 Source IP Visibility 문제를 발생시킬수 있습니다. 왜냐하면 Envoy가 TLS 스트림의 TCP 프록시를 수행하고 있기 때문입니다.
- 새로운 TCP 스트림이 생기기 때문에 백엔드에서 바라본 소스 IP는 Envoy(Cilium 구성에 따라 Node IP인 경우가 많음)입니다.
- 즉, TLS Passthrough를 사용하면 백엔드는 Envoy의 IP 주소를 소스 IP로 받게되는 문제가 발생합니다.
Ingress Path Type과 우선순위
- Ingress 규격은 다음의 세가지 타입의 경로를 지원합니다.
- 정확한 값 (
Exact) : 경로가 정확히 일치해야 합니다. - 접두사 (
Prefix) : 경로가/로 구분되는 지정된 접두사로 시작해야 합니다.- 마지막 부분은 온전히 동일해야 합니다. 예를들어서 prefix가
/foo/bar인 경우/foo/bar/baz는 일치하지만/foo/barbaz는 일치하지 않습니다.
- 마지막 부분은 온전히 동일해야 합니다. 예를들어서 prefix가
- 구현 종속 (
ImplementationSpecific) : Ingress Controller에 따라 다르게 동작합니다.- Cilium Ingress의 경우에는
Regex, 즉, 정규표현식을 의미합니다.
- Cilium Ingress의 경우에는
- 정확한 값 (
- ingress에 대해서 여러 경로가 구성되어있으면 다음의 순서로 매칭합니다
- 정확한 값 (
Exact) - 구현 종속 (
ImplementationSpecific) - 접두사 (
Prefix) -
/접두사 처리
- 정확한 값 (
- 또한 동일한 경로 타입인 경우 경로의 길이가 긴 경로가 우선순위가 높습니다. 예를들어서
/foo/bar와/foo가 있을때/foo/bar가 우선순위가 높습니다. - 만약 구현 종속 방식을 사용한다면
*을 사용할때 주의가 필요합니다.*문자로 인해서 길이가 길어지지만, 실제 매칭되는 경로는 더 짧을 수 있습니다.- 예를들어서
/foo/bar/와/foo/bar/*가 있을때,/foo/bar/*는/foo/bar/에도 매칭이 되지만, 길이가 길어서/foo/bar/보다 우선순위가 높습니다. 이러한 경우 엉뚱한 백엔드로 트래픽이 전달될 수 있으니 주의해야 합니다.
- 예를들어서
- 추가적인 사항은 문서를 참고하시기 바랍니다. Docs
eBPF Datapath : Ingress to Endpoint
 https://docs.cilium.io/en/stable/network/ebpf/lifeofapacket/#ingress-to-endpoint
Cilium K8S Ingress Support 관련 정보 확인
- Cilium Ingress와 Cilium Gateway API는 동시 활성화가 불가능합니다. 단, 다른 Ingress Controller와 Cilium Gateway API는 함께 사용할 수 있습니다.
# cilium 설치 시 아래 파라미터 적용되어 있음
## --set ingressController.enabled=true
## --set ingressController.loadbalancerMode=shared
## --set loadBalancer.l7.backend=envoy \
$ cilium config view | grep -E '^loadbalancer|l7'
# => enable-l7-proxy                                   true
#    loadbalancer-l7                                   envoy
#    loadbalancer-l7-algorithm                         round_robin
#    loadbalancer-l7-ports

# ingress 에 예약된 내부 IP 확인 : node(cilium-envoy) 별로 존재
$ kubectl exec -it -n kube-system ds/cilium -- cilium ip list | grep ingress
# => 172.20.0.16/32      reserved:ingress
#    172.20.1.60/32      reserved:ingress

# cilium-envoy 확인
$ kubectl get ds -n kube-system cilium-envoy -owide
$ kubectl get pod -n kube-system -l k8s-app=cilium-envoy -owide
# => NAME                 READY   STATUS    RESTARTS   AGE     IP               NODE      NOMINATED NODE   READINESS GATES
#    cilium-envoy-b25zf   1/1     Running   0          2m50s   192.168.10.101   k8s-w1    <none>           <none>
#    cilium-envoy-hpsbc   1/1     Running   0          4m37s   192.168.10.100   k8s-ctr   <none>           <none>

$ kc describe pod -n kube-system -l k8s-app=cilium-envoy
# => ...
#    Containers:
#      cilium-envoy:
#        Container ID:  containerd://db82015552f31d7a16d8cada0883cdc7a4f75d39f36e76e0c582b10b1f3988e4
#        Image:         quay.io/cilium/cilium-envoy:v1.34.4-1754895458-68cffdfa568b6b226d70a7ef81fc65dda3b890bf@sha256:247e908700012f7ef56f75908f8c965215c26a27762f296068645eb55450bda2
#        Image ID:      quay.io/cilium/cilium-envoy@sha256:247e908700012f7ef56f75908f8c965215c26a27762f296068645eb55450bda2
#        Port:          9964/TCP
#        Host Port:     9964/TCP
#        Command:
#          /usr/bin/cilium-envoy-starter
#        Args:
#          --
#          -c /var/run/cilium/envoy/bootstrap-config.json
#          --base-id 0
#        ...
#        Mounts:
#          /sys/fs/bpf from bpf-maps (rw)
#          /var/run/cilium/envoy/ from envoy-config (ro)
#          /var/run/cilium/envoy/artifacts from envoy-artifacts (ro)
#          /var/run/cilium/envoy/sockets from envoy-sockets (rw)
#          /var/run/secrets/kubernetes.io/serviceaccount from kube-api-access-jxsqh (ro)
#    ...
#    Volumes:
#      envoy-sockets:
#        Type:          HostPath (bare host directory volume)
#        Path:          /var/run/cilium/envoy/sockets
#        HostPathType:  DirectoryOrCreate
#      envoy-artifacts:
#        Type:          HostPath (bare host directory volume)
#        Path:          /var/run/cilium/envoy/artifacts
#        HostPathType:  DirectoryOrCreate
#      envoy-config:
#        Type:      ConfigMap (a volume populated by a ConfigMap)
#        Name:      cilium-envoy-config
#        Optional:  false
#      bpf-maps:
#        Type:          HostPath (bare host directory volume)
#        Path:          /sys/fs/bpf
#        HostPathType:  DirectoryOrCreate
#      kube-api-access-jxsqh:
#        Type:                    Projected (a volume that contains injected data from multiple sources)
#        TokenExpirationSeconds:  3607
#        ConfigMapName:           kube-root-ca.crt
#        Optional:                false
#        DownwardAPI:             true

#
$ ls -al /var/run/cilium/envoy/sockets
# => ...
#    srw-rw---- 1 root 1337   0 Aug 23 14:20 access_log.sock
#    srwxr-xr-x 1 root root   0 Aug 23 14:19 admin.sock
#    drwxr-xr-x 3 root root  60 Aug 23 14:20 envoy
#    srw-rw---- 1 root 1337   0 Aug 23 14:20 xds.sock

#
$ kubectl exec -it -n kube-system ds/cilium-envoy -- ls -al /var/run/cilium/envoy
$ kubectl exec -it -n kube-system ds/cilium-envoy -- cat /var/run/cilium/envoy/bootstrap-config.json
$ kubectl exec -it -n kube-system ds/cilium-envoy -- cat /var/run/cilium/envoy/bootstrap-config.json > envoy.json
$ cat envoy.json | jq

# envoy configmap 설정 내용 확인
$ kubectl -n kube-system get configmap cilium-envoy-config
# => NAME                  DATA   AGE
#    cilium-envoy-config   1      7m54s
$ kubectl -n kube-system get configmap cilium-envoy-config -o json \
  | jq -r '.data["bootstrap-config.json"]' \
  | jq .
# => ...
#      "admin": {
#        "address": {
#          "pipe": {
#            "path": "/var/run/cilium/envoy/sockets/admin.sock"
#          }
#        }
#      },
#    ...
#        "listeners": [
#          {
#            "address": {
#              "socketAddress": {
#                "address": "0.0.0.0",
#                "portValue": 9964
#    ...

$ tree /sys/fs/bpf
# => /sys/fs/bpf
#    ├── cilium
#    │   ├── devices
#    │   │   ├── cilium_host
#    │   │   │   └── links
#    │   │   │       ├── cil_from_host
#    │   │   │       └── cil_to_host
#    │   │   ├── cilium_net
#    │   │   │   └── links
#    │   │   │       └── cil_to_host
#    │   │   ├── eth0
#    │   │   │   └── links
#    │   │   │       ├── cil_from_netdev
#    │   │   │       └── cil_to_netdev
#    │   │   └── eth1
#    │   │       └── links
#    │   │           ├── cil_from_netdev
#    │   │           └── cil_to_netdev
#    │   ├── endpoints
#    │   │   ├── 1019
#    │   │   │   └── links
#    │   │   │       ├── cil_from_container
#    │   │   │       └── cil_to_container
#    ...

#
$ kubectl get svc,ep -n kube-system cilium-envoy
# => NAME                   TYPE        CLUSTER-IP   EXTERNAL-IP   PORT(S)    AGE
#    service/cilium-envoy   ClusterIP   None         <none>        9964/TCP   9m24s
#
#    NAME                     ENDPOINTS                                 AGE
#    endpoints/cilium-envoy   192.168.10.100:9964,192.168.10.101:9964   9m22s

#
$ kubectl get svc,ep -n kube-system cilium-ingress
# => NAME                     TYPE           CLUSTER-IP     EXTERNAL-IP   PORT(S)                      AGE
#    service/cilium-ingress   LoadBalancer   10.96.58.190   <pending>     80:32243/TCP,443:30329/TCP   9m35s
#
#    NAME                       ENDPOINTS              AGE
#    endpoints/cilium-ingress   192.192.192.192:9999   9m35s  # Cilium → Envoy 간의 제어 채널(Control Plane), 외부 클라이언트가 접근하는 데이터 채널이 아님
LB-IPAM 설정 후 확인 : CiliumL2AnnouncementPolicy
# 현재 L2 Announcement 활성화 상태
$ cilium config view | grep l2
# => enable-l2-announcements                           true
#    enable-l2-neigh-discovery                         false

# 충돌나지 않는지 대역 확인 할 것!
$ cat << EOF | kubectl apply -f -
apiVersion: "cilium.io/v2"
kind: CiliumLoadBalancerIPPool
metadata:
  name: "cilium-lb-ippool"
spec:
  blocks:
  - start: "192.168.10.211"
    stop:  "192.168.10.215"
EOF
# => ciliumloadbalancerippool.cilium.io/cilium-lb-ippool created
$ kubectl get ippool
# => NAME               DISABLED   CONFLICTING   IPS AVAILABLE   AGE
#    cilium-lb-ippool   false      False         4               7s
$ kubectl get ippools -o jsonpath='{.items[*].status.conditions[?(@.type!="cilium.io/PoolConflict")]}' | jq
# => {
#      "lastTransitionTime": "2025-08-23T06:40:43Z",
#      "message": "5",
#      "observedGeneration": 1,
#      "reason": "noreason",
#      "status": "Unknown",
#      "type": "cilium.io/IPsTotal"
#    }
#    {
#      "lastTransitionTime": "2025-08-23T06:40:43Z",
#      "message": "4",
#      "observedGeneration": 1,
#      "reason": "noreason",
#      "status": "Unknown",
#      "type": "cilium.io/IPsAvailable"
#    }
#    {
#      "lastTransitionTime": "2025-08-23T06:40:43Z",
#      "message": "1",
#      "observedGeneration": 1,
#      "reason": "noreason",
#      "status": "Unknown",
#      "type": "cilium.io/IPsUsed"
#    }

# L2 Announcement 정책 설정
$ cat << EOF | kubectl apply -f -
apiVersion: "cilium.io/v2alpha1"
kind: CiliumL2AnnouncementPolicy
metadata:
  name: policy1
spec:
  interfaces:
  - eth1
  externalIPs: true
  loadBalancerIPs: true
EOF
# => ciliuml2announcementpolicy.cilium.io/policy1 created

# 현재 리더 역할 노드 확인
$ kubectl -n kube-system get lease | grep "cilium-l2announce"
# => cilium-l2announce-kube-system-cilium-ingress  k8s-w1  16s
$ kubectl -n kube-system get lease/cilium-l2announce-kube-system-cilium-ingress -o yaml | yq

# K8S 클러스터 내부 LB EX-IP로 호출 가능
$ LBIP=$(kubectl get svc -n kube-system cilium-ingress -o jsonpath='{.status.loadBalancer.ingress[0].ip}')
$ echo $LBIP
# => 192.168.10.211
$ arping -i eth1 $LBIP -c 2
# => ARPING 192.168.10.211
#    60 bytes from 08:00:27:12:18:4f (192.168.10.211): index=0 time=3.241 msec
#    60 bytes from 08:00:27:12:18:4f (192.168.10.211): index=1 time=184.759 usec
#
#    --- 192.168.10.211 statistics ---
#    2 packets transmitted, 2 packets received,   0% unanswered (0 extra)
#    rtt min/avg/max/std-dev = 0.185/1.713/3.241/1.528 ms

# k8s 외부 노드(router)에서 LB EX-IP로 호출 가능 확인
$ sshpass -p 'vagrant' ssh vagrant@router sudo arping -i eth1 $LBIP -c 2
# => ARPING 192.168.10.211
#    60 bytes from 08:00:27:12:18:4f (192.168.10.211): index=0 time=385.109 usec
#    60 bytes from 08:00:27:12:18:4f (192.168.10.211): index=1 time=384.192 usec
#
#    --- 192.168.10.211 statistics ---
#    2 packets transmitted, 2 packets received,   0% unanswered (0 extra)
#    rtt min/avg/max/std-dev = 0.384/0.385/0.385/0.000 ms
# <span style="color: green;">👉 k8s 외부 노드에서 LB EX-IP로 호출 가능합니다.</span>
Ingress HTTP Example : XFF 확인
# Deploy the Demo App : 공식 문서는 release-1.11 로 ARM CPU 에서 실패한다. 1.26 버전을 높여서 샘플 배포 할 것!
$ kubectl apply -f https://raw.githubusercontent.com/istio/istio/release-1.26/samples/bookinfo/platform/kube/bookinfo.yaml
# => ...
#    service/productpage created
#    serviceaccount/bookinfo-productpage created
#    deployment.apps/productpage-v1 created

$ kubectl get pod,svc,ep
# => NAME                                  READY   STATUS    RESTARTS   AGE
#    pod/details-v1-766844796b-fwxlh       <span style="color: green;">1/1</span>     Running   0          81s
#    pod/productpage-v1-54bb874995-5zh9b   <span style="color: green;">1/1</span>     Running   0          81s
#    pod/ratings-v1-5dc79b6bcd-l4fw4       <span style="color: green;">1/1</span>     Running   0          81s
#    pod/reviews-v1-598b896c9d-wxrrw       <span style="color: green;">1/1</span>     Running   0          81s
#    ...
#
#    NAME                  TYPE        CLUSTER-IP      EXTERNAL-IP   PORT(S)    AGE
#    service/details       <span style="color: green;">ClusterIP</span>   10.96.68.221    <none>        9080/TCP   81s
#    service/kubernetes    <span style="color: green;">ClusterIP</span>   10.96.0.1       <none>        443/TCP    92m
#    service/productpage   <span style="color: green;">ClusterIP</span>   10.96.86.254    <none>        9080/TCP   81s
#    service/ratings       <span style="color: green;">ClusterIP</span>   10.96.108.142   <none>        9080/TCP   81s
#    service/reviews       <span style="color: green;">ClusterIP</span>   10.96.47.199    <none>        9080/TCP   81s
#
#    NAME                    ENDPOINTS                                               AGE
#    endpoints/details       172.20.1.185:9080                                       81s
#    endpoints/kubernetes    192.168.10.100:6443                                     92m
#    endpoints/productpage   172.20.1.100:9080                                       81s
#    endpoints/ratings       172.20.1.247:9080                                       81s
#    endpoints/reviews       172.20.1.114:9080,172.20.1.186:9080,172.20.1.232:9080   81s
# <span style="color: green;">👉 istio 와 다르게 사이드카 컨테이너가 없어서 파드가 1개의 (1/1) 컨테이너로 동작합니다. NodePort와 LoadBalancer 서비스도 없습니다.</span>

#
$ kc describe ingressclasses.networking.k8s.io
# => Name:         cilium
#    Labels:       app.kubernetes.io/managed-by=Helm
#    Annotations:  meta.helm.sh/release-name: cilium
#                  meta.helm.sh/release-namespace: kube-system
#    Controller:   cilium.io/ingress-controller
#    Events:       <none>
$ kubectl get ingressclasses.networking.k8s.io
# => NAME     CONTROLLER                     PARAMETERS   AGE
#    cilium   cilium.io/ingress-controller   <none>       94m


# Basic ingress for istio bookinfo demo application, which can be found in below
$ cat << EOF | kubectl apply -f -
apiVersion: networking.k8s.io/v1
kind: Ingress
metadata:
  name: basic-ingress
  namespace: default
spec:
  ingressClassName: cilium
  rules:
  - http:
      paths:
      - backend:
          service:
            name: details
            port:
              number: 9080
        path: /details
        pathType: Prefix
      - backend:
          service:
            name: productpage
            port:
              number: 9080
        path: /
        pathType: Prefix
EOF
# => ingress.networking.k8s.io/basic-ingress created

# Adress 는 cilium-ingress LoadBalancer 의 EX-IP
$ kubectl get svc -n kube-system cilium-ingress
# => NAME             TYPE           CLUSTER-IP     EXTERNAL-IP      PORT(S)                      AGE
#    cilium-ingress   LoadBalancer   10.96.58.190   192.168.10.211   80:32243/TCP,443:30329/TCP   95m

$ kubectl get ingress
# => NAME            CLASS    HOSTS   ADDRESS          PORTS   AGE
#    basic-ingress   cilium   *       192.168.10.211   80      34s

$ kc describe ingress
# => ...
#    Rules:
#      Host        Path  Backends
#      ----        ----  --------
#      *
#                  /details   details:9080 (172.20.1.185:9080)
#                  /          productpage:9080 (172.20.1.100:9080)

# 호출 확인
$ LBIP=$(kubectl get svc -n kube-system cilium-ingress -o jsonpath='{.status.loadBalancer.ingress[0].ip}')
$ echo $LBIP
# => 192.168.10.211

# 실패하는 호출이 있는가?
$ curl -so /dev/null -w "%{http_code}\n" http://$LBIP/
# => 200
$ curl -so /dev/null -w "%{http_code}\n" http://$LBIP/details/1
# => 200
$ curl -so /dev/null -w "%{http_code}\n" http://$LBIP/ratings
# => 404
# <span style="color: green;">👉 실패하였습니다. 앞서 살펴본 ingress 룰에는 /ratings가 없고, `/`를 담당하는 productpage에서도 처리하지 않는 URL이기 때문입니다.</span>

# Access the Bookinfo application
$ curl "http://$LBIP/productpage?u=normal"

# 모니터링
$ cilium hubble port-forward&
# => ℹ️   Hubble Relay is available at 127.0.0.1:4245
$ hubble observe -f -t l7
# or
# $ hubble observe -f --identity ingress
# => ...

# router에서 호출
$ curl -so /dev/null -w "%{http_code}\n" http://$LBIP/
# => 200
$ curl -so /dev/null -w "%{http_code}\n" http://$LBIP/details/1
# => 200

$ sshpass -p 'vagrant' ssh vagrant@router curl -s http://$LBIP/
$ sshpass -p 'vagrant' ssh vagrant@router curl -s http://$LBIP/details/1 -v
# => ...
#    < server: envoy
#    < date: Sat, 23 Aug 2025 07:06:51 GMT
#    < content-length: 178
#    < x-envoy-upstream-service-time: 18
$ sshpass -p 'vagrant' ssh vagrant@router curl -s http://$LBIP/ratings
# => <!doctype html>
#    <html lang=en>
#    <title>404 Not Found</title>
#    <h1>Not Found</h1>
#    <p>The requested URL was not found on the server. If you entered the URL manually please check your spelling and try again.</p>

# productpage-v1 파드가 배포된 노드 확인
$ kubectl get pod -l app=productpage -owide
# => NAME                              READY   STATUS    RESTARTS   AGE   IP             NODE     NOMINATED NODE   READINESS GATES
#    productpage-v1-54bb874995-5zh9b   1/1     Running   0          17m   172.20.1.100   k8s-w1   <none>           <none>

# 해당 노드(k8s-w1)에서 veth 인터페이스 정보 확인
$ sshpass -p 'vagrant' ssh vagrant@k8s-w1
---
$ PROID=172.20.1.100

$ ip route |grep $PROID
# => 172.20.1.100 dev <span style="color: green;">lxcdd0576ed651e</span> proto kernel scope link

$ PROVETH=lxcdd0576ed651e

# ngrep 로 veth 트래픽 캡쳐 : productpage 는 9080 TCP Port 사용
$ ngrep -tW byline -d $PROVETH '' 'tcp port 9080'

# 외부에서 호출 시도
$ sshpass -p 'vagrant' ssh vagrant@router curl -s http://$LBIP

# ngrep 로 veth 트래픽 캡쳐 : productpage 는 9080 TCP Port 사용
$ ngrep -tW byline -d $PROVETH '' 'tcp port 9080'
# => <span style="color: green;">## igress(envoy) 가 XFF에 client-ip 담고, 목적지 파드로 요청</span>
#    T 2025/08/23 16:10:12.309006 10.0.2.15:32780 -> 172.20.1.100:9080 [AP] #4
#    GET / HTTP/1.1.
#    host: 192.168.10.211.
#    user-agent: curl/8.5.0.
#    accept: */*.
#    <span style="color: green;">x-forwarded-for: 192.168.10.200.</span>
#    x-forwarded-proto: http.
#    x-envoy-internal: true.
#    x-request-id: 6d2bda20-5f73-41d3-ac90-159cd56a2386.
#    .
#
#    <span style="color: green;">## igress(envoy)로 리턴하는 트래픽</span>
#    T 2025/08/23 16:10:12.325238 172.20.1.100:9080 -> 10.0.2.15:32780 [AP] #6
#    HTTP/1.1 200 OK.
#    Server: gunicorn.
#    Date: Sat, 23 Aug 2025 07:10:12 GMT.
#    Connection: keep-alive.
#    Content-Type: text/html; charset=utf-8.
#    Content-Length: 2080.
Ingress-Nginx 설치하여 Cilium Ingress와 공존 가능여부 확인
- 이번에는 Cilium ingress와 Ingress-Nginx가 동시에 활성화 될 수 있는지 확인해보겠습니다.
# Ingress-Nginx 컨트롤러 설치
$ helm repo add ingress-nginx https://kubernetes.github.io/ingress-nginx
# => "ingress-nginx" has been added to your repositories
$ helm install ingress-nginx ingress-nginx/ingress-nginx --create-namespace -n ingress-nginx
# => NAME: ingress-nginx
#    LAST DEPLOYED: Sat Aug 23 16:18:18 2025
#    NAMESPACE: ingress-nginx
#    STATUS: deployed
#    REVISION: 1
#    TEST SUITE: None
#    NOTES:
#    The ingress-nginx controller has been installed.
#    It may take a few minutes for the load balancer IP to be available.
#    ...

# 확인
$ kubectl get all -n ingress-nginx
# => NAME                                            READY   STATUS    RESTARTS   AGE
#    pod/ingress-nginx-controller-67bbdf7d8d-qmtp2   1/1     Running   0          34s
#
#    NAME                                         TYPE           CLUSTER-IP     EXTERNAL-IP      PORT(S)                      AGE
#    service/ingress-nginx-controller             LoadBalancer   10.96.45.145   192.168.10.212   80:32426/TCP,443:30289/TCP   35s
#    service/ingress-nginx-controller-admission   ClusterIP      10.96.79.200   <none>           443/TCP                      35s
#
#    NAME                                       READY   UP-TO-DATE   AVAILABLE   AGE
#    deployment.apps/ingress-nginx-controller   1/1     1            1           35s
#
#    NAME                                                  DESIRED   CURRENT   READY   AGE
#    replicaset.apps/ingress-nginx-controller-67bbdf7d8d   1         1         1       34s
$ kc describe svc -n ingress-nginx ingress-nginx-controller
# => Name:                     ingress-nginx-controller
#    Namespace:                ingress-nginx
#    ...
#    LoadBalancer Ingress:     192.168.10.212 (VIP)
#    Port:                     http  80/TCP
#    TargetPort:               http/TCP
#    NodePort:                 http  32426/TCP
#    Endpoints:                172.20.1.154:80
#    Port:                     https  443/TCP
#    TargetPort:               https/TCP
#    NodePort:                 https  30289/TCP
#    Endpoints:                172.20.1.154:443
#    ...
$ kubectl get svc -n ingress-nginx
# => NAME                                 TYPE           CLUSTER-IP     EXTERNAL-IP      PORT(S)                      AGE
#    ingress-nginx-controller             LoadBalancer   10.96.45.145   192.168.10.212   80:32426/TCP,443:30289/TCP   2m
#    ingress-nginx-controller-admission   ClusterIP      10.96.79.200   <none>           443/TCP                      2m
$ kubectl get ingressclasses.networking.k8s.io
# => NAME     CONTROLLER                     PARAMETERS   AGE
#    cilium   cilium.io/ingress-controller   <none>       121m
#    nginx    k8s.io/ingress-nginx           <none>       2m6s

# ingress 설정
$ cat << EOF | kubectl apply -f -
apiVersion: networking.k8s.io/v1
kind: Ingress
metadata:
  name: webpod-ingress-nginx
  namespace: default
spec:
  ingressClassName: nginx
  rules:
  - host: nginx.webpod.local
    http:
      paths:
      - backend:
          service:
            name: webpod
            port:
              number: 80
        path: /
        pathType: Prefix
EOF
# => ingress.networking.k8s.io/webpod-ingress-nginx created

# ingress LB EX-IP 할당 까지 다소 시간 소요..
$ kubectl get ingress -w
# => NAME                   CLASS    HOSTS                ADDRESS          PORTS   AGE
#    basic-ingress          cilium   *                    192.168.10.211   80      29m
#    webpod-ingress-nginx   nginx    nginx.webpod.local   <span style="color: green;">192.168.10.212</span>   80      32s

#
$ LB2IP=$(kubectl get svc -n ingress-nginx ingress-nginx-controller -o jsonpath='{.status.loadBalancer.ingress[0].ip}')
$ echo $LB2IP
# => 192.168.10.211

$ curl $LB2IP
# => <html>
#    <head><title>404 Not Found</title></head>
#    ...
# <span style="color: green;">👉 nginx.webpod.local 호스트명이 없어서 404 에러 발생</span>
$ curl -H "Host: nginx.webpod.local" $LB2IP
# => Hostname: webpod-697b545f57-b5vtj
#    IP: 172.20.0.70
#    RemoteAddr: 172.20.1.154:40984
#    GET / HTTP/1.1
#    Host: nginx.webpod.local
#    User-Agent: curl/8.5.0
#    Accept: */*
#    X-Forwarded-For: <span style="color: green;">192.168.10.100</span>
#    ...
$ curl -H "Host: nginx.webpod.local" $LB2IP
# => Hostname: webpod-697b545f57-jp4wc
#    IP: 172.20.1.206
#    RemoteAddr: 172.20.1.154:48320
#    GET / HTTP/1.1
#    Host: nginx.webpod.local
#    User-Agent: curl/8.5.0
#    Accept: */*
#    X-Forwarded-For: 192.168.10.100
#    ...

$ sshpass -p 'vagrant' ssh vagrant@router "curl -s -H 'Host: nginx.webpod.local' $LB2IP"
# => Hostname: webpod-697b545f57-jp4wc
#    ...
#    X-Forwarded-For: 192.168.10.200
#    ...
$ sshpass -p 'vagrant' ssh vagrant@router "curl -s -H 'Host: nginx.webpod.local' $LB2IP"
# => Hostname: webpod-697b545f57-b5vtj
#    ...
#    X-Forwarded-For: 192.168.10.200
#    ...
- Cilium Ingress와 Nginx ingress는 동시 활성화가 가능하며, 각각의 EX-IP로 정상 호출이 가능한 것을 확인할 수 있습니다.
Dedicated Mode
- Cilium Ingress는 기본적으로 Shared Mode로 동작합니다. Dedicated Mode로 변경하는 방법을 알아보겠습니다.
# Basic ingress for istio bookinfo demo application, which can be found in below
$ cat << EOF | kubectl apply -f -
apiVersion: networking.k8s.io/v1
kind: Ingress
metadata:
  name: webpod-ingress
  namespace: default
  annotations:
    ingress.cilium.io/loadbalancer-mode: dedicated
spec:
  ingressClassName: cilium
  rules:
  - http:
      paths:
      - backend:
          service:
            name: webpod
            port:
              number: 80
        path: /
        pathType: Prefix
EOF
# => ingress.networking.k8s.io/webpod-ingress created

#
$ kc describe ingress webpod-ingress
# => Name:             webpod-ingress
#    Labels:           <none>
#    Namespace:        default
#    Address:          192.168.10.213
#    Ingress Class:    cilium
#    Default backend:  <default>
#    Rules:
#      Host        Path  Backends
#      ----        ----  --------
#      *
#                  /   webpod:80 (172.20.1.206:80,172.20.0.70:80)
#    Annotations:  ingress.cilium.io/loadbalancer-mode: <span style="color: green;">dedicated</span>
$ kubectl get ingress
# => NAME                   CLASS    HOSTS                ADDRESS          PORTS   AGE
#    basic-ingress          cilium   *                    192.168.10.211   80      45m
#    <span style="color: green;">webpod-ingress</span>         cilium   *                    192.168.10.213   80      29s
#    webpod-ingress-nginx   nginx    nginx.webpod.local   192.168.10.212   80      16m

$ kubectl get svc,ep cilium-ingress-webpod-ingress
# => NAME                                    TYPE           CLUSTER-IP      EXTERNAL-IP      PORT(S)                      AGE
#    service/cilium-ingress-webpod-ingress   LoadBalancer   10.96.153.108   192.168.10.213   80:30159/TCP,443:30408/TCP   50s
#
#    NAME                                      ENDPOINTS              AGE
#    endpoints/cilium-ingress-webpod-ingress   192.192.192.192:9999   50s

# LB EX-IP에 대한 L2 Announcement 의 Leader 노드 확인
$ kubectl get lease -n kube-system | grep ingress
# => cilium-l2announce-default-cilium-ingress-webpod-ingress   k8s-w1  80s
#    cilium-l2announce-ingress-nginx-ingress-nginx-controller  k8s-w1  21m
#    cilium-l2announce-kube-system-cilium-ingress              k8s-w1  58m

# webpod 파드 IP 확인
$ kubectl get pod -l app=webpod -owide
# => NAME                      READY   STATUS    RESTARTS   AGE   IP             NODE      NOMINATED NODE   READINESS GATES
#    webpod-697b545f57-b5vtj   1/1     Running   0          12m   172.20.0.70    k8s-ctr   <none>           <none>
#    webpod-697b545f57-jp4wc   1/1     Running   0          12m   172.20.1.206   k8s-w1    <none>           <none>

# k8c-ctr, k8s-w1 노드에서 파드 IP에 veth 찾기(ip -c route) 이후 ngrep 로 각각 트래픽 캡쳐

$ sshpass -p 'vagrant' ssh vagrant@k8s-ctr
---
$ ip route | grep 172.20.0.70
# => 172.20.0.70 dev lxc148c311965e6 proto kernel scope link
$ WPODVETHCTR=lxc148c311965e6
$ ngrep -tW byline -d $WPODVETHCTR '' 'tcp port 80'
# => lxc148c311965e6: no IPv4 address assigned: Cannot assign requested address
#    interface: lxc148c311965e6
#    filter: ( tcp port 80 ) and ((ip || ip6) || (vlan && (ip || ip6)))
#    ###
#    T 2025/08/23 16:48:28.123959 172.20.0.70:80 -> 172.20.1.60:40517 [AP] #3
#    HTTP/1.1 200 OK.
#    Date: Sat, 23 Aug 2025 07:48:28 GMT.
#    Content-Length: 343.
#    Content-Type: text/plain; charset=utf-8.
#    .
#    Hostname: webpod-697b545f57-b5vtj
#    IP: 127.0.0.1
#    IP: ::1
#    IP: 172.20.0.70
#    IP: fe80::d46d:b0ff:fe0d:619a
#    RemoteAddr: 172.20.1.60:40517
#    GET / HTTP/1.1.
#    Host: 192.168.10.213.
#    User-Agent: curl/8.5.0.
#    Accept: */*.
#    X-Envoy-Internal: true.
#    X-Forwarded-For: 192.168.10.200.
#    X-Forwarded-Proto: http.
#    X-Request-Id: 01bd1da4-e1f1-47e7-958d-1032c55ec11b.
#    ...
---

$ sshpass -p 'vagrant' ssh vagrant@k8s-w1
---
$ ip route | grep 172.20.1.206
# => 172.20.1.206 dev lxc9e0d1071b53f proto kernel scope link
$ WPODVETHW1=lxc9e0d1071b53f
$ ngrep -tW byline -d $WPODVETHW1 '' 'tcp port 80'
# => lxc9e0d1071b53f: no IPv4 address assigned: Cannot assign requested address
#    interface: lxc9e0d1071b53f
#    filter: ( tcp port 80 ) and ((ip || ip6) || (vlan && (ip || ip6)))
#    ####
#    T 2025/08/23 16:48:29.296230 10.0.2.15:34958 -> 172.20.1.206:80 [AP] #4
#    GET / HTTP/1.1.
#    host: 192.168.10.213.
#    user-agent: curl/8.5.0.
#    accept: */*.
#    x-forwarded-for: 192.168.10.200.
#    x-forwarded-proto: http.
#    x-envoy-internal: true.
#    x-request-id: 80e8099d-b64b-4f05-805e-72a4d670024f.
#    .
#
#    ##
#    T 2025/08/23 16:48:29.300200 172.20.1.206:80 -> 10.0.2.15:34958 [AP] #6
#    HTTP/1.1 200 OK.
#    Date: Sat, 23 Aug 2025 07:48:29 GMT.
#    Content-Length: 342.
#    Content-Type: text/plain; charset=utf-8.
#    .
#    Hostname: webpod-697b545f57-jp4wc
#    IP: 127.0.0.1
#    IP: ::1
#    IP: 172.20.1.206
#    IP: fe80::a4ee:c1ff:fed4:b3c3
#    RemoteAddr: 10.0.2.15:34958
#    GET / HTTP/1.1.
#    Host: 192.168.10.213.
#    User-Agent: curl/8.5.0.
#    Accept: */*.
#    X-Envoy-Internal: true.
#    X-Forwarded-For: 192.168.10.200.
#    X-Forwarded-Proto: http.
#    X-Request-Id: 80e8099d-b64b-4f05-805e-72a4d670024f.
#    ...
---

# router 에서 호출 확인
$ LB2IP=$(kubectl get svc cilium-ingress-webpod-ingress -o jsonpath='{.status.loadBalancer.ingress[0].ip}')
$ sshpass -p 'vagrant' ssh vagrant@router curl -s http://$LB2IP
# => Hostname: webpod-697b545f57-jp4wc
#    IP: 127.0.0.1
#    IP: ::1
#    IP: 172.20.1.206
#    IP: fe80::a4ee:c1ff:fed4:b3c3
#    RemoteAddr: 10.0.2.15:34958  # webpod 인입 시 S.IP : 마치 L2 Leader 노드에 webpod로 전달되어, 소스IP가 해당 노드의 첫 번째 NIC IP,
#    GET / HTTP/1.1
#    Host: 192.168.10.213
#    User-Agent: curl/8.5.0
#    Accept: */*
#    X-Envoy-Internal: true
#    X-Forwarded-For: 192.168.10.200
#    X-Forwarded-Proto: http
#    X-Request-Id: 80e8099d-b64b-4f05-805e-72a4d670024f
$ sshpass -p 'vagrant' ssh vagrant@router curl -s http://$LB2IP
# => Hostname: webpod-697b545f57-b5vtj
#    IP: 127.0.0.1
#    IP: ::1
#    IP: 172.20.0.70
#    IP: fe80::d46d:b0ff:fe0d:619a
#    RemoteAddr: 172.20.1.60:40517  # webpod 인입 시 S.IP : L2 Leader 노드(k8s-w1)에서 다른 노드에 파드로 전달되어, ingress 예약IP로 SNAT
#    GET / HTTP/1.1
#    Host: 192.168.10.213
#    User-Agent: curl/8.5.0
#    Accept: */*
#    X-Envoy-Internal: true
#    X-Forwarded-For: 192.168.10.200
#    X-Forwarded-Proto: http
#    X-Request-Id: 01bd1da4-e1f1-47e7-958d-1032c55ec11b
Ingress and Network Policies Example
# 클러스터 전체(모든 네임스페이스)에 적용되는 정책 : 참고로 아래 정책 적용 후 Hubble-ui 로 접속 불가!
$ cat << EOF | kubectl apply -f -
apiVersion: "cilium.io/v2"
kind: CiliumClusterwideNetworkPolicy
metadata:
  name: "external-lockdown"
spec:
  description: "Block all the traffic originating from outside of the cluster"
  endpointSelector: {}
  ingress:
  - fromEntities:
    - cluster
EOF
# => ciliumclusterwidenetworkpolicy.cilium.io/external-lockdown created
$ kubectl get ciliumclusterwidenetworkpolicy
# => NAME                VALID
#    external-lockdown   True

#
$ curl --fail -v http://"$LBIP"/details/1
# => < HTTP/1.1 403 Forbidden

#
$ hubble observe -f --identity ingress
## k8s-ctr 에서 curl 실행 시
# => Aug 23 08:10:11.770: 127.0.0.1:36726 (ingress) -> 127.0.0.1:15778 (world) http-request DROPPED (HTTP/1.1 GET http://192.168.10.211/details/1)
#    Aug 23 08:10:11.770: 127.0.0.1:36726 (ingress) <- 127.0.0.1:15778 (world) http-response FORWARDED (HTTP/1.1 403 1ms (GET http://192.168.10.211/details/1))
## router 에서 curl 실행 시
# => Aug 23 08:10:20.475: 192.168.10.200:43490 (ingress) -> kube-system/cilium-ingress:80 (world) http-request DROPPED (HTTP/1.1 GET http://192.168.10.211/details/1)
#    Aug 23 08:10:20.475: 192.168.10.200:43490 (ingress) <- kube-system/cilium-ingress:80 (world) http-response FORWARDED (HTTP/1.1 403 0ms (GET http://192.168.10.211/details/1))

# router와 k8s-ctr의 요청은 허용하는 정책 적용
$ cat << EOF | kubectl apply -f -
apiVersion: "cilium.io/v2"
kind: CiliumClusterwideNetworkPolicy
metadata:
  name: "allow-cidr"
spec:
  description: "Allow all the traffic originating from a specific CIDR"
  endpointSelector:
    matchExpressions:
    - key: reserved:ingress
      operator: Exists
  ingress:
  - fromCIDRSet:
    # Please update the CIDR to match your environment
    - cidr: 192.168.10.200/32
    - cidr: 127.0.0.1/32
EOF
# => ciliumclusterwidenetworkpolicy.cilium.io/allow-cidr created

# 요청 성공! : k8s-ctr , router 모두 가능
$ curl --fail -v http://"$LBIP"/details/1
# => < HTTP/1.1 200 OK
$ sshpass -p 'vagrant' ssh vagrant@router "curl -s --fail -v http://"$LBIP"/details/1"
# => *   Trying 192.168.10.211:80...
#    * Connected to 192.168.10.211 (192.168.10.211) port 80
#    > GET /details/1 HTTP/1.1
#    > Host: 192.168.10.211
#    > User-Agent: curl/8.5.0
#    > Accept: */*
#    >
#    {"id":1,"author":"William Shakespeare","year":1595,"type":"paperback","pages":200,"publisher":"PublisherA","language":"English","ISBN-10":"1234567890","ISBN-13":"123-1234567890"}< HTTP/1.1 200 OK
#    < content-type: application/json
#    < server: envoy
#    < date: Sat, 23 Aug 2025 08:11:39 GMT
#    < content-length: 178
#    < x-envoy-upstream-service-time: 16
#    <
#    { [178 bytes data]
#    * Connection #0 to host 192.168.10.211 left intact

# Default Deny Ingress Policy : DNS쿼리와 kube-system내의 파드 제외 to deny all traffic by default
$ cat << EOF | kubectl apply -f -
apiVersion: cilium.io/v2
kind: CiliumClusterwideNetworkPolicy
metadata:
  name: "default-deny"
spec:
  description: "Block all the traffic (except DNS) by default"
  egress:
  - toEndpoints:
    - matchLabels:
        io.kubernetes.pod.namespace: kube-system
        k8s-app: kube-dns
    toPorts:
    - ports:
      - port: '53'
        protocol: UDP
      rules:
        dns:
        - matchPattern: '*'
  endpointSelector:
    matchExpressions:
    - key: io.kubernetes.pod.namespace
      operator: NotIn
      values:
      - kube-system
EOF
# => ciliumclusterwidenetworkpolicy.cilium.io/default-deny created
$ kubectl get ciliumclusterwidenetworkpolicy
# => NAME                VALID
#    allow-cidr          True
#    default-deny        True
#    external-lockdown   True

# 요청
$ curl --fail -v http://"$LBIP"/details/1
# => < HTTP/1.1 403 Forbidden
$ sshpass -p 'vagrant' ssh vagrant@router "curl -s --fail -v http://"$LBIP"/details/1"
# => < HTTP/1.1 403 Forbidden

# ingress 를 통해서 인입 시 허용
$ cat << EOF | kubectl apply -f -
apiVersion: cilium.io/v2
kind: CiliumClusterwideNetworkPolicy
metadata:
  name: allow-ingress-egress
spec:
  description: "Allow all the egress traffic from reserved ingress identity to any endpoints in the cluster"
  endpointSelector:
    matchExpressions:
    - key: reserved:ingress
      operator: Exists
  egress:
  - toEntities:
    - cluster
EOF
# => ciliumclusterwidenetworkpolicy.cilium.io/allow-ingress-egress created
$ kubectl get ciliumclusterwidenetworkpolicy
# => NAME                   VALID
#    allow-cidr             True
#    allow-ingress-egress   True
#    default-deny           True
#    external-lockdown      True

#
$ curl --fail -v http://"$LBIP"/details/1
# => < HTTP/1.1 200 OK
$ sshpass -p 'vagrant' ssh vagrant@router "curl -s --fail -v http://"$LBIP"/details/1"
# => *   Trying 192.168.10.211:80...
#    * Connected to 192.168.10.211 (192.168.10.211) port 80
#    > GET /details/1 HTTP/1.1
#    > Host: 192.168.10.211
#    > User-Agent: curl/8.5.0
#    > Accept: */*
#    >
#    {"id":1,"author":"William Shakespeare","year":1595,"type":"paperback","pages":200,"publisher":"PublisherA","language":"English","ISBN-10":"1234567890","ISBN-13":"123-1234567890"}< HTTP/1.1 200 OK
#    < content-type: application/json
#    < server: envoy
#    < date: Sat, 23 Aug 2025 08:13:20 GMT
#    < content-length: 178
#    < x-envoy-upstream-service-time: 8
#    <
#    { [178 bytes data]
#    * Connection #0 to host 192.168.10.211 left intact

# 정책 삭제
$ kubectl delete CiliumClusterwideNetworkPolicy --all
# => ciliumclusterwidenetworkpolicy.cilium.io "allow-cidr" deleted
#    ciliumclusterwidenetworkpolicy.cilium.io "allow-ingress-egress" deleted
#    ciliumclusterwidenetworkpolicy.cilium.io "default-deny" deleted
#    ciliumclusterwidenetworkpolicy.cilium.io "external-lockdown" deleted
Ingress Path Type Example
# Apply the base definitions
$ kubectl apply -f https://raw.githubusercontent.com/cilium/cilium/main/examples/kubernetes/servicemesh/ingress-path-types.yaml
# => ...
#    deployment.apps/implpath2 created
#    ...
#    service/implpath2 created

# 확인
$ kubectl get -f https://raw.githubusercontent.com/cilium/cilium/main/examples/kubernetes/servicemesh/ingress-path-types.yaml
# => NAME                          READY   UP-TO-DATE   AVAILABLE   AGE
#    deployment.apps/exactpath     1/1     1            1           18s
#    deployment.apps/prefixpath    1/1     1            1           18s
#    deployment.apps/prefixpath2   1/1     1            1           18s
#    deployment.apps/implpath      1/1     1            1           18s
#    deployment.apps/implpath2     1/1     1            1           18s
#
#    NAME                  TYPE        CLUSTER-IP     EXTERNAL-IP   PORT(S)   AGE
#    service/prefixpath    ClusterIP   10.96.11.159   <none>        80/TCP    18s
#    service/prefixpath2   ClusterIP   10.96.158.98   <none>        80/TCP    18s
#    service/exactpath     ClusterIP   10.96.46.141   <none>        80/TCP    18s
#    service/implpath      ClusterIP   10.96.88.45    <none>        80/TCP    18s
#    service/implpath2     ClusterIP   10.96.18.242   <none>        80/TCP    18s

# Apply the Ingress
$ kubectl apply -f https://raw.githubusercontent.com/cilium/cilium/main/examples/kubernetes/servicemesh/ingress-path-types-ingress.yaml
# => ingress.networking.k8s.io/multiple-path-types created

# 확인
$ kc describe ingress multiple-path-types
# => Rules:
#      Host                   Path  Backends
#      ----                   ----  --------
#      pathtypes.example.com
#                             /exact    exactpath:80 (172.20.1.238:3000)
#                             /         prefixpath:80 (172.20.1.72:3000)
#                             /prefix   prefixpath2:80 (172.20.1.176:3000)
#                             /impl     implpath:80 (172.20.1.210:3000)
#                             /impl.+   implpath2:80 (172.20.1.223:3000)
$ kc get ingress multiple-path-types -o yaml
# => ...
#    spec:
#      ingressClassName: cilium
#      rules:
#      - host: pathtypes.example.com
#        http:
#          paths:
#          - backend:
#              service:
#                name: exactpath
#                port:
#                  number: 80
#            path: /exact
#            pathType: Exact
#          - backend:
#              service:
#                name: prefixpath
#                port:
#                  number: 80
#            path: /
#            pathType: Prefix
#          - backend:
#              service:
#                name: prefixpath2
#                port:
#                  number: 80
#            path: /prefix
#            pathType: Prefix
#          - backend:
#              service:
#                name: implpath
#                port:
#                  number: 80
#            path: /impl
#            pathType: ImplementationSpecific
#          - backend:
#              service:
#                name: implpath2
#                port:
#                  number: 80
#            path: /impl.+
#            pathType: ImplementationSpecific

# 호출 확인
$ export PATHTYPE_IP=`k get ing multiple-path-types -o json | jq -r '.status.loadBalancer.ingress[0].ip'`
$ curl -s -H "Host: pathtypes.example.com" http://$PATHTYPE_IP/ | jq
# => {
#      "path": "/",
#      "host": "pathtypes.example.com",
#      "method": "GET",
#      ...
#        "X-Envoy-Internal": [
#          "true"
#        ],
#        "X-Forwarded-For": [
#          "10.0.2.15"
#        ],
#    ...

# 파드명 이름 확인
$ kubectl get pod | grep path
# => exactpath-7488f8c6c6-4w7rx        1/1     Running   0          2m7s
#    implpath-7d8bf85676-qz6t6         1/1     Running   0          2m7s
#    implpath2-56c97c8556-mv66q        1/1     Running   0          2m7s
#    prefixpath-5d6b989d4-kwvv6        1/1     Running   0          2m7s
#    prefixpath2-b7c7c9568-br2nl       1/1     Running   0          2m7s

# Should show prefixpath
$ curl -s -H "Host: pathtypes.example.com" http://$PATHTYPE_IP/ | grep -E 'path|pod'
# =>  "path": "/",
#     "host": "pathtypes.example.com",
#     "pod": "prefixpath-5d6b989d4-kwvv6"

# Should show exactpath
$ curl -s -H "Host: pathtypes.example.com" http://$PATHTYPE_IP/exact | grep -E 'path|pod'
# =>  "path": "/exact",
#     "host": "pathtypes.example.com",
#     "pod": "exactpath-7488f8c6c6-4w7rx"

# Should show prefixpath2
$ curl -s -H "Host: pathtypes.example.com" http://$PATHTYPE_IP/prefix | grep -E 'path|pod'
# =>  "path": "/prefix",
#     "host": "pathtypes.example.com",
#     "pod": "prefixpath2-b7c7c9568-br2nl"

# Should show implpath
$ curl -s -H "Host: pathtypes.example.com" http://$PATHTYPE_IP/impl | grep -E 'path|pod'
# =>  "path": "/impl",
#     "host": "pathtypes.example.com",
#     "pod": "implpath-7d8bf85676-qz6t6"

# Should show implpath2
$ curl -s -H "Host: pathtypes.example.com" http://$PATHTYPE_IP/implementation | grep -E 'path|pod'
# =>  "path": "/implementation",
#     "host": "pathtypes.example.com",
#     "pod": "implpath2-56c97c8556-mv66q"

# 삭제
$ kubectl delete -f https://raw.githubusercontent.com/cilium/cilium/main/examples/kubernetes/servicemesh/ingress-path-types.yaml
$ kubectl delete -f https://raw.githubusercontent.com/cilium/cilium/main/examples/kubernetes/servicemesh/ingress-path-types-ingress.yaml
Ingress Example with TLS Termination
TLS 인증서와 개인키 생성 : mkcert - Github
-
mkcert는 로컬 개발 환경에서 신뢰할 수 있는 SSL 인증서를 쉽게 생성할 수 있도록 도와주는 도구입니다.
# For demonstration purposes we will use a TLS certificate signed by a made-up, self-signed certificate authority (CA).
# One easy way to do this is with mkcert. We want a certificate that will validate bookinfo.cilium.rocks and hipstershop.cilium.rocks, as these are the host names used in this example.
$ apt install mkcert -y
$ mkcert -h
# => Usage of mkcert:
#
#            $ mkcert -install
#            Install the local CA in the system trust store.
#
#            $ mkcert example.org
#            Generate "example.org.pem" and "example.org-key.pem".
#
#            $ mkcert example.com myapp.dev localhost 127.0.0.1 ::1
#            Generate "example.com+4.pem" and "example.com+4-key.pem".
#
#            $ mkcert "*.example.it"
#            Generate "_wildcard.example.it.pem" and "_wildcard.example.it-key.pem".
#
#            $ mkcert -uninstall
#            Uninstall the local CA (but do not delete it).
#
#    For more options, run "mkcert -help".

#
$ mkcert '*.cilium.rocks'
# => Created a new local CA 💥
#    Note: the local CA is not installed in the system trust store.
#    Run "mkcert -install" for certificates to be trusted automatically ⚠️
#
#    Created a new certificate valid for the following names 📜
#     - "*.cilium.rocks"
#    ...

#
$ ls -l *.pem
# => -rw------- 1 root root 1704 Aug 23 17:27 _wildcard.cilium.rocks-key.pem
#    -rw-r--r-- 1 root root 1452 Aug 23 17:27 _wildcard.cilium.rocks.pem

#
$ openssl x509 -in _wildcard.cilium.rocks.pem -text -noout
# =>         Issuer: O = mkcert development CA, OU = root@k8s-ctr, CN = mkcert root@k8s-ctr
#            Validity
#                Not Before: Aug 23 08:27:20 2025 GMT
#                Not After : Oct 01 08:27:20 2027 GMT
#            Subject: O = mkcert development certificate, OU = root@k8s-ctr
#            ...
#            X509v3 extensions:
#                X509v3 Key Usage: critical
#                    Digital Signature, Key Encipherment
#                X509v3 Extended Key Usage:
#                    TLS Web Server Authentication
#                X509v3 Authority Key Identifier:
#                    4E:3C:EA:36:AE:39:1C:4C:16:E0:55:3A:B8:B3:E3:D6:10:5B:31:FC
#                X509v3 Subject Alternative Name:
#                    <span style="color: green;">DNS:*.cilium.rocks</span>

$ openssl rsa -in _wildcard.cilium.rocks-key.pem -text -noout
# => Private-Key: (2048 bit, 2 primes)
#    modulus:
#        00:95:4a:de:e4:5c:7a:b6:7e:6c:8a:65:fe:8d:9c:
#    ...

# Mkcert created a key (_wildcard.cilium.rocks-key.pem) and a certificate (_wildcard.cilium.rocks.pem) that we will use for the Gateway service.
# Create a Kubernetes TLS secret with this key and certificate:
$ kubectl create secret tls demo-cert --key=_wildcard.cilium.rocks-key.pem --cert=_wildcard.cilium.rocks.pem
# => secret/demo-cert created
$ kubectl get secret demo-cert -o json | jq
# => {
#      "apiVersion": "v1",
#      "data": {
#        "tls.crt": "LS0tLS1CRUdJT...VRFLS0tLS0K",
#        "tls.key": "LS0tLS1CRUdJT...gS0VZLS0tLS0K"
#      },
#      ...
#      "type": "kubernetes.io/tls"
#    }
Ingress 배포
#
$ cat << EOF | kubectl apply -f -
apiVersion: networking.k8s.io/v1
kind: Ingress
metadata:
  name: tls-ingress
  namespace: default
spec:
  ingressClassName: cilium
  rules:
  - host: webpod.cilium.rocks
    http:
      paths:
      - backend:
          service:
            name: webpod
            port:
              number: 80
        path: /
        pathType: Prefix
  - host: bookinfo.cilium.rocks
    http:
      paths:
      - backend:
          service:
            name: details
            port:
              number: 9080
        path: /details
        pathType: Prefix
      - backend:
          service:
            name: productpage
            port:
              number: 9080
        path: /
        pathType: Prefix
  tls:
  - hosts:
    - webpod.cilium.rocks
    - bookinfo.cilium.rocks
    secretName: demo-cert
EOF
# => ingress.networking.k8s.io/tls-ingress created

#
$ kubectl get ingress tls-ingress
# => NAME          CLASS    HOSTS                                       ADDRESS          PORTS     AGE
#    tls-ingress   cilium   webpod.cilium.rocks,bookinfo.cilium.rocks   192.168.10.211   80, 443   22s
요청하기
# 시스템(OS) 신뢰 저장소에 CA 정보 확인
$ cat /etc/ssl/certs/ca-certificates.crt
$ ls -al /etc/ssl/certs/ca-certificates.crt
# => -rw-r--r-- 1 root root 219342 Feb 17  2025 /etc/ssl/certs/ca-certificates.crt

# Install the Mkcert CA into your system so cURL can trust it:
# mkcert -install은 “내 로컬에서 만든 인증서를 시스템이 믿도록” 환경을 꾸며주는 명령.
$ mkcert -install
# => The local CA is now installed in the system trust store! ⚡️

# 1. 로컬 CA(자체 루트 인증기관) 생성
# 아직 없으면 로컬 CA 인증서와 개인키를 만듭니다.
# 파일은 $(mkcert -CAROOT)가 가리키는 사용자 데이터 디렉터리에 저장돼요(예: rootCA.pem, rootCA-key.pem). 이 위치는 mkcert -CAROOT로 확인합니다.
## CA 저장 위치 확인
$ mkcert -CAROOT
# => /root/.local/share/mkcert

$ ls "$(mkcert -CAROOT)"
# => rootCA-key.pem  rootCA.pem

# 2. 시스템(OS) 신뢰 저장소에 CA를 등록
# 배포판에 맞는 도구(예: Debian/Ubuntu의 update-ca-certificates, RHEL/Fedora의 update-ca-trust, Arch의 trust)를 사용해 루트 CA 인증서를 시스템 신뢰 저장소에 넣습니다.
# 이렇게 하면 OpenSSL/GnuTLS를 쓰는 대부분의 CLI가 이 CA로 서명된 서버 인증서를 신뢰합니다. (curl도 포함)
$ ls -al /etc/ssl/certs/ca-certificates.crt
# => -rw-r--r-- 1 root root 220952 Aug 23 17:31 /etc/ssl/certs/ca-certificates.crt

## 맨 하단에 인증서만 파일로 만들어서 디코딩!
$ tail -n 50 /etc/ssl/certs/ca-certificates.crt
# => ...
#    -----END CERTIFICATE-----
#    -----BEGIN CERTIFICATE-----
#    MIIEeTCCAuGgAwIBAgIQHQmaPLojsfEios2wRChKPTANBgkqhkiG9w0BAQsFADBV
#    ...
#    zLFNEfhNUdhcRarky3dp/Jbp16t2QJRYh39gFskAJ1+02uQrsFq14pPnOO1d
#    -----END CERTIFICATE-----
$ vi 1.pem
---
-----BEGIN CERTIFICATE-----
MIIEeTCCAuGgAwIBAgIQHQmaPLojsfEios2wRChKPTANBgkqhkiG9w0BAQsFADBV
...
zLFNEfhNUdhcRarky3dp/Jbp16t2QJRYh39gFskAJ1+02uQrsFq14pPnOO1d
-----END CERTIFICATE-----
---
$ openssl x509 -in 1.pem -text -noout
# =>         Issuer: O = mkcert development CA, OU = root@k8s-ctr, CN = mkcert root@k8s-ctr
#            Validity
#                Not Before: Aug 23 08:27:20 2025 GMT
#                Not After : Aug 23 08:27:20 2035 GMT
#            Subject: O = mkcert development CA, OU = root@k8s-ctr, CN = mkcert root@k8s-ctr
#            Subject Public Key Info:
#    ...
#            X509v3 extensions:
#                X509v3 Key Usage: critical
#                    Certificate Sign
#                X509v3 Basic Constraints: critical
#                    CA:TRUE, pathlen:0
#    ...

# 3. NSS(브라우저) 신뢰 저장소에 등록
# Linux에서는 Firefox/Chromium이 쓰는 NSS 데이터베이스에도 CA를 넣습니다(사전에 certutil 설치 필요). Firefox는 브라우저 재시작이 필요합니다

# Now let's make a request to the Gateway:
# The data should be properly retrieved, using HTTPS (and thus, the TLS handshake was properly achieved).
# In the next challenge, we will see how to use Gateway API for general TLS traffic.
$ kubectl get ingress tls-ingress -o jsonpath='{.status.loadBalancer.ingress[0].ip}'
# => 192.168.10.211
$ LBIP=$(kubectl get ingress tls-ingress -o jsonpath='{.status.loadBalancer.ingress[0].ip}')

$ curl -s --resolve bookinfo.cilium.rocks:443:${LBIP} https://bookinfo.cilium.rocks/details/1 | jq
# => {
#      "id": 1,
#      "author": "William Shakespeare",
#      "year": 1595,
#      "type": "paperback",
#      "pages": 200,
#      "publisher": "PublisherA",
#      "language": "English",
#      "ISBN-10": "1234567890",
#      "ISBN-13": "123-1234567890"
#    }

$ curl -s --resolve webpod.cilium.rocks:443:${LBIP}   https://webpod.cilium.rocks/ -v
# => ...
#    *  CAfile: /etc/ssl/certs/ca-certificates.crt
#    *  CApath: /etc/ssl/certs
#    ...
#    * Server certificate:
#    *  subject: O=mkcert development certificate; OU=root@k8s-ctr
#    *  start date: Aug 23 08:27:20 2025 GMT
#    *  expire date: Oct 01 08:27:20 2027 GMT
#    *  subjectAltName: host "webpod.cilium.rocks" matched cert's "*.cilium.rocks"
#    *  issuer: O=mkcert development CA; OU=root@k8s-ctr; CN=mkcert root@k8s-ctr
#    ...
#    Hostname: webpod-697b545f57-b5vtj
#    ...
#    IP: 172.20.0.70
#    RemoteAddr: 10.0.2.15:51328
#    GET / HTTP/1.1
#    Host: webpod.cilium.rocks
#    User-Agent: curl/8.5.0
#    Accept: */*
#    X-Envoy-Internal: true
#    X-Forwarded-For: 10.0.2.15
#    X-Forwarded-Proto: https
#    X-Request-Id: da68b521-852e-4678-92ed-37f72101d75d
- TLS Termination이 잘 되어서 https로 요청시 인증서가 유효하고, 서비스로 요청이 잘 전달되는 것을 확인할 수 있습니다.
ingress 삭제
$ kubectl delete ingress basic-ingress tls-ingress webpod-ingress
# => ingress.networking.k8s.io "basic-ingress" deleted
#    ingress.networking.k8s.io "tls-ingress" deleted
#    ingress.networking.k8s.io "webpod-ingress" deleted
Gateway API Support
Gateway API 소개
- Gateway API는 기존의 Ingress API의 한계를 극복하고 대체하기 위한 차세대 API로, 기능을 추가하고, 역할을 분리하고, 더 유연하고 확장 가능한 방식으로 클러스터 외부에서 내부로의 트래픽을 관리할 수 있도록 설계되었습니다. Docs, Youtube
- 기존 Ingress의 한계
- 고급 라우팅 지원 부족 (URL rewriting 등) : Ingress Controller 마다 지원하는 기능이 다르고, 특수한 Annotation을 사용해야 하는 등 일관성이 부족합니다.
- 역할 분리 부족 : Ingress 리소스는 클러스터 운영자와 애플리케이션 개발자 간의 역할 분리가 명확하지 않아, 운영자가 애플리케이션의 라우팅 정책을 완전히 제어할 수 있습니다
- 프로토콜 제한 : Ingress는 주로 HTTP/HTTPS 트래픽을 처리하도록 설계되어 있어, TCP, UDP 등 다른 프로토콜에 대한 지원이 제한적입니다.
- 운영 제한 : Ingress의 API는 유연하지 못하여 로드밸런싱을 공유하는 인프라를 여러 팀이 관리하는 클러스터에 적합하지 않는등 운영상의 제약이 있습니다.
- 서비스 메시(istiod 등)에서 제공하는 풍부한 기능 중 일부 기능들과 운영관리 기능들을 Gateway API를 통해 사용할 수 있습니다.
- 주요 기능
- 개선된 리소스 모델 : Gateway API는 GatewayClass, Gateway 및 Route(HTTPRoute, TCPRoute 등)와 같은 새로운 사용자 정의 리소스를 도입하여 라우팅 규칙을 정의하는 보다 세부적이고 표현력 있는 방법을 제공합니다.
- 프로토콜 독립적 : 주로 HTTP용으로 설계된 Ingress와 달리 Gateway API는 TCP, UDP, TLS를 포함한 여러 프로토콜을 지원합니다.
- 강화된 보안 : TLS 구성 및 보다 세부적인 액세스 제어에 대한 기본 제공 지원.
- 교차 네임스페이스 지원 : 서로 다른 네임스페이스의 서비스로 트래픽을 라우팅하여 보다 유연한 아키텍처를 구축할 수 있는 기능을 제공합니다.
- 확장성 : API는 사용자 정의 리소스 및 정책으로 쉽게 확장할 수 있도록 설계되었습니다.
- 역할 지향 : 클러스터 운영자, 애플리케이션 개발자, 보안 팀 간의 관심사를 명확하게 분리합니다.
- Gateway API의 구성요소 (Resource)
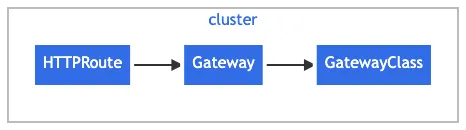
- GatewayClass : 클러스터에서 사용 가능한 Gateway의 유형을 정의합니다. 클래스를 구현하는 컨트롤러에의해 관리 됩니다.
- Gateway : 네트워크 트래픽을 처리하는 인프라스트럭쳐 구성요소를 나타냅니다. (예) 클라우드 로드 밸런서, 프록시 서버 등)
- HTTPRoute : HTTP 트래픽에 특화된 라우팅 규칙을 정의합니다.
- TCPRoute : TCP 트래픽에 특화된 라우팅 규칙을 정의합니다.
- Service : Kubernetes 서비스 리소스와 유사하게,트래픽이 라우팅될 백엔드 서비스를 나타냅니다.
- 역할 지향에 의한 관심사 분리
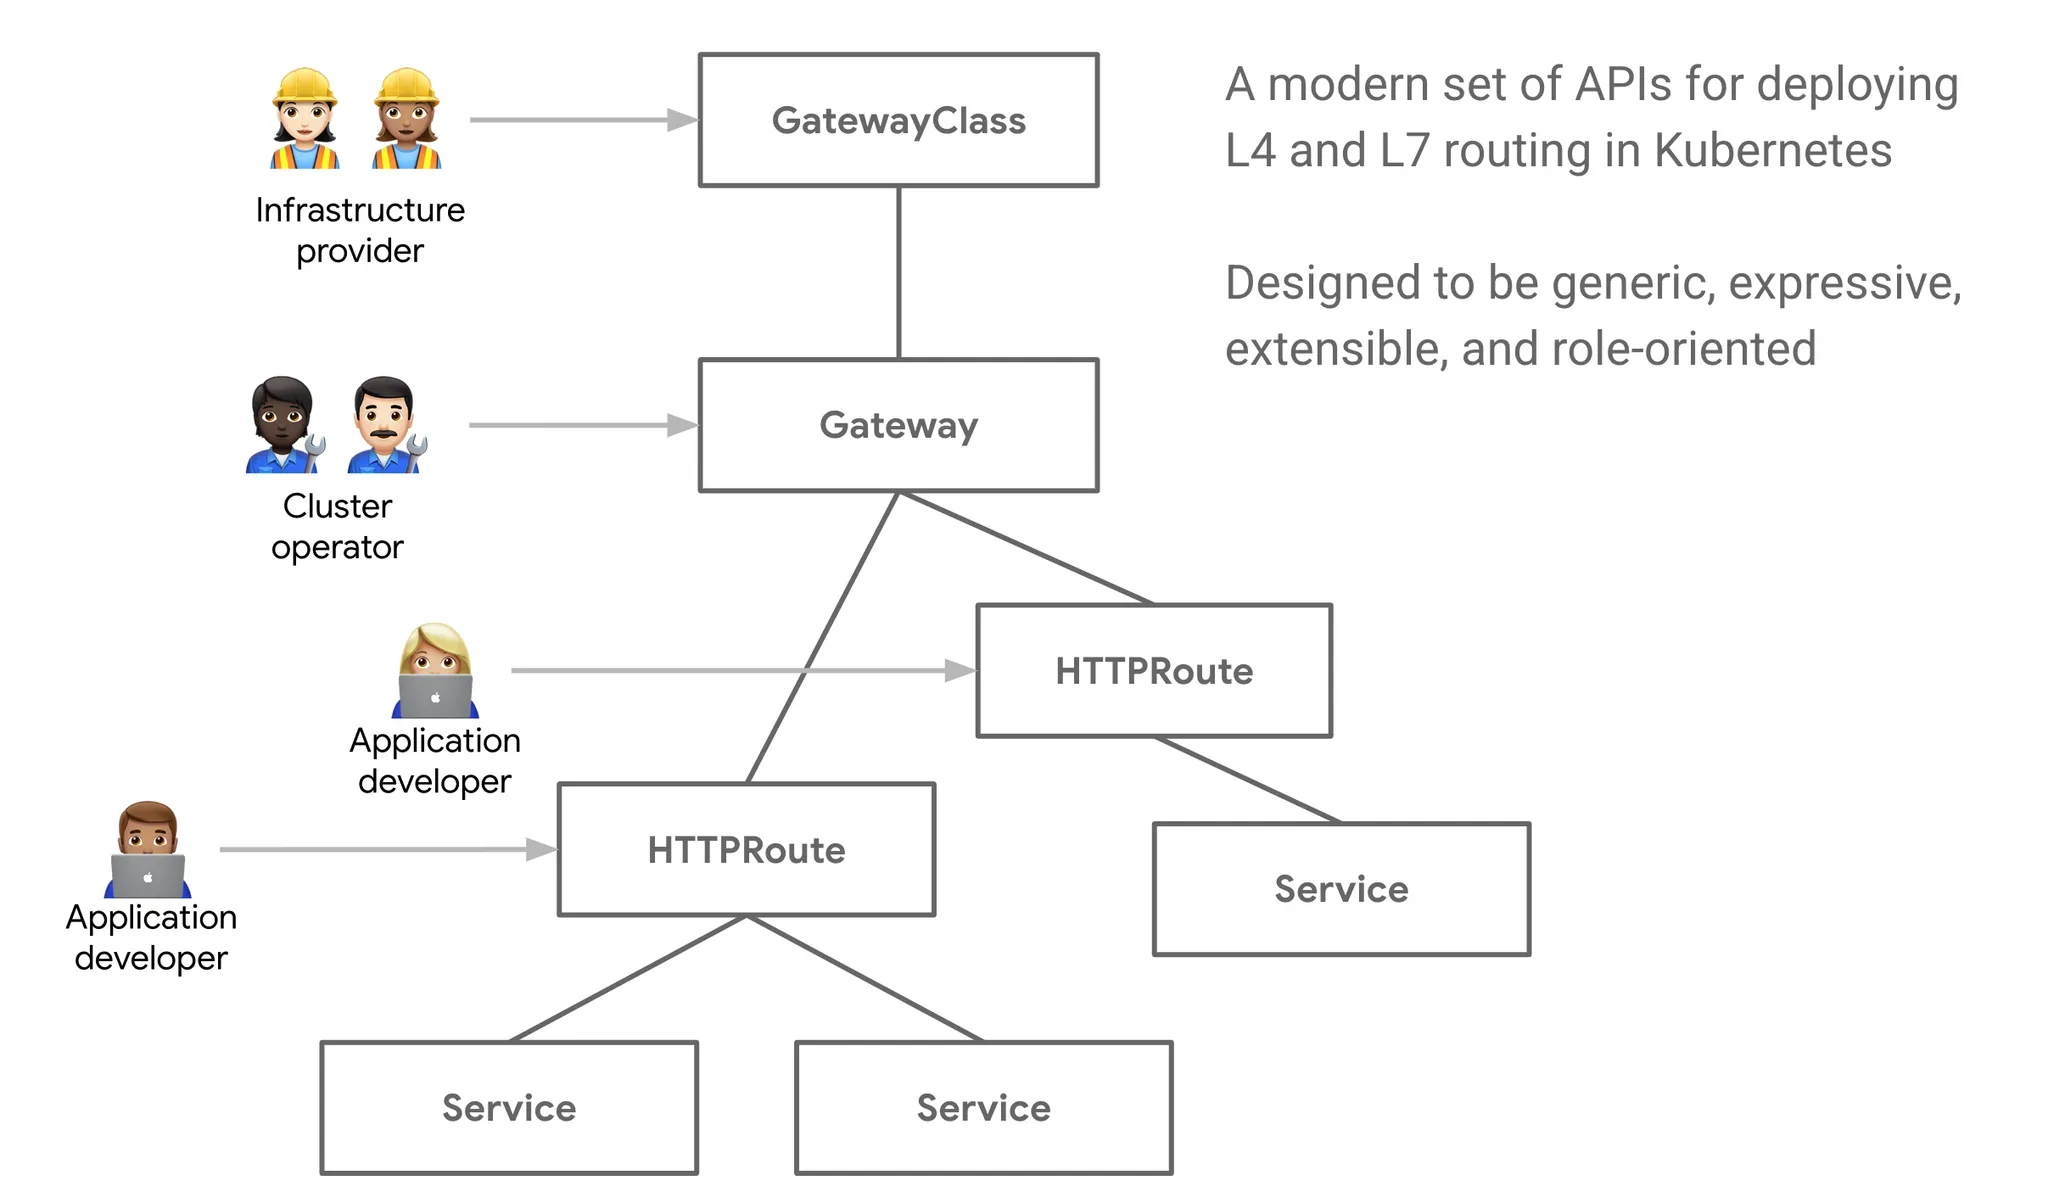
- Ingress의 경우 Ingress 리소스에 대한 권한이 있는 사용자가 Ingress 컨트롤러의 동작을 완전히 제어할 수 있습니다.
- 하지만 Gateway API에서는 GatewayClass, Gateway 및 Route 리소스를 통해 역할을 분리하여 각 역할에 대한 권한을 세분화하여 필요한 최소한의 권한만 부여할 수 있습니다.
- 역할 지향에 의한 권한 부여 예시 - Blog1, Blog2
- 아래의 그림 처럼 “Store 개발자”는 Store namespace에서 해당 store PATH 라우팅 정책을 스스로 관리할 수 있습니다.
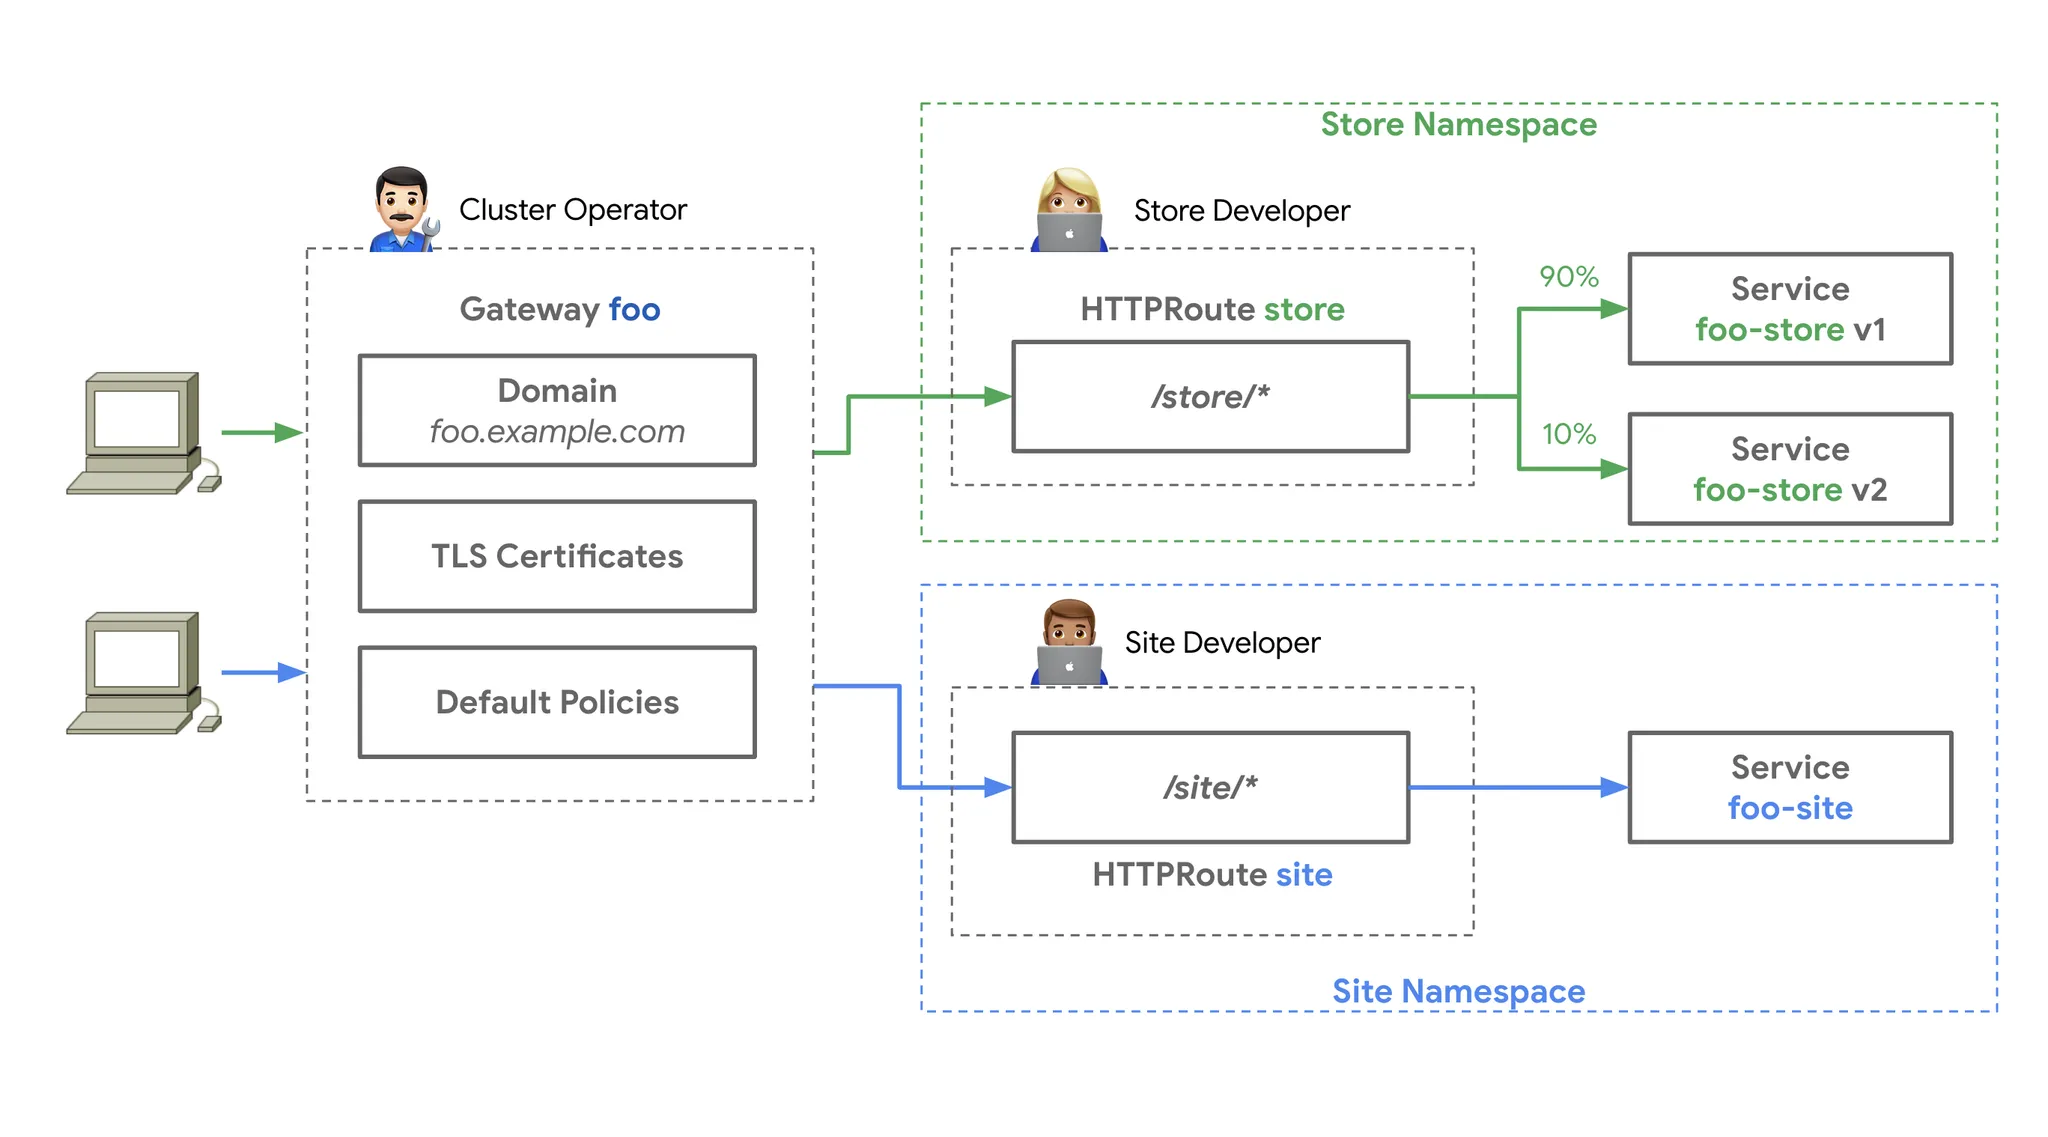 https://gateway-api.sigs.k8s.io/
- Infrastructure 제공자 : 여러 테넌트를 지원하기위해 여러 격리된 클러스터를 운영하는 인프라를 관리합니다.
- Cluster 운영자 : 정책, 네트워크 제어, 애플리케이션 권한 등의 클러스터를 관리합니다. 위의 그림에서는 도메인, 인증서, 전체적인 정책 등을 관리합니다.
- Application 개발자 : 클러스터에서 동작하는 애플리케이션을 개발하고 배포, 관리합니다. 위의 그림에서는 개별 애플리케이션에 대한 라우팅 정책을 관리합니다.
- 아래의 그림 처럼 “Store 개발자”는 Store namespace에서 해당 store PATH 라우팅 정책을 스스로 관리할 수 있습니다.
Cilium Gateway API 지원
- 관련 문서
- Cilium은 Gateway API를 지원하며, Cilium의 서비스 메시 기능과 통합하여 고급 트래픽 관리 및 보안 기능을 제공합니다.
- Cilium은 아래의 resource에 대해 Gateway API v1.2.0을 지원하고, 모든 중요한 기능에 대한 만족토 테스트를 통과하였습니다. (v1.3은 아직 일부항목이 만족되지 않은 상태입니다. - https://gateway-api.sigs.k8s.io/implementations/v1.3/)
- GatewayClass
- Gateway
- HTTPRoute
- GRPCRoute
- TLSRoute (experimental)
-
ReferenceGrant
- 추가적으로
CiliumGatewayClassConfigCRD를 제공하며, GatewayClass.parametersRef에서 참조할 수 있습니다.
- 추가적으로
- 사전 준비
- Cilium은 NodePort 지원이 활성화(
nodePort.enabled=true) 되어 있어있거나 Kube-Proxy 대체 모드(kubeProxyReplacement=true)로 동작하고 있어야 합니다. - Cilium은 L7 프록시 기능이 활성화(
l7Proxy=true) 되어 있어야 합니다. (기본값은 true) - 아래의 Gateway API 1.2.0 CRD가 클러스터에 적용되어 있어야 합니다. (설치과정은 문서를 참고하세요.)
# CRD 설치 $ kubectl apply -f https://raw.githubusercontent.com/kubernetes-sigs/gateway-api/v1.2.0/config/crd/standard/gateway.networking.k8s.io_gatewayclasses.yaml $ kubectl apply -f https://raw.githubusercontent.com/kubernetes-sigs/gateway-api/v1.2.0/config/crd/standard/gateway.networking.k8s.io_gateways.yaml $ kubectl apply -f https://raw.githubusercontent.com/kubernetes-sigs/gateway-api/v1.2.0/config/crd/standard/gateway.networking.k8s.io_httproutes.yaml $ kubectl apply -f https://raw.githubusercontent.com/kubernetes-sigs/gateway-api/v1.2.0/config/crd/standard/gateway.networking.k8s.io_referencegrants.yaml $ kubectl apply -f https://raw.githubusercontent.com/kubernetes-sigs/gateway-api/v1.2.0/config/crd/standard/gateway.networking.k8s.io_grpcroutes.yaml $ kubectl apply -f https://raw.githubusercontent.com/kubernetes-sigs/gateway-api/v1.2.0/config/crd/experimental/gateway.networking.k8s.io_tlsroutes.yaml # 확인 $ kubectl get crd | grep gateway.networking.k8s.io # => gatewayclasses.gateway.networking.k8s.io 2025-08-23T10:48:59Z # gateways.gateway.networking.k8s.io 2025-08-23T10:48:59Z # grpcroutes.gateway.networking.k8s.io 2025-08-23T10:49:01Z # httproutes.gateway.networking.k8s.io 2025-08-23T10:49:00Z # referencegrants.gateway.networking.k8s.io 2025-08-23T10:49:01Z # tlsroutes.gateway.networking.k8s.io 2025-08-23T10:49:02Z - 기본적으로 Gateway API 컨트롤러는 LoadBalancer 타입의 Service를 생성하여 외부에서 접근할 수 있도록 합니다. 대안으로 Cilium 1.16 이상에서는 Cilium L7 Proxy를 호스트 네트워크에 노출 시킬 수도 있습니다.
- Cilium은 NodePort 지원이 활성화(
- 전반적인 동작 메커니즘
- Cilium은 크게 Cilium Agent와 Cilium Operator의 두 컴포넌트로 구성됩니다.
- Cilium Operator는 모든 Gateway API 리소스를 감시하고, 리소스가 적합한지 검증합니다. 만약 리소스가 적합하다면 구성을 수용해서 Cilium Envoy 구성에 반영합니다.
- Cilium Agent는 각 노드에서 실행되며, Cilium Operator가 제공하는 구성을 사용하여 Envoy나 Envoy DaemonSet을 설정하고 관리합니다. Envoy는 트래픽을 처리하고 라우팅하는 역할을 합니다.
Cilium Gateway API 설정 및 배포
Cilium Gateway API 활성화
# ingress와 Gateway API는 동시에 사용할 수 없기 때문에 ingressController를 비활성화합니다.
$ helm upgrade cilium cilium/cilium --version 1.18.1 --namespace kube-system --reuse-values \
  --set ingressController.enabled=false --set gatewayAPI.enabled=true

#
$ kubectl -n kube-system rollout restart deployment/cilium-operator
# => deployment.apps/cilium-operator restarted
$ kubectl -n kube-system rollout restart ds/cilium
# => daemonset.apps/cilium restarted

#
$ cilium config view | grep gateway-api
# => enable-gateway-api                                true
#    enable-gateway-api-alpn                           false
#    enable-gateway-api-app-protocol                   false
#    enable-gateway-api-proxy-protocol                 false
#    enable-gateway-api-secrets-sync                   true
#    gateway-api-hostnetwork-enabled                   false
#    gateway-api-hostnetwork-nodelabelselector
#    gateway-api-secrets-namespace                     cilium-secrets
#    gateway-api-service-externaltrafficpolicy         Cluster
#    gateway-api-xff-num-trusted-hops                  0

# cilium-ingress 제거 확인
$ kubectl get svc,pod -n kube-system

$ kubectl get GatewayClass
# => NAME     CONTROLLER                     ACCEPTED   AGE
#    cilium   io.cilium/gateway-controller   True       64s

$ kubectl get gateway -A
# => No resources found
# <span style="color: green;">👉 아직 배포된 Gateway가 없습니다.</span>
Cilium Gateway 배포
#
$ cat << EOF | kubectl apply -f -
apiVersion: gateway.networking.k8s.io/v1
kind: Gateway
metadata:
  name: my-gateway
spec:
  gatewayClassName: cilium
  listeners:
  - protocol: HTTP
    port: 80
    name: web-gw
    allowedRoutes:
      namespaces:
        from: Same
---
apiVersion: gateway.networking.k8s.io/v1
kind: HTTPRoute
metadata:
  name: http-app-1
spec:
  parentRefs:
  - name: my-gateway
    namespace: default
  rules:
  - matches:
    - path:
        type: PathPrefix
        value: /details
    backendRefs:
    - name: details
      port: 9080
  - matches:
    - headers:
      - type: Exact
        name: magic
        value: foo
      queryParams:
      - type: Exact
        name: great
        value: example
      path:
        type: PathPrefix
        value: /
      method: GET
    backendRefs:
    - name: productpage
      port: 9080
EOF
# => gateway.gateway.networking.k8s.io/my-gateway created
#    httproute.gateway.networking.k8s.io/http-app-1 created

$ kubectl get svc,ep cilium-gateway-my-gateway
# => NAME                                TYPE           CLUSTER-IP     EXTERNAL-IP      PORT(S)        AGE
#    service/cilium-gateway-my-gateway   LoadBalancer   10.96.119.37   192.168.10.211   80:30910/TCP   17s
#
#    NAME                                  ENDPOINTS              AGE
#    endpoints/cilium-gateway-my-gateway   192.192.192.192:9999   17s

$ kubectl get gateway
# => NAME         CLASS    ADDRESS          PROGRAMMED   AGE
#    my-gateway   cilium   192.168.10.211   True         32s

## Accepted: Gateway 구성이 올바르고 수용되었음을 나타냅니다.
## Programmed: Gateway 구성이 Envoy에 성공적으로 적용되었음을 나타냅니다.
## ResolvedRefs: 모든 참조된 시크릿이 발견되고 사용 권한이 있음을 나타냅니다.
$ kc describe gateway
# => ...
#      Conditions:
#        Last Transition Time:  2025-08-23T11:11:49Z
#        Message:               Gateway successfully scheduled
#        Observed Generation:   1
#        Reason:                Accepted
#        Status:                True
#        Type:                  Accepted
#        Last Transition Time:  2025-08-23T11:11:49Z
#        Message:               Gateway successfully reconciled
#        Observed Generation:   1
#        Reason:                Programmed
#        Status:                True
#        Type:                  Programmed
#    ...

#
$ kubectl get httproutes -A
# => NAMESPACE   NAME         HOSTNAMES   AGE
#    default     http-app-1               2m53s

# Accepted: HTTPRoute가 올바르게 수용되었음을 나타냅니다.
# ResolvedRefs: 참조된 서비스가 발견되고 유효한 참조임을 나타냅니다.
$ kc describe httproutes
# => ...
#        Conditions:
#          Last Transition Time:  2025-08-23T11:11:49Z
#          Message:               Accepted HTTPRoute
#          Observed Generation:   1
#          Reason:                Accepted
#          Status:                True
#          Type:                  Accepted
#          Last Transition Time:  2025-08-23T11:11:49Z
#          Message:               Service reference is valid
#          Observed Generation:   1
#          Reason:                ResolvedRefs
#          Status:                True
#          Type:                  ResolvedRefs
#    ...

# Cilium Operator 로그 확인
$ kubectl logs -n kube-system deployments/cilium-operator | grep gateway
요청 하기
- HTTP 경로 매칭과 HTTP 헤더 매칭
#
$ GATEWAY=$(kubectl get gateway my-gateway -o jsonpath='{.status.addresses[0].value}')
$ echo $GATEWAY
# => 192.168.10.211

# HTTP 경로 매칭
$ curl --fail -s http://"$GATEWAY"/details/1 | jq
# => {
#      "id": 1,
#      "author": "William Shakespeare",
#      "year": 1595,
#      "type": "paperback",
#      "pages": 200,
#      "publisher": "PublisherA",
#      "language": "English",
#      "ISBN-10": "1234567890",
#      "ISBN-13": "123-1234567890"
#    }
$ sshpass -p 'vagrant' ssh vagrant@router "curl -s --fail -v http://"$GATEWAY"/details/1"
# => {"id":1,"author":"William Shakespeare","year":1595,"type":"paperback","pages":200,"publisher":"PublisherA","language":"English","ISBN-10":"1234567890","ISBN-13":"123-1234567890"}
#    < HTTP/1.1 200 OK

# HTTP 헤더 매칭
$ curl -v -H 'magic: foo' http://"$GATEWAY"\?great\=example
# => < HTTP/1.1 200 OK
$ sshpass -p 'vagrant' ssh vagrant@router "curl -s -v -H 'magic: foo' http://"$GATEWAY"\?great\=example"
# => < HTTP/1.1 200 OK
HTTPS 예제
#
$ cat << EOF | kubectl apply -f -
apiVersion: gateway.networking.k8s.io/v1
kind: Gateway
metadata:
  name: tls-gateway
spec:
  gatewayClassName: cilium
  listeners:
  - name: https-1
    protocol: HTTPS
    port: 443
    hostname: "bookinfo.cilium.rocks"
    tls:
      certificateRefs:
      - kind: Secret
        name: demo-cert
  - name: https-2
    protocol: HTTPS
    port: 443
    hostname: "webpod.cilium.rocks"
    tls:
      certificateRefs:
      - kind: Secret
        name: demo-cert
---
apiVersion: gateway.networking.k8s.io/v1
kind: HTTPRoute
metadata:
  name: https-app-route-1
spec:
  parentRefs:
  - name: tls-gateway
  hostnames:
  - "bookinfo.cilium.rocks"
  rules:
  - matches:
    - path:
        type: PathPrefix
        value: /details
    backendRefs:
    - name: details
      port: 9080
---
apiVersion: gateway.networking.k8s.io/v1
kind: HTTPRoute
metadata:
  name: https-app-route-2
spec:
  parentRefs:
  - name: tls-gateway
  hostnames:
  - "webpod.cilium.rocks"
  rules:
  - matches:
    - path:
        type: PathPrefix
        value: /
    backendRefs:
    - name: webpod
      port: 80
EOF
# => gateway.gateway.networking.k8s.io/tls-gateway created
#    httproute.gateway.networking.k8s.io/https-app-route-1 created
#    httproute.gateway.networking.k8s.io/https-app-route-2 created

#
$ kubectl get gateway tls-gateway
# => NAME          CLASS    ADDRESS          PROGRAMMED   AGE
#    tls-gateway   cilium   192.168.10.213   True         24s

$ kubectl get httproutes https-app-route-1 https-app-route-2
# => NAME                HOSTNAMES                   AGE
#    https-app-route-1   ["bookinfo.cilium.rocks"]   36s
#    https-app-route-2   ["webpod.cilium.rocks"]     36s

#
$ GATEWAY2=$(kubectl get gateway tls-gateway -o jsonpath='{.status.addresses[0].value}')
$ echo $GATEWAY2
# => 192.168.10.213

$ curl -s --resolve bookinfo.cilium.rocks:443:${GATEWAY2} https://bookinfo.cilium.rocks/details/1 | jq
# => {
#      "id": 1,
#      "author": "William Shakespeare",
#      "year": 1595,
#      "type": "paperback",
#      "pages": 200,
#      "publisher": "PublisherA",
#      "language": "English",
#      "ISBN-10": "1234567890",
#      "ISBN-13": "123-1234567890"
#    }

$ curl -s --resolve webpod.cilium.rocks:443:${GATEWAY2}   https://webpod.cilium.rocks/ -v
# => ...
#    * TLSv1.3 (OUT), TLS handshake, Client hello (1):
#    *  CAfile: /etc/ssl/certs/ca-certificates.crt
#    *  CApath: /etc/ssl/certs
#    ...
#    *  subjectAltName: host "webpod.cilium.rocks" matched cert's "*.cilium.rocks"
#    *  issuer: O=mkcert development CA; OU=root@k8s-ctr; CN=mkcert root@k8s-ctr
#    *  SSL certificate verify ok.
#    ...
- TLS Termination이 잘 되어서 https로 요청시 인증서가 유효하고, 서비스로 요청이 잘 전달되는 것을 확인할 수 있습니다.
TLS Route
- TLS Route는 앞에서 살펴본 TLS Termination과는 다르게 TLS Passthrough를 지원합니다.
- TLS Termination : Gateway가 TLS 연결을 종료하고, 내부 서비스로는 평문 HTTP 트래픽을 전달합니다. (즉, Gateway가 클라이언트와 서버 간의 TLS 세션을 종료합니다.)
-
TLS Passthrough : Gateway가 TLS 연결을 종료하지 않고, 클라이언트와 서버 간의 TLS 트래픽을 그대로 전달합니다.
graph TD A[Client] -->|TLS Handshake| B["Gateway (TLS Termination)"] B -->|HTTP Traffic| C[Backend Service] A2[Client] -->|TLS Handshake| B2["Gateway (TLS Passthrough)"] B2 -->|TLS Traffic| C2[Backend Service]
- 샘플앱 배포
# Deploy the Demo app : HTTPS 웹서버
# We will be using a NGINX web server. Review the NGINX configuration.
$ cat <<'EOF' > nginx.conf
events {
}

http {
  log_format main '$remote_addr - $remote_user [$time_local]  $status '
  '"$request" $body_bytes_sent "$http_referer" '
  '"$http_user_agent" "$http_x_forwarded_for"';
  access_log /var/log/nginx/access.log main;
  error_log  /var/log/nginx/error.log;

  server {
    listen 443 ssl;

    root /usr/share/nginx/html;
    index index.html;

    server_name nginx.cilium.rocks;
    ssl_certificate /etc/nginx-server-certs/tls.crt;
    ssl_certificate_key /etc/nginx-server-certs/tls.key;
  }
}
EOF

# As you can see, it listens on port 443 for SSL traffic. Notice it specifies the certificate and key previously created.
# We will need to mount the files to the right path (/etc/nginx-server-certs) when we deploy the server.
# The NGINX server configuration is held in a Kubernetes ConfigMap. Let's create it.
$ kubectl create configmap nginx-configmap --from-file=nginx.conf=./nginx.conf
# => configmap/nginx-configmap created

# Review the NGINX server Deployment and the Service fronting it:
$ cat << EOF | kubectl apply -f -
apiVersion: v1
kind: Service
metadata:
  name: my-nginx
  labels:
    run: my-nginx
spec:
  ports:
    - port: 443
      protocol: TCP
  selector:
    run: my-nginx
---
apiVersion: apps/v1
kind: Deployment
metadata:
  name: my-nginx
spec:
  selector:
    matchLabels:
      run: my-nginx
  replicas: 1
  template:
    metadata:
      labels:
        run: my-nginx
    spec:
      containers:
        - name: my-nginx
          image: nginx
          ports:
            - containerPort: 443
          volumeMounts:
            - name: nginx-config
              mountPath: /etc/nginx
              readOnly: true
            - name: nginx-server-certs
              mountPath: /etc/nginx-server-certs
              readOnly: true
      volumes:
        - name: nginx-config
          configMap:
            name: nginx-configmap
        - name: nginx-server-certs
          secret:
            secretName: demo-cert
EOF
# => service/my-nginx created
#    deployment.apps/my-nginx created

# Verify the Service and Deployment have been deployed successfully:
$ kubectl get deployment,svc,ep my-nginx
# => NAME                       READY   UP-TO-DATE   AVAILABLE   AGE
#    deployment.apps/my-nginx   1/1     1            1           17s
#
#    NAME               TYPE        CLUSTER-IP      EXTERNAL-IP   PORT(S)   AGE
#    service/my-nginx   ClusterIP   10.96.141.153   <none>        443/TCP   17s
#
#    NAME                 ENDPOINTS          AGE
#    endpoints/my-nginx   172.20.1.187:443   17s
- Gateway 배포
#
$ cat << EOF | kubectl apply -f -
apiVersion: gateway.networking.k8s.io/v1
kind: Gateway
metadata:
  name: cilium-tls-gateway
spec:
  gatewayClassName: cilium
  listeners:
    - name: https
      hostname: "nginx.cilium.rocks"
      port: 443
      protocol: TLS
      tls:
        mode: Passthrough
      allowedRoutes:
        namespaces:
          from: All
---
apiVersion: gateway.networking.k8s.io/v1alpha2
kind: TLSRoute
metadata:
  name: nginx
spec:
  parentRefs:
    - name: cilium-tls-gateway
  hostnames:
    - "nginx.cilium.rocks"
  rules:
    - backendRefs:
        - name: my-nginx
          port: 443
EOF
# => gateway.gateway.networking.k8s.io/cilium-tls-gateway created
#    tlsroute.gateway.networking.k8s.io/nginx created

# The Gateway does not actually inspect the traffic aside from using the SNI header for routing. Indeed the hostnames field defines a set of SNI names that should match against the SNI attribute of TLS ClientHello message in TLS handshake.
# Let's now deploy the Gateway and the TLSRoute to the cluste
$ kubectl get gateway cilium-tls-gateway
# => NAME                 CLASS    ADDRESS          PROGRAMMED   AGE
#    cilium-tls-gateway   cilium   192.168.10.214   True         10s

$ GATEWAY=$(kubectl get gateway cilium-tls-gateway -o jsonpath='{.status.addresses[0].value}')
$ echo $GATEWAY
# => 192.168.10.214

# Let's also double check the TLSRoute has been provisioned successfully and has been attached to the Gateway.
$ kubectl get tlsroutes.gateway.networking.k8s.io -o json | jq '.items[0].status.parents[0]'
# => {
#      "conditions": [
#        {
#          "lastTransitionTime": "2025-08-23T11:34:35Z",
#          "message": "Accepted TLSRoute",
#          "observedGeneration": 1,
#          "reason": "Accepted",
#          "status": "True",
#          "type": "Accepted"
#        },
#        {
#          "lastTransitionTime": "2025-08-23T11:34:35Z",
#          "message": "Service reference is valid",
#          "observedGeneration": 1,
#          "reason": "ResolvedRefs",
#          "status": "True",
#          "type": "ResolvedRefs"
#    ...
- TLS 요청 보내기
# nginx 파드에서 tcpdump 실행

# nginx 파드로 진입
$ kubectl exec -it my-nginx-d65548cd4-nn5b4 -- bash
---
# tcpdump 설치
$ apt update && apt install -y tcpdump
# tcpdump 실행 (모든 tcp 패킷 캡처)
$ tcpdump tcp
# => tcpdump: verbose output suppressed, use -v[v]... for full protocol decode
#    listening on eth0, link-type EN10MB (Ethernet), snapshot length 262144 bytes
#    11:41:57.543620 IP 172.20.0.16.37591 > my-nginx-d65548cd4-nn5b4.<span style="color: green;">443</span>: Flags [S], seq 2314011092, win 64240, options [mss 1460,sackOK,TS val 363195874 ecr 0,nop,wscale 7], length 0
#    11:41:57.544029 IP my-nginx-d65548cd4-nn5b4.<span style="color: green;">443</span> > 172.20.0.16.37591: Flags [S.], seq 3765696136, ack 2314011093, win 65160, options [mss 1460,sackOK,TS val 3668269186 ecr 363195874,nop,wscale 7], length 0
#    11:41:57.546319 IP 172.20.0.16.37591 > my-nginx-d65548cd4-nn5b4.443: Flags [.], ack 1, win 502, options [nop,nop,TS val 363195876 ecr 3668269186], length 0
#    11:41:57.546319 IP 172.20.0.16.37591 > my-nginx-d65548cd4-nn5b4.443: Flags [P.], seq 1:518, ack 1, win 502, options [nop,nop,TS val 363195876 ecr 3668269186], length 517
#    ...
---

# k8s-ctr에서 TLS 요청 보내기
$ curl -v --resolve "nginx.cilium.rocks:443:$GATEWAY" "https://nginx.cilium.rocks:443"
# => ...
#    * Server certificate:
#    *  subject: O=mkcert development certificate; OU=root@k8s-ctr
#    *  start date: Aug 23 08:27:20 2025 GMT
#    *  expire date: Oct 01 08:27:20 2027 GMT
#    *  subjectAltName: host "nginx.cilium.rocks" matched cert's "*.cilium.rocks"
#    *  issuer: O=mkcert development CA; OU=root@k8s-ctr; CN=mkcert root@k8s-ctr
#    *  SSL certificate verify ok.
#    ...
#    < HTTP/1.1 200 OK
#    ...
- nginx 파드에서 tcpdump 결과 nginx의 https(443) 포트로 인입되어 https(443) 포트를 통해 응답이 나가는 것을 확인할 수 있습니다.
- 즉, TLS Termination과는 달리 전체 TLS 트래픽이 nginx 파드까지 전달된 것을 확인할 수 있습니다.
Gateway API 주소 지정
- Gateway의 External IP를 직접 지정 가능합니다. - 관련 문서
$ kubectl edit gateway tls-gateway
# spec에 addresses 추가
---
...
spec:
  addresses:                # 추가됨
  - type: IPAddress         #
    value: 192.168.10.219   #
  gatewayClassName: cilium
...
---
# => gateway.gateway.networking.k8s.io/tls-gateway edited
- 호출 테스트
#
$ GATEWAY=$(kubectl get gateway tls-gateway -o jsonpath='{.status.addresses[0].value}')
$ echo $GATEWAY
# => 192.168.10.219
# <span style="color: green;">👉 지정한 IP(192.168.10.219)로 External IP가 변경된 것을 확인할 수 있습니다.</span>

$ curl -v --resolve "nginx.cilium.rocks:443:$GATEWAY" "https://nginx.cilium.rocks:443"
Ingress에서 Gateway API로 마이그레이션
- 관련 문서
- 수동 전환 : 기존의 Ingress API 리소스를 참고하여 동일한 구성을 가진 Gateway API 리소스를 수동으로 작성합니다.
- 자동 전환 : ingress2gateway 툴과 같은 자동화 도구를 사용하여 Ingress 리소스를 Gateway API 리소스로 변환합니다.
- 마이그레이션 예제
실습 리소스 삭제
# Gateway 삭제
$ kubectl delete gateway my-gateway tls-gateway cilium-tls-gateway

# Bookinfo 삭제
$ kubectl delete -f https://raw.githubusercontent.com/istio/istio/release-1.26/samples/bookinfo/platform/kube/bookinfo.yaml
Mutual Authentication (Beta)
- Cilium도 istio와 마찬가지로 SPIFFE(“스피페”라고 발음하는것 같습니다.) 통한 상호 인증을 지원합니다.
- 아직은 Beta 단계이기 때문에 프로덕션 환경에서 사용하기에는 무리가 있어보입니다.
- 관련 문서
주요 개념
- SPIFFE
- Secure Production Identity Framework For Everyone의 약자로 클라우드 네이티브 환경에서 서비스 간의 신뢰를 구축하기 위한 오픈 소스 표준입니다.
- 서비스가 서로를 신뢰할 수 있도록 고유한 식별자(SPIFFE ID)를 제공합니다.
- ID를 발급하고 부트스트랩하기 위해 다음 사양을 정의 합니다.
- SPIFFE ID : 신뢰 도메인 내의 서비스 고유 ID
- Workload Endpoint : 워크로드의 ID를 나타내는 엔드포인트
- Workload API : SPIFFE ID가 포함된 인증서를 서명하고 발급하는 API
- SVID (SPIFFE Verifiable Identity Document) : Workload API가 발급하는 인증서
- TLS와 mTLS - 관련 블로그
- TLS (Transport Layer Security) : 네트워크 통신을 암호화하여 데이터의 기밀성과 무결성을 보장하는 프로토콜입니다.
- mTLS (Mutual TLS) : TLS의 확장으로, 클라이언트와 서버가 서로를 인증하는 양방향 인증을 제공합니다.
- 기본 TLS가 서버측의 인증서를 활용하여, 적합한 서버임을 증명하는것 과는 달리 mTLS는 클라이언트와 서버 모두가 인증서를 사용하여 서로의 신원을 확인합니다.
- mTLS는 서비스 간의 신뢰를 구축하고, 중간자 공격과 같은 보안 위협을 방지하는 데 효과적입니다.
Cilium에서의 상호 인증
- Cilium은 SPIFFE 표준을 준수하는 구현체인 spire 서버를 사용하여 상호인증을 구현합니다.
- Cilium은 spire 서버와 통신하여 각 워크로드에 대한 SPIFFE ID를 발급받고, 이를 기반으로 각 노드에서 실행중인 워크로드의 ID 요청을 검증합니다.
- Spire 서버는 Kubernetes에서 실행되는 Spire 에이전트의 검증을 위해 PSAT(Kubernetes Projected Service Account Token)을 사용합니다.
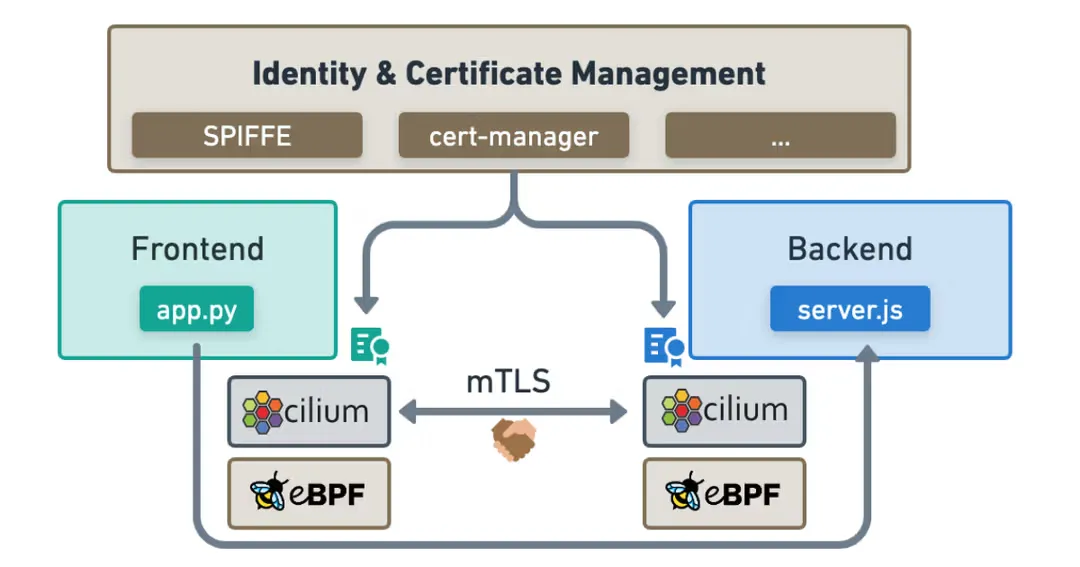
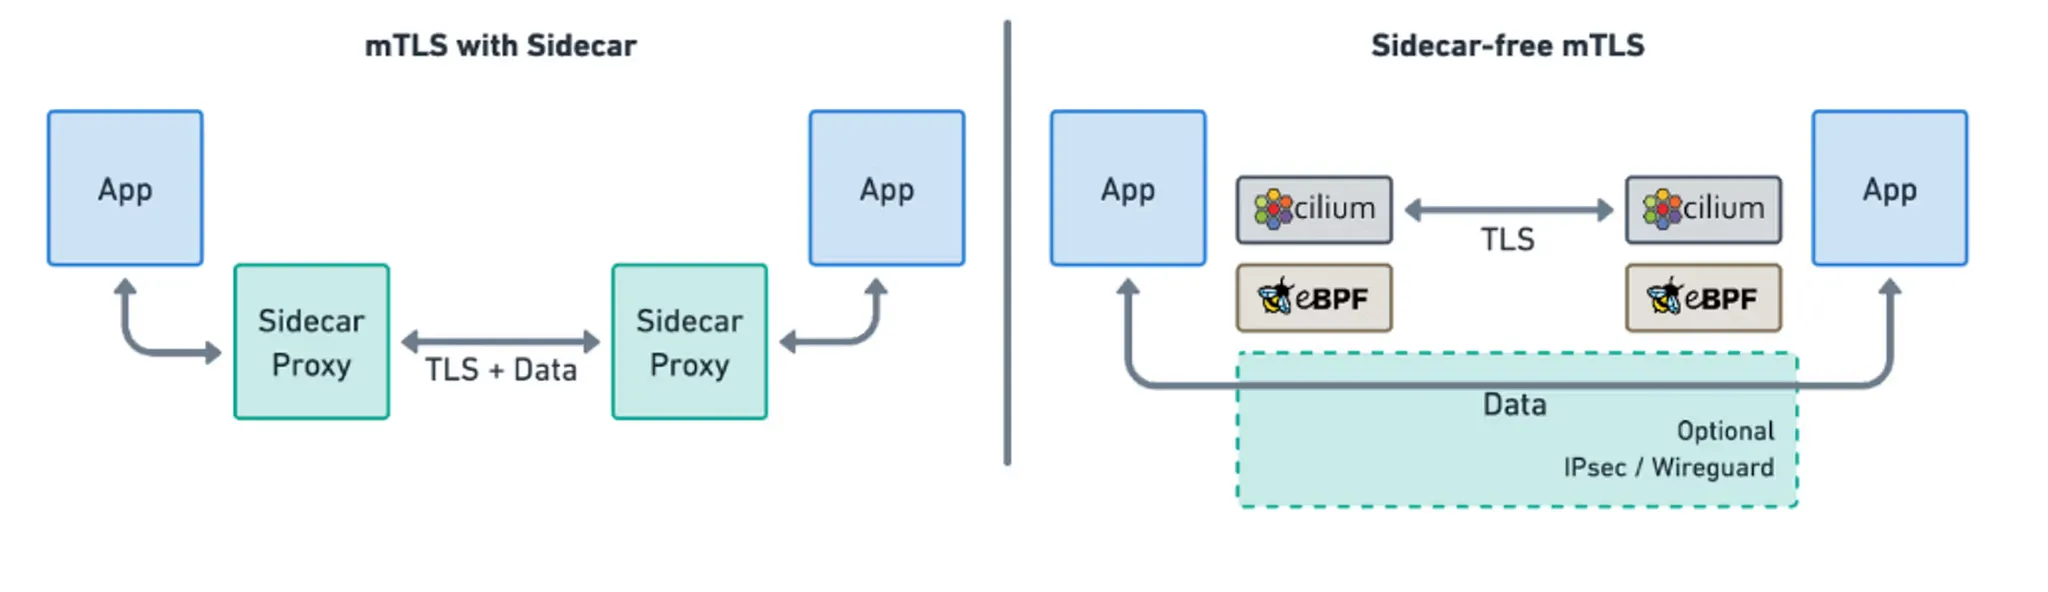 Cilium의 상호인증 구조
Cilium의 상호 인증 아키텍쳐
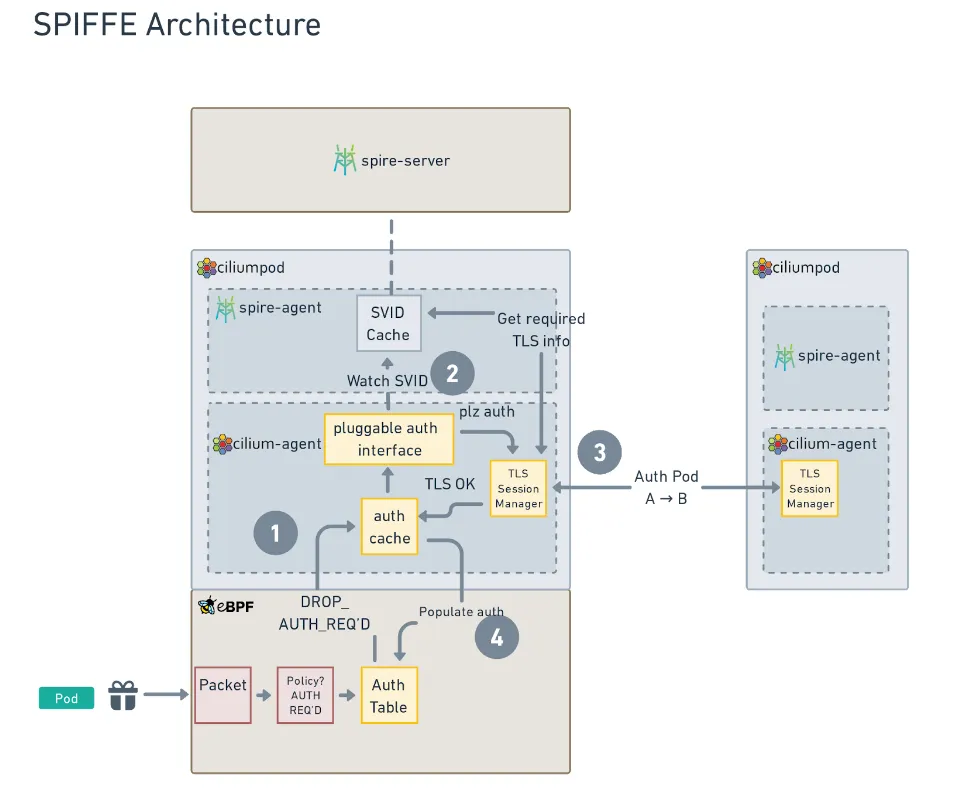
- Cilium의 상호 인증은 다음과 같은 주요 구성 요소로 이루어져 있습니다.
- Spire 서버 : SPIFFE ID를 발급하고 관리하는 중앙 컴포넌트입니다. Cilium Operator와 통신하여 워크로드의 ID 요청을 처리합니다.
- Spire 에이전트 : 각 노드에서 실행되며, Spire 서버와 통신하여 워크로드에 대한 SPIFFE ID를 요청하고 갱신합니다.
- Cilium Agent : 각 노드에서 실행되며, Spire 에이전트와 통신하여 워크로드의 ID를 검증합니다.
L7-Aware Traffic Management
L7-Aware Traffic Management 소개
- L7-Aware Traffic Management는 HTTP, gRPC와 같은 애플리케이션 계층(Layer 7) 프로토콜의 특성을 이해하고 이를 기반으로 트래픽을 세밀하게 제어하는 기능입니다.
- Cilium은 eBPF와 Envoy 프록시를 통해 강력한 L7 트래픽 관리 기능을 제공합니다.
주요 기능
- L7 프로토콜 인식: HTTP, gRPC, Kafka 등 다양한 애플리케이션 계층 프로토콜을 인식하고 제어할 수 있습니다.
- 고급 로드 밸런싱: 요청 헤더, 경로, 메소드 등을 기반으로 한 지능적인 로드 밸런싱이 가능합니다.
- 트래픽 분할: 동일한 서비스의 여러 버전 간에 트래픽을 비율에 따라 분배할 수 있어 카나리 배포 및 A/B 테스트를 지원합니다.
- 자동 재시도: 일시적인 오류 발생 시 요청을 자동으로 재시도하여 애플리케이션의 복원력을 높일 수 있습니다.
- 타임아웃 및 서킷 브레이킹: 장애 확산을 방지하기 위한 타임아웃 설정 및 서킷 브레이커 패턴을 지원합니다.
구현 방식
- Cilium은 eBPF를 사용하여 네트워크 패킷을 가로채고, L7 처리가 필요한 경우 Envoy 프록시로 트래픽을 리디렉션합니다.
- 이러한 아키텍처는 기존 서비스 메시 솔루션에 비해 더 적은 오버헤드를 제공합니다.
Istio와의 비교
- Cilium의 L7 트래픽 관리는 Istio와 같은 기존 Service Mesh 보다 성능 오버헤드가 적습니다.
- kubeproxy 대신 eBPF를 사용하여 필요한 트래픽만 선택적으로 Envoy 프록시로 리디렉션하기 때문입니다.
- 그러나 기능 측면에서는 Istio가 더 풍부한 옵션을 제공할 수 있습니다.
실습: L7 트래픽 관리
- 이번 실습에는 isovalent에서 제공하는 온라인 Lab 환경을 사용합니다. https://isovalent.com/labs/cilium-envoy-l7-proxy/
실습환경 설정
# 데모 앱 설치
$ kubectl apply -f sw-pods.yaml
# => service/deathstar created
#    deployment.apps/deathstar created
#    pod/tiefighter created
#    pod/xwing created

# 앱 배포 확인
$ kubectl rollout status deployment/deathstar
# => deployment "deathstar" successfully rolled out

$ kubectl get pod xwing
# => NAME    READY   STATUS    RESTARTS   AGE
#    xwing   1/1     Running   0          2m22s

$ kubectl exec xwing -- curl --max-time 1 -s -X POST deathstar.default.svc.cluster.local/v1/request-landing
# => Ship landed

$ hubble observe --to-pod default/deathstar
# => Aug 23 14:05:42.357: default/xwing (ID:57137) <> default/deathstar-67c5c5c88-d9xct:80 (ID:3549) post-xlate-fwd TRANSLATED (TCP)
#    Aug 23 14:05:42.357: default/xwing:54550 (ID:57137) -> default/deathstar-67c5c5c88-d9xct:80 (ID:3549) to-endpoint FORWARDED (TCP Flags: SYN)
#    Aug 23 14:05:42.357: default/xwing:54550 (ID:57137) -> default/deathstar-67c5c5c88-d9xct:80 (ID:3549) to-endpoint FORWARDED (TCP Flags: ACK)
#    Aug 23 14:05:42.357: default/xwing:54550 (ID:57137) <> default/deathstar-67c5c5c88-d9xct (ID:3549) pre-xlate-rev TRACED (TCP)
#    Aug 23 14:05:42.357: default/xwing:54550 (ID:57137) -> default/deathstar-67c5c5c88-d9xct:80 (ID:3549) to-endpoint FORWARDED (TCP Flags: ACK, PSH)
#    Aug 23 14:05:42.358: default/xwing:54550 (ID:57137) -> default/deathstar-67c5c5c88-d9xct:80 (ID:3549) to-endpoint FORWARDED (TCP Flags: ACK, FIN)
#    Aug 23 14:05:42.358: default/xwing:54550 (ID:57137) -> default/deathstar-67c5c5c88-d9xct:80 (ID:3549) to-endpoint FORWARDED (TCP Flags: ACK)
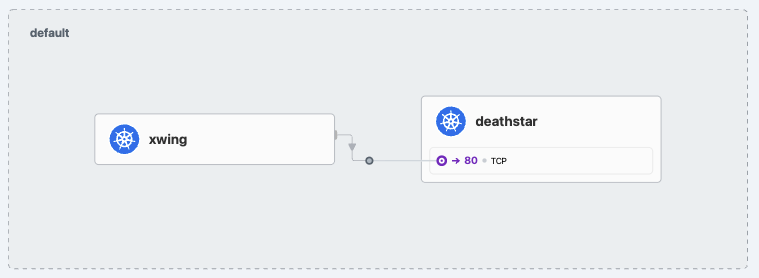
HTTP 트래픽 관측하기
- L7 Cilium Network Policy를 사용하여 HTTP 트래픽을 관측할 수 있습니다.
# The trace:to-proxy filter will show all flows that go through a proxy. In general, this could be either Envoy or the Cilium DNS proxy.
# However, since we have not yet deployed a DNS Network Policy, you will only see flows related to Envoy at the moment.
$ hubble observe --type trace:to-proxy
# => Aug 23 14:10:33.004: default/tiefighter:53502 (ID:13923) -> default/deathstar-67c5c5c88-d9xct:80 (ID:3549) to-proxy FORWARDED (TCP Flags: SYN)
#    Aug 23 14:10:33.004: default/tiefighter:53502 (ID:13923) -> default/deathstar-67c5c5c88-d9xct:80 (ID:3549) to-proxy FORWARDED (TCP Flags: ACK)
#    Aug 23 14:10:33.004: default/tiefighter:53502 (ID:13923) -> default/deathstar-67c5c5c88-d9xct:80 (ID:3549) to-proxy FORWARDED (TCP Flags: ACK, PSH)
#    Aug 23 14:10:33.006: default/tiefighter:53502 (ID:13923) -> default/deathstar-67c5c5c88-d9xct:80 (ID:3549) to-proxy FORWARDED (TCP Flags: ACK, FIN)
#    ...

# Let's extract all the flow information based on the protocol (e.g. HTTP) and source pod (e.g. the Tie Fighter), then export the result with the JSON output option, and finally filter with jq to only see the .flow.l7 field. This will show us the specific details parsed from the L7 traffic, such as the method and headers:
# Observe the details of the flow, in particular the envoy-specific headers added to the request:
## X-Envoy-Internal
## X-Request-Id
$ hubble observe --protocol http --from-pod default/tiefighter -o jsonpb | \
  head -n 1 | jq '.flow.l7'
# => {
#      "type": "REQUEST",
#      "http": {
#        "method": "POST",
#        "url": "http://deathstar.default.svc.cluster.local/v1/request-landing",
#        "protocol": "HTTP/1.1",
#        "headers": [
#          {
#            "key": ":scheme",
#            "value": "http"
#          },
#          {
#            "key": "Accept",
#            "value": "*/*"
#          },
#          {
#            "key": "User-Agent",
#            "value": "curl/7.88.1"
#          },
#          {
#            "key": "X-Envoy-Internal",
#            "value": "true"
#          },
#          {
#            "key": "X-Request-Id",
#            "value": "45ee8e37-6ae0-48bf-925d-13c98532b113"
#          }
#        ]
#      }
#    }

# Let's use the X-Request-Id to match a request and its response.
# First, we'll need to make sure egress traffic from the Tie Fighter is captured by Envoy, so we'll need a L7 CNP for that.
# If we apply an egress CNP though, this will disrupt DNS requests, which are also egress traffic, so we need to add a DNS policy as well:
$ cat policies/tiefighter.yaml
# => apiVersion: cilium.io/v2
#    kind: CiliumNetworkPolicy
#    metadata:
#      name: tiefighter
#      namespace: default
#    spec:
#      endpointSelector:
#        matchLabels:
#          org: empire
#          class: tiefighter
#      egress:
#        - toEndpoints:
#            - matchLabels:
#                class: deathstar
#                org: empire
#          toPorts:
#            - ports:
#                - port: "80"
#                  protocol: TCP
#              rules:
#                http:
#                - method: POST
#                  path: /v1/request-landing

$ kubectl apply -f policies/dns.yaml -f policies/tiefighter.yaml
# => ciliumnetworkpolicy.cilium.io/dns created
#    ciliumnetworkpolicy.cilium.io/tiefighter created

# All these flows are ingress flows, as you can see by filtering for HTTP flows in the egress direction, which should return nothing:
# You can now see egress requests from the Tie Fighter being forwarded to the Death Star, as well as the responses from the Death Star:
# When using Kubernetes Network Policies, responses are automatically allowed and do not require an explicit rule.
# This is why egress traffic corresponding to the response from the Death Star to the Tie Fighter is allowed, even though there is not egress policy for it.
$ hubble observe --protocol http --traffic-direction egress
# => Aug 23 14:12:40.875: default/tiefighter:57526 (ID:13923) -> default/deathstar-67c5c5c88-d9xct:80 (ID:3549) http-request FORWARDED (HTTP/1.1 POST http://deathstar.default.svc.cluster.local/v1/request-landing)
#    Aug 23 14:12:40.876: default/tiefighter:57526 (ID:13923) <- default/deathstar-67c5c5c88-d9xct:80 (ID:3549) http-response FORWARDED (HTTP/1.1 200 0ms (POST http://deathstar.default.svc.cluster.local/v1/request-landing))
#    ...

# Now, let's match request IDs! Run the following command to record some Hubble HTTP flows and save them to a file:
$ hubble observe --namespace default --protocol http -o jsonpb > flows.json

# Find the first EGRESS flow in the file and get its ID:
$ REQUEST_ID=$(cat flows.json | jq -r '.flow | select(.source.labels[0]=="k8s:app.kubernetes.io/name=tiefighter" and .traffic_direction=="EGRESS") .l7.http.headers[] | select(.key=="X-Request-Id") .value' | head -n1)
$ echo $REQUEST_ID
# => 91e9eb02-b1a7-4379-9825-8c6f72124d04

# Then find all flows with this request ID in the file and display their source identities:
## an egress flow from the tiefighter to the deathstar, corresponding to the original request
## the ingress flow for the same request, being forwarded from the proxy to the Death Star
## another egress flow for the response, from the deathstar to the tiefighter
## the corresponding ingress flow from the deathstar pod to the tiefighter

$ cat flows.json | \
  jq 'select(.flow.l7.http.headers[] | .value == "'$REQUEST_ID'") .flow | {src_label: .source.labels[0], dst_label: .destination.labels[0], traffic_direction, type: .l7.type, time}'
# => {
#      "src_label": "k8s:app.kubernetes.io/name=tiefighter",
#      "dst_label": "k8s:app.kubernetes.io/name=deathstar",
#      "traffic_direction": "EGRESS",
#      "type": "REQUEST",
#      "time": "2025-08-23T14:13:38.661418360Z"
#    }
#    {
#      "src_label": "k8s:app.kubernetes.io/name=tiefighter",
#      "dst_label": "k8s:app.kubernetes.io/name=deathstar",
#      "traffic_direction": "INGRESS",
#      "type": "REQUEST",
#      "time": "2025-08-23T14:13:38.661841958Z"
#    }
#    {
#      "src_label": "k8s:app.kubernetes.io/name=deathstar",
#      "dst_label": "k8s:app.kubernetes.io/name=tiefighter",
#      "traffic_direction": "INGRESS",
#      "type": "RESPONSE",
#      "time": "2025-08-23T14:13:38.662308747Z"
#    }
#    {
#      "src_label": "k8s:app.kubernetes.io/name=deathstar",
#      "dst_label": "k8s:app.kubernetes.io/name=tiefighter",
#      "traffic_direction": "EGRESS",
#      "type": "RESPONSE",
#      "time": "2025-08-23T14:13:38.662497732Z"
#    }
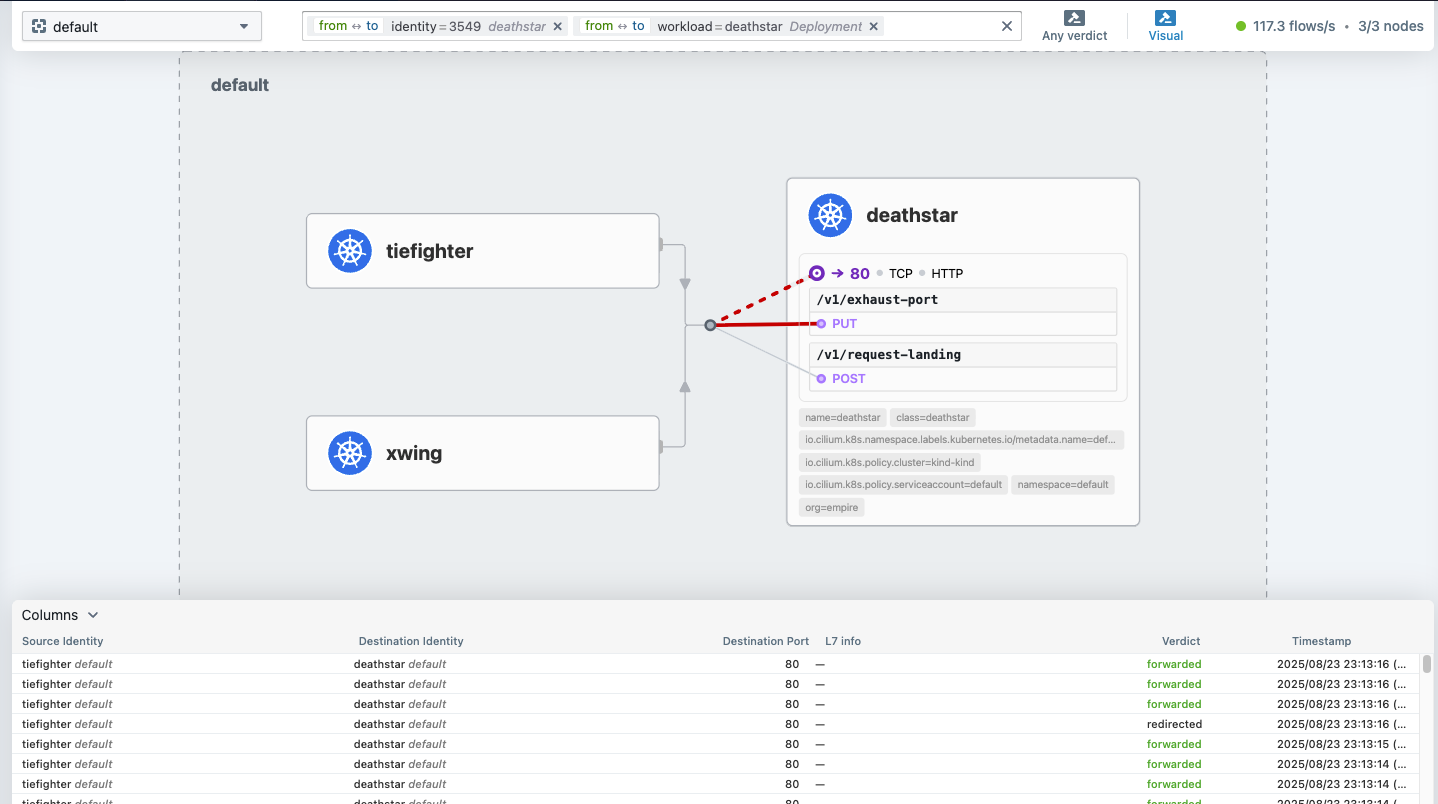
L7 메트릭
- Envoy를 통해 Hubble에서 L7 메트릭을 수집할 수 있고, Prometheus로 내보낼 수 있습니다.
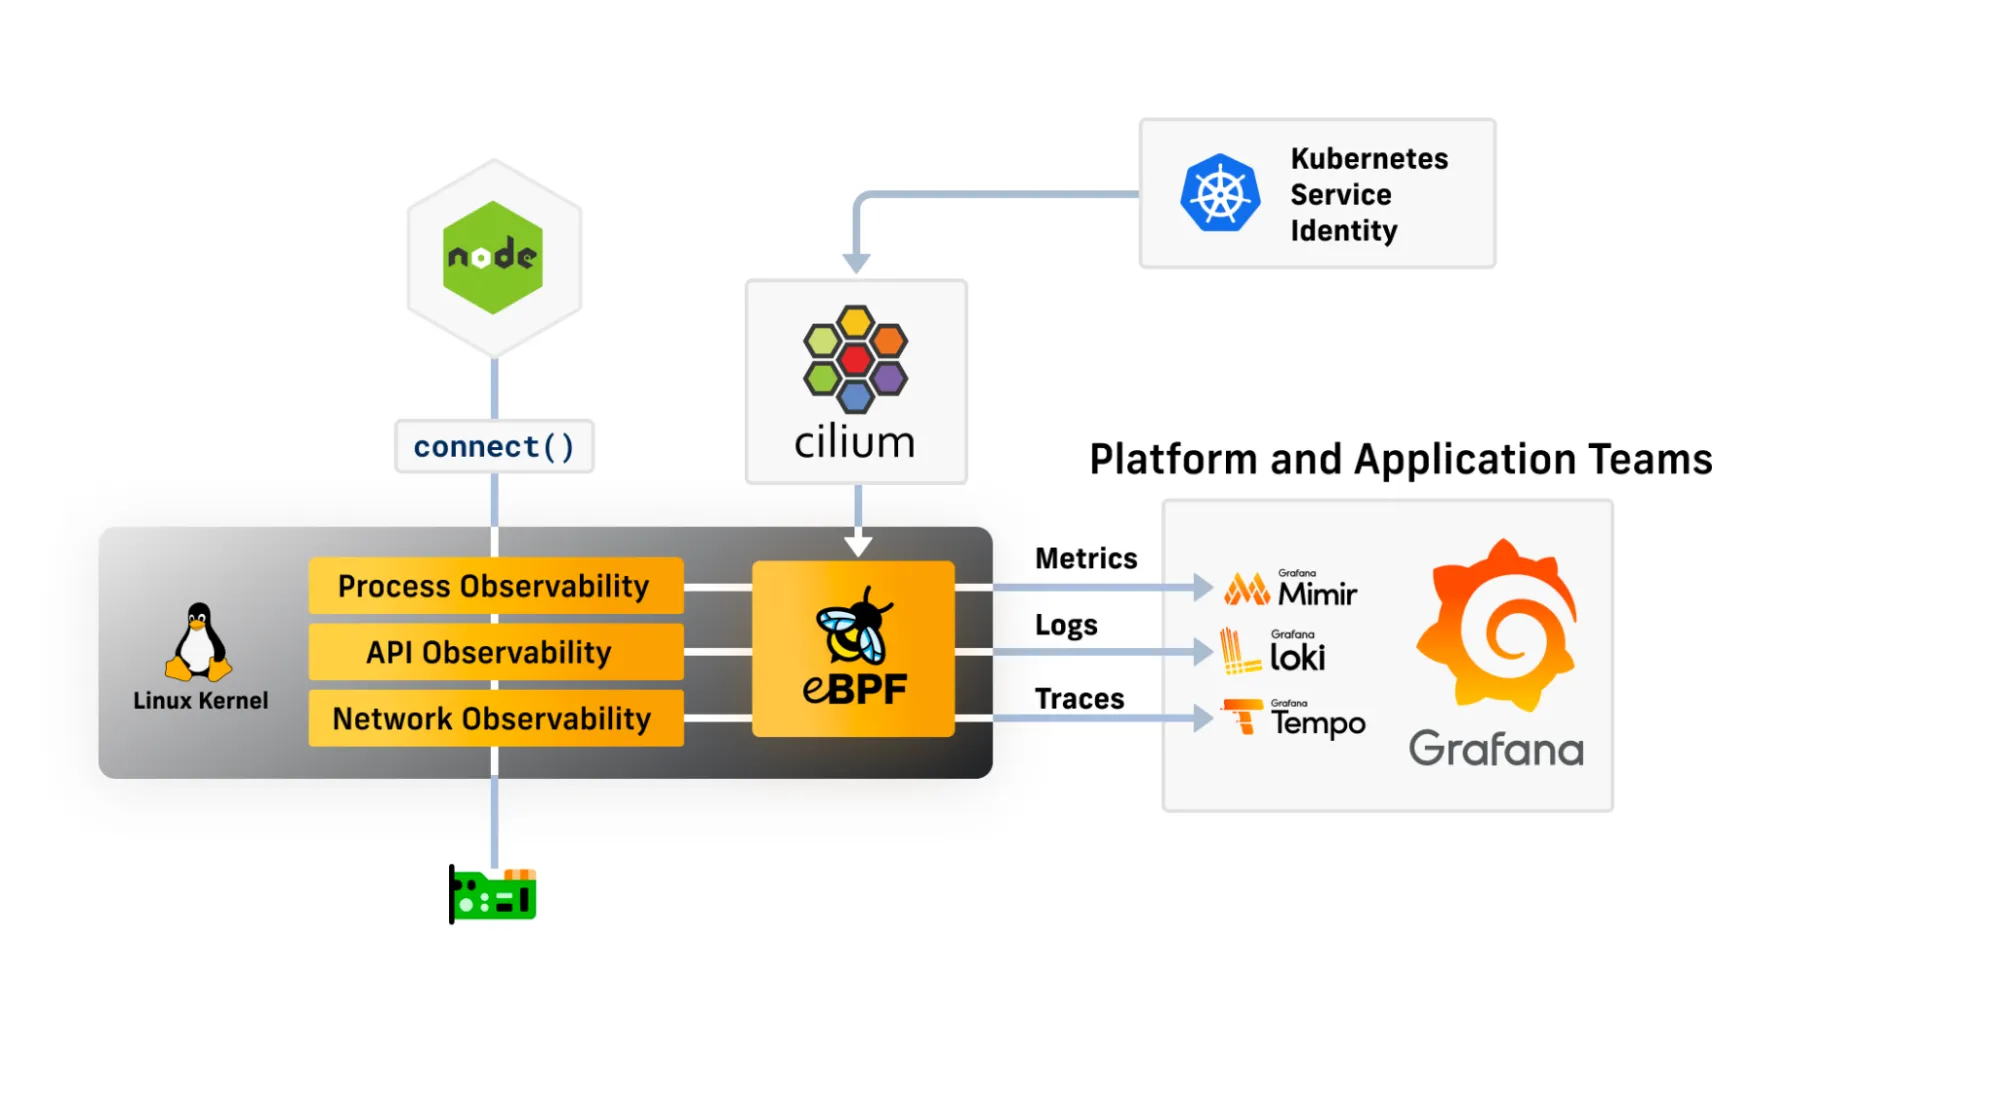 Cilium의 L7 메트릭 수집
Envoy를 통한 L7 네트워크 정책 적용
- HTTP : 지난 포스트에서 [Cilium] (Observability) Hubble, Prometheus, Grafana Http-aware L7 정책 적용 및 테스트를 다뤘습니다. 해당 포스트를 참고해주세요.
L7-Aware Traffic Management 활성화
- CiliumEnvoyConfig , CiliumClusterwideEnvoyConfig - Docs
- 주의사항 :
- CiliumEnvoyConfig 리소스는 최소한의 검증만 수행되며 정의된 충돌 해결 동작이 없습니다. 즉, EnvoyConfig의 동일한 구성 부분을 수정하는 CEC를 여러 개 만들면 결과를 예측할 수 없을 수 있습니다.
- 이 최소한의 검증 외에도, CiliumEnvoyConfig는 사용자에게 구성의 정확성에 대한 피드백을 최소한으로 제공합니다. 따라서 CEC가 바람직하지 않은 결과를 초래할 경우, 문제 해결을 위해서는 문제의 CiliumEnvoyConfig를 확인할 수 있는 대신 EnvoyConfig를 검토해야 합니다.
- CiliumEnvoyConfig는 Cilium의 Ingress 및 Gateway API 지원을 통해 노드별 Envoy 프록시를 통해 트래픽을 유도하는 데 사용됩니다. 자동 생성된 구성과 충돌하거나 수정하는 CEC를 만들면 결과를 예측할 수 없을 수 있습니다. 이러한 사용 사례에서는 CEC를 사용하는 데 매우 주의하세요. 위의 위험은 Cilium에서 생성된 모든 구성이 가능한 한 의미적으로 유효한지 확인함으로써 관리됩니다.
- CiliumEnvoyConfig 리소스를 직접 생성하는 경우(즉, Cilium Ingress 또는 Gateway API 컨트롤러를 통해 생성하지 않고), CEC가 E/W 트래픽을 관리하려는 경우 레이블 cilium.io/use-original-source-address : “false”를 설정합니다. 그렇지 않으면, EnvoyConfig는 업스트림 연결 풀의 소켓을 원래 소스 주소/포트에 바인딩합니다. 이로 인해 포드가 동일한 파이프라인 HTTP/1.1 또는 HTTP/2 연결을 통해 여러 요청을 보낼 때 5-tup 충돌이 발생할 수 있습니다. (Cilium 에이전트는 부모 Ref가 Cilium Ingress 또는 Gateway API 컨트롤러를 가리키는 모든 CEC가 cilium.io/use-original-source-address 을 “false”로 설정한 것으로 가정하지만, 다른 모든 CEC는 이 레이블을 “true”로 설정한 것으로 가정합니다.)
- 현재는 Envoy API v3만 지원합니다. - Docs
- 주의사항 :
- 설정
# $ helm upgrade cilium cilium/cilium --version 1.18.1 --namespace kube-system --reuse-values \ --set ingressController.enabled=true --set gatewayAPI.enabled=false \ --set envoyConfig.enabled=true --set loadBalancer.l7.backend=envoy # => Release "cilium" has been upgraded. Happy Helming! $ kubectl -n kube-system rollout restart deployment/cilium-operator # => deployment.apps/cilium-operator restarted $ kubectl -n kube-system rollout restart ds/cilium # => daemonset.apps/cilium restarted $ kubectl -n kube-system rollout restart ds/cilium-envoy # => daemonset.apps/cilium-envoy restarted # $ cilium config view |grep -i envoy # => enable-envoy-config true # envoy-access-log-buffer-size 4096 # envoy-base-id 0 # envoy-config-retry-interval 15s # envoy-keep-cap-netbindservice false # envoy-secrets-namespace cilium-secrets # external-envoy-proxy true # loadbalancer-l7 envoy $ cilium status --wait - 지원하는 Envoy 확장 리소스 유형
- 확장은 Envoy 빌드에 선택적으로 포함될 수 있는 리소스 유형입니다. Envoy 문서에서 언급되는 표준 유형들,
예를 들어
type.googleapis.com/envoy.config.listener.v3.Listener와type.googleapis.com/envoy.config.route.v3.RouteConfiguration은 항상 사용할 수 있습니다. - Cilium 노드는 Cilium HTTP 정책 적용 및 관측 가능성을 지원하기 위해 Envoy 이미지를 배포합니다. 이 Envoy 빌드는 Cilium Agent의 요구사항에 최적화되어 있으며 Envoy 코드베이스에서 사용할 수 있는 많은 Envoy 확장들을 포함하지 않습니다.
- 사용 가능한 Envoy 확장을 확인하려면 Envoy 확장 구성 파일을 참조하세요.
#으로 주석 처리되지 않은 확장만이 Cilium Envoy 이미지에 빌드됩니다. 사용자 피드백에 따라 내장 확장 목록을 발전해 나갈 것입니다.
- 확장은 Envoy 빌드에 선택적으로 포함될 수 있는 리소스 유형입니다. Envoy 문서에서 언급되는 표준 유형들,
예를 들어
L7 Load Balancing과 URL Rewriting
- 관련 문서
- 두 백엔드 서비스(echo-service-1/2) 간의 요청 부하를 분산하고, URL을 Rewrite하는 Envoy 구성을 생성해 보겠습니다.
실습 환경 구성
# 샘플 애플리케이션 배포
$ kubectl apply -f https://raw.githubusercontent.com/cilium/cilium/1.18.1/examples/kubernetes/servicemesh/envoy/test-application.yaml
# => configmap/coredns-configmap created
#    deployment.apps/client created
#    deployment.apps/client2 created
#    deployment.apps/echo-service-1 created
#    deployment.apps/echo-service-2 created
#    service/echo-service-1 created
#    service/echo-service-2 created

# 확인
## 두 개의 클라이언트 배포 client , client2
## 두 가지 서비스, echo-service-1, echo-service-2
$ kubectl get -f https://raw.githubusercontent.com/cilium/cilium/1.18.1/examples/kubernetes/servicemesh/envoy/test-application.yaml
# => NAME                          DATA   AGE
#    configmap/coredns-configmap   1      30s
#
#    NAME                             READY   UP-TO-DATE   AVAILABLE   AGE
#    deployment.apps/client           1/1     1            1           30s
#    deployment.apps/client2          1/1     1            1           30s
#    deployment.apps/echo-service-1   1/1     1            1           30s
#    deployment.apps/echo-service-2   1/1     1            1           30s
#
#    NAME                     TYPE       CLUSTER-IP     EXTERNAL-IP   PORT(S)          AGE
#    service/echo-service-1   NodePort   10.96.162.98   <none>        8080:30749/TCP   30s
#    service/echo-service-2   NodePort   10.96.78.11    <none>        8080:31200/TCP   30s

# client2 에 대한 Pod ID로 환경 변수 지정
$ export CLIENT2=$(kubectl get pods -l name=client2 -o jsonpath='{.items[0].metadata.name}')
$ echo $CLIENT2
# => client2-c97ddf6cf-2gm94

# Start Observing Traffic with Hubble
$ cilium hubble port-forward&
# => ℹ️   Hubble Relay is available at 127.0.0.1:4245
$ hubble observe --from-pod $CLIENT2 -f


# You should be able to get a response from both of the backend services individually from client2:
$ kubectl exec -it $CLIENT2 -- curl -v echo-service-1:8080/
# => < HTTP/1.1 200 OK
$ kubectl exec -it $CLIENT2 -- curl -v echo-service-2:8080/
# => < HTTP/1.1 200 OK

# Verify that you get a 404 error response if you curl to the non-existent URL /foo on these services:
$ kubectl exec -it $CLIENT2 -- curl -v echo-service-1:8080/foo
# => < HTTP/1.1 404 Not Found
$ kubectl exec -it $CLIENT2 -- curl -v echo-service-2:8080/foo
# => < HTTP/1.1 404 Not Found
L7 정책 추가
-
one.one.one.one도메인에 대한 HTTP GET 요청을 허용하는 정책과 echo 서비스의/경로에 대한 HTTP GET 요청을 허용하는 정책을 추가합니다.
# Adding a Layer 7 policy introduces the Envoy proxy into the path for this traffic
$ kubectl apply -f https://raw.githubusercontent.com/cilium/cilium/1.18.1/examples/kubernetes/servicemesh/envoy/client-egress-l7-http.yaml
# => ciliumnetworkpolicy.cilium.io/client-egress-l7-http created

# client2 is allowed to contact one.one.one.one/ on port 80 and the echo Pod
# on port 8080. HTTP introspection is enabled for client2.
# The toFQDNs section relies on DNS introspection being performed by
# the client-egress-only-dns policy.
apiVersion: "cilium.io/v2"
kind: CiliumNetworkPolicy
metadata:
  name: client-egress-l7-http
spec:
  description: "Allow GET one.one.one.one:80/ and GET <echo>:8080/ from client2"
  endpointSelector:
    matchLabels:
      other: client
  egress:
    # Allow GET / requests towards echo pods.
    - toEndpoints:
        - matchLabels:
            k8s:kind: echo
      toPorts:
        - ports:
            - port: "8080"
              protocol: TCP
          rules:
            http:
              - method: "GET"
                path: "/"
    # Allow GET / requests, only towards one.one.one.one.
    - toFQDNs:
        - matchName: "one.one.one.one"
      toPorts:
        - ports:
            - port: "80"
              protocol: TCP
          rules:
            http:
              - method: "GET"
                path: "/"

$ kubectl apply -f https://raw.githubusercontent.com/cilium/cilium/1.18.1/examples/kubernetes/servicemesh/envoy/client-egress-only-dns.yaml
# => ciliumnetworkpolicy.cilium.io/client-egress-only-dns created

apiVersion: cilium.io/v2
kind: CiliumNetworkPolicy
metadata:
  name: client-egress-only-dns
spec:
  endpointSelector:
    matchLabels:
      kind: client
  egress:
    - toPorts:
        - ports:
            - port: "53"
              protocol: ANY
          rules:
            dns:
              - matchPattern: "*"
      toEndpoints:
        - matchLabels:
            k8s:io.kubernetes.pod.namespace: kube-system
            k8s:k8s-app: kube-dns
        - matchLabels:
            k8s:io.kubernetes.pod.namespace: kube-system
            k8s:k8s-app: coredns

# Make a request to a backend service (either will do):
$ kubectl exec -it $CLIENT2 -- curl -v echo-service-1:8080/
# => < HTTP/1.1 200 OK
# <span style="color: green;">👉 echo 서비스의 / 경로에 대해서는 승인 정책이 적용되었기 때문에 200 OK 응답을 받을 수 있습니다.</span>
$ kubectl exec -it $CLIENT2 -- curl -v echo-service-2:8080/foo
# => < HTTP/1.1 403 Forbidden
# <span style="color: green;">👉 /foo는 승인 정책에 포함되지 않았기 때문에 403 Forbidden 응답을 받습니다.</span>

$ hubble observe --from-pod $CLIENT2 -f
# => Aug 23 15:01:32.615: default/client2-c97ddf6cf-2gm94:35118 (ID:30927) -> default/echo-service-2-5df858689b-lbtff:8080 (ID:15303) http-request DROPPED (HTTP/1.1 GET http://echo-service-2:8080/foo)
# <span style="color: green;">👉 Hubble에서 트래픽을 관찰해보면, echo-service-2로의 요청이 DROPPED된 것을 확인할 수 있습니다.</span>
L7 Load Balancing과 URL Rewriting 적용
# Envoy 로드 밸런싱 및 URL 재작성 추가 : 두 백엔드 echo-서비스 간에 50/50의 부하 분산 , 경로 /foo를 다시 작성합니다/
# Apply the envoy-traffic-management-test.yaml file, which defines a CiliumClusterwideEnvoyConfig
$ kubectl apply -f https://raw.githubusercontent.com/cilium/cilium/1.18.1/examples/kubernetes/servicemesh/envoy/envoy-traffic-management-test.yaml
# => ciliumclusterwideenvoyconfig.cilium.io/envoy-lb-listener created

apiVersion: cilium.io/v2
kind: CiliumClusterwideEnvoyConfig
metadata:
  name: envoy-lb-listener
spec:
  services:
    - name: echo-service-1
      namespace: default
    - name: echo-service-2
      namespace: default
  resources:
    - "@type": type.googleapis.com/envoy.config.listener.v3.Listener
      name: envoy-lb-listener
      filter_chains:
        - filters:
            - name: envoy.filters.network.http_connection_manager
              typed_config:
                "@type": type.googleapis.com/envoy.extensions.filters.network.http_connection_manager.v3.HttpConnectionManager
                stat_prefix: envoy-lb-listener
                rds:
                  route_config_name: lb_route
                use_remote_address: true
                skip_xff_append: true
                http_filters:
                  - name: envoy.filters.http.router
                    typed_config:
                      "@type": type.googleapis.com/envoy.extensions.filters.http.router.v3.Router
    - "@type": type.googleapis.com/envoy.config.route.v3.RouteConfiguration
      name: lb_route
      virtual_hosts:
        - name: "lb_route"
          domains: [ "*" ]
          routes:
            - match:
                prefix: "/"
              route:
                weighted_clusters:
                  clusters:
                    - name: "default/echo-service-1"
                      weight: 50
                    - name: "default/echo-service-2"
                      weight: 50
                retry_policy:
                  retry_on: 5xx
                  num_retries: 3
                  per_try_timeout: 1s
                regex_rewrite:
                  pattern:
                    google_re2: { }
                    regex: "^/foo.*$"
                  substitution: "/"
    - "@type": type.googleapis.com/envoy.config.cluster.v3.Cluster
      name: "default/echo-service-1"
      connect_timeout: 5s
      lb_policy: ROUND_ROBIN
      type: EDS
      outlier_detection:
        split_external_local_origin_errors: true
        consecutive_local_origin_failure: 2
    - "@type": type.googleapis.com/envoy.config.cluster.v3.Cluster
      name: "default/echo-service-2"
      connect_timeout: 3s
      lb_policy: ROUND_ROBIN
      type: EDS
      outlier_detection:
        split_external_local_origin_errors: true
        consecutive_local_origin_failure: 2

# CiliumClusterwideEnvoyConfig 약자 ccec
$ kubectl get ccec -o yaml | yq
$ kubectl get ccec
# => NAME                AGE
#    envoy-lb-listener   21s

# 50:50 LB 분산 호출됨
$ kubectl exec -it $CLIENT2 -- curl -v echo-service-1:8080/foo

$ kubectl exec -it $CLIENT2 -- curl -v echo-service-1:8080/foo
# => < HTTP/1.1 200 OK
# <span style="color: green;">👉 URL Rewriting이 적용되어 /foo 경로에 대한 요청이 /로 다시 작성되어 200 OK 응답을 받습니다.</span>

# 하지만 네트워크 정책은 여전히 /로 다시 작성되지 않은 경로에 대한 요청을 방지합니다.
# 예를 들어, 이 요청은 패킷이 삭제되고 403 금지 응답 코드가 생성
$ kubectl exec -it $CLIENT2 -- curl -v echo-service-1:8080/bar
# => < HTTP/1.1 403 Forbidden

## rewrite 되지 않은 /bar 경로에 대한 요청에 대한 hubble 출력
# => Aug 23 15:26:06.041: default/client2-c97ddf6cf-2gm94:50256 (ID:30927) -> default/echo-service-2-5df858689b-lbtff:8080 (ID:15303) http-request DROPPED (HTTP/1.1 GET http://echo-service-1:8080/bar)

# 로그 확인
$ kubectl -n kube-system logs daemonsets/cilium-envoy
마치며
이번 포스트에서도 Cilium Service Mesh에서 제공하는 다양한 기능을 살펴보았습니다. 특히 기존에 Nginx Ingress를 사용하면서 세부적인 설정을 하려면 annotation도 찾아보고, 해당 annotation의 동작을 이해하기 위해서 nginx 문서도 봐야했는데, Gateway API가 이를 해결 할 것 같아서 기대됩니다.
상호 인증만 Beta를 벗어나면 istio같은 기존 서비스 메시 솔루션을 대체할 수 있을것 같다는 생각이 듭니다. eBPF와 Envoy라는 튼튼한 기초가 있으니 다양한 기능들을 확장해 나가는것 같아서 초기 설계와 철학이 얼마나 중요한지 다시 한번 느끼게 됩니다.