[Cilium] K8S/Cilium Performance
들어가며
이번 포스트에서는 Cilium의 performance와 그의 기반이 되는 K8S의 performance에 대해 실습을 통하여 알아보도록 하겠습니다.
K8S Performance
실습 환경 구성
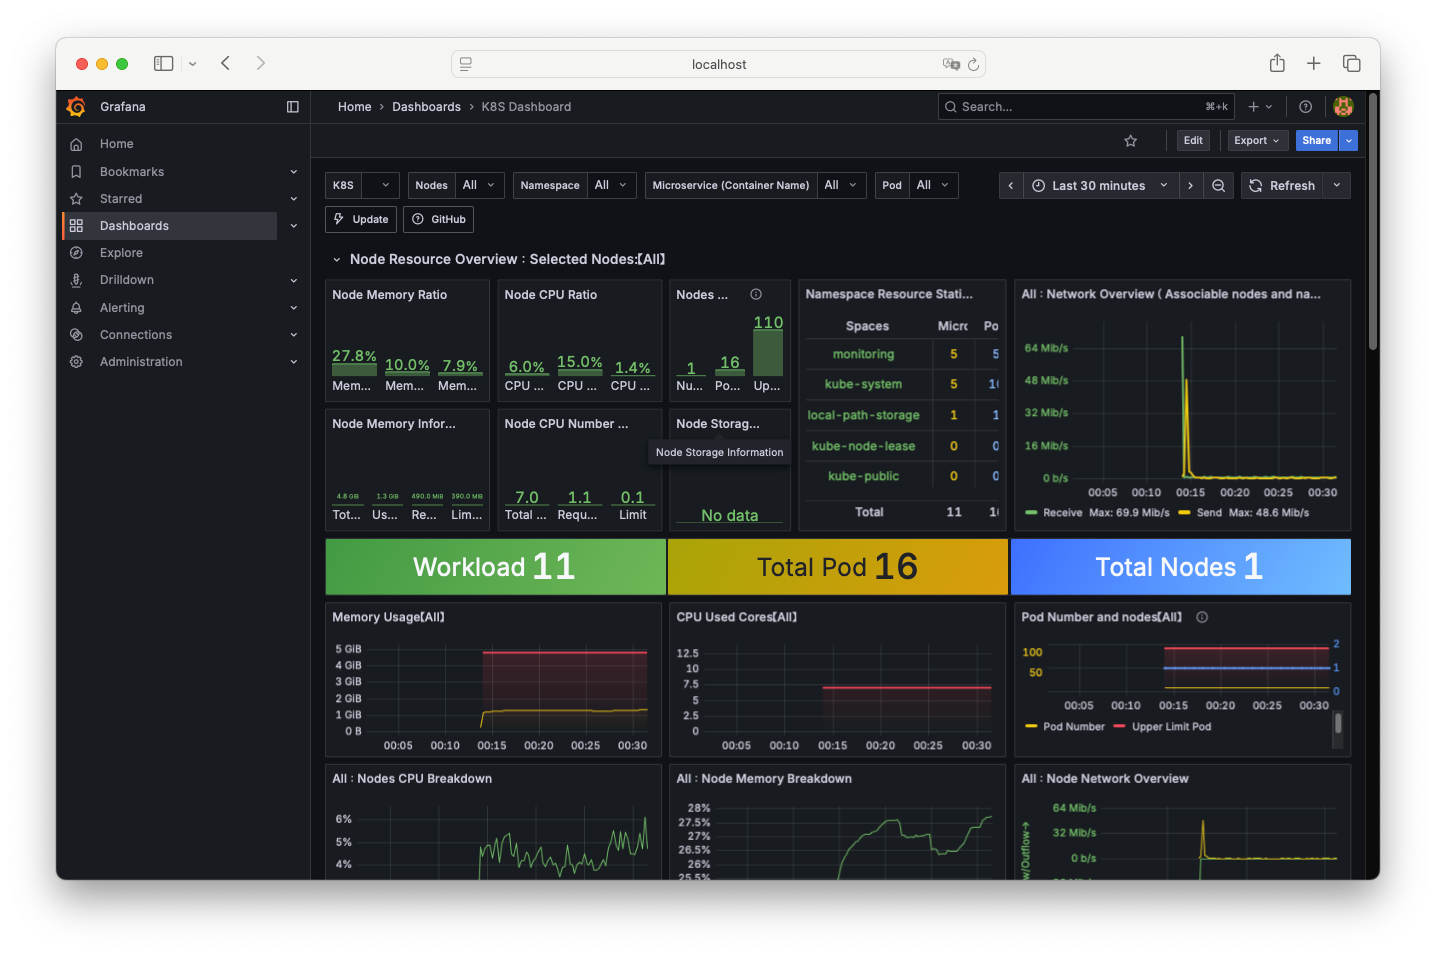
- 이번 실습에서는 kind를 사용해서 Kubernetes 클러스터를 구성하고 성능 평가를 위해 다음의 요소들을 설치합니다.
-
kube-ops-view: 클러스터 상태 시각화 도구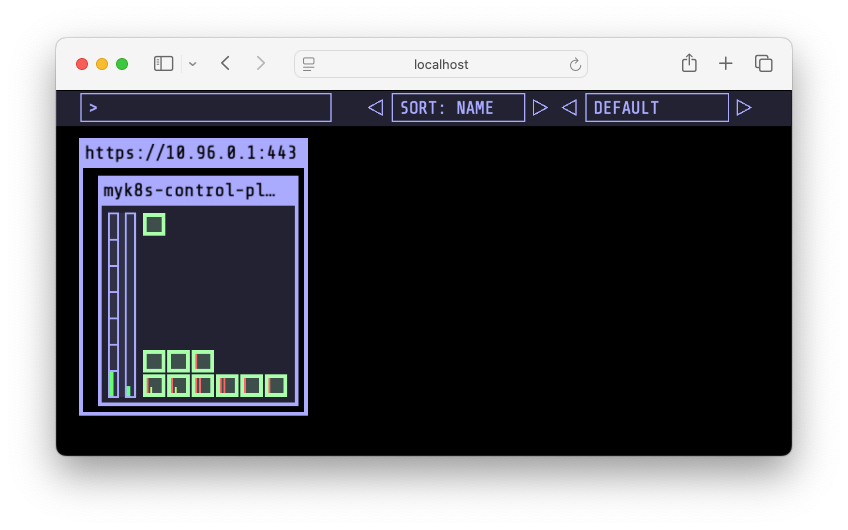
-
metrics-server: 클러스터 리소스 사용량 수집 -
kube-prometheus-stack: Prometheus와 Grafana를 포함한 모니터링 스택
-
실습환경 배포
- Kind를 사용하여 클러스터를 설치하고 metrics-server를 설치합니다.
# Prometheus Target connection refused bind-address 설정 : kube-controller-manager , kube-scheduler , etcd , kube-proxy
$ kind create cluster --name myk8s --image kindest/node:v1.33.2 --config - <<EOF
kind: Cluster
apiVersion: kind.x-k8s.io/v1alpha4
nodes:
- role: control-plane
  extraPortMappings:
  - containerPort: 30000
    hostPort: 30000
  - containerPort: 30001
    hostPort: 30001
  - containerPort: 30002
    hostPort: 30002
  - containerPort: 30003
    hostPort: 30003
  kubeadmConfigPatches: # Prometheus Target connection refused bind-address 설정
  - |
    kind: ClusterConfiguration
    controllerManager:
      extraArgs:
        bind-address: 0.0.0.0
    etcd:
      local:
        extraArgs:
          listen-metrics-urls: http://0.0.0.0:2381
    scheduler:
      extraArgs:
        bind-address: 0.0.0.0
  - |
    kind: KubeProxyConfiguration
    metricsBindAddress: 0.0.0.0
EOF
# => Creating cluster "myk8s" ...
#     ✓ Ensuring node image (kindest/node:v1.33.2) 🖼
#     ✓ Preparing nodes 📦
#     ✓ Writing configuration 📜
#     ✓ Starting control-plane 🕹️
#     ✓ Installing CNI 🔌
#     ✓ Installing StorageClass 💾
#    Set kubectl context to "kind-myk8s"
#    You can now use your cluster with:
#
#    kubectl cluster-info --context kind-myk8s
#
#    Have a question, bug, or feature request? Let us know! https://kind.sigs.k8s.io/#community 🙂

# kube-ops-view 설치
$ helm repo add geek-cookbook https://geek-cookbook.github.io/charts/
$ helm install kube-ops-view geek-cookbook/kube-ops-view --version 1.2.2 --set service.main.type=NodePort,service.main.ports.http.nodePort=30003 --set env.TZ="Asia/Seoul" --namespace kube-system
# => NAME: kube-ops-view
#    LAST DEPLOYED: Sat Aug 30 00:04:30 2025
#    NAMESPACE: kube-system
#    STATUS: deployed
#    REVISION: 1
#    TEST SUITE: None
#    NOTES:
#    1. Get the application URL by running these commands:
#      export NODE_PORT=$(kubectl get --namespace kube-system -o jsonpath="{.spec.ports[0].nodePort}" services kube-ops-view)
#      export NODE_IP=$(kubectl get nodes --namespace kube-system -o jsonpath="{.items[0].status.addresses[0].address}")
#      echo http://$NODE_IP:$NODE_PORT
$ open "http://localhost:30003/#scale=1.5"
$ open "http://localhost:30003/#scale=2"

# metrics-server
$ helm repo add metrics-server https://kubernetes-sigs.github.io/metrics-server/
$ helm upgrade --install metrics-server metrics-server/metrics-server --set 'args[0]=--kubelet-insecure-tls' -n kube-system
# => Release "metrics-server" does not exist. Installing it now.
#    NAME: metrics-server
#    ...

# 확인
$ kubectl top node
# => NAME                  CPU(cores)   CPU(%)   MEMORY(bytes)   MEMORY(%)
#    myk8s-control-plane   328m         4%       913Mi           18%
$ kubectl top pod -A --sort-by='cpu'
# => NAMESPACE            NAME                                          CPU(cores)   MEMORY(bytes)
#    kube-system          kube-apiserver-myk8s-control-plane            78m          194Mi
#    kube-system          etcd-myk8s-control-plane                      45m          28Mi
#    kube-system          kube-ops-view-6658c477d4-vntvq                36m          83Mi
#    kube-system          kube-controller-manager-myk8s-control-plane   33m          48Mi
#    kube-system          kube-scheduler-myk8s-control-plane            16m          20Mi
#    ...
$ kubectl top pod -A --sort-by='memory'
# => NAMESPACE            NAME                                          CPU(cores)   MEMORY(bytes)
#    kube-system          kube-apiserver-myk8s-control-plane            72m          197Mi
#    kube-system          kube-ops-view-6658c477d4-vntvq                35m          83Mi
#    kube-system          kube-controller-manager-myk8s-control-plane   33m          48Mi
#    kube-system          etcd-myk8s-control-plane                      43m          28Mi
#    kube-system          kube-scheduler-myk8s-control-plane            16m          21Mi
#    ...
- 이어서 kube-prometheus-stack를 설치합니다. - Link
# 파라미터 파일 생성
$ cat <<EOT > monitor-values.yaml
prometheus:
  prometheusSpec:
    scrapeInterval: "15s"
    evaluationInterval: "15s"
  service:
    type: NodePort
    nodePort: 30001

grafana:
  defaultDashboardsTimezone: Asia/Seoul
  adminPassword: prom-operator
  service:
    type: NodePort
    nodePort: 30002

alertmanager:
  enabled: false
defaultRules:
  create: false
prometheus-windows-exporter:
  prometheus:
    monitor:
      enabled: false
EOT
$ cat monitor-values.yaml

$ helm repo add prometheus-community https://prometheus-community.github.io/helm-charts
$ helm repo update

# 배포
$ helm install kube-prometheus-stack prometheus-community/kube-prometheus-stack --version 75.15.1 \
  -f monitor-values.yaml --create-namespace --namespace monitoring
# => NAME: kube-prometheus-stack
#    ...
#    kube-prometheus-stack has been installed. Check its status by running:
#      kubectl --namespace monitoring get pods -l "release=kube-prometheus-stack"
#
#    Get Grafana 'admin' user password by running:
#
#      kubectl --namespace monitoring get secrets kube-prometheus-stack-grafana -o jsonpath="{.data.admin-password}" | base64 -d ; echo
#
#    Access Grafana local instance:
#
#      export POD_NAME=$(kubectl --namespace monitoring get pod -l "app.kubernetes.io/name=grafana,app.kubernetes.io/instance=kube-prometheus-stack" -oname)
#      kubectl --namespace monitoring port-forward $POD_NAME 3000

# 웹 접속 실행
$ open http://127.0.0.1:30001 # macOS prometheus 웹 접속
$ open http://127.0.0.1:30002 # macOS grafana 웹 접속 ( admin , prom-operator )
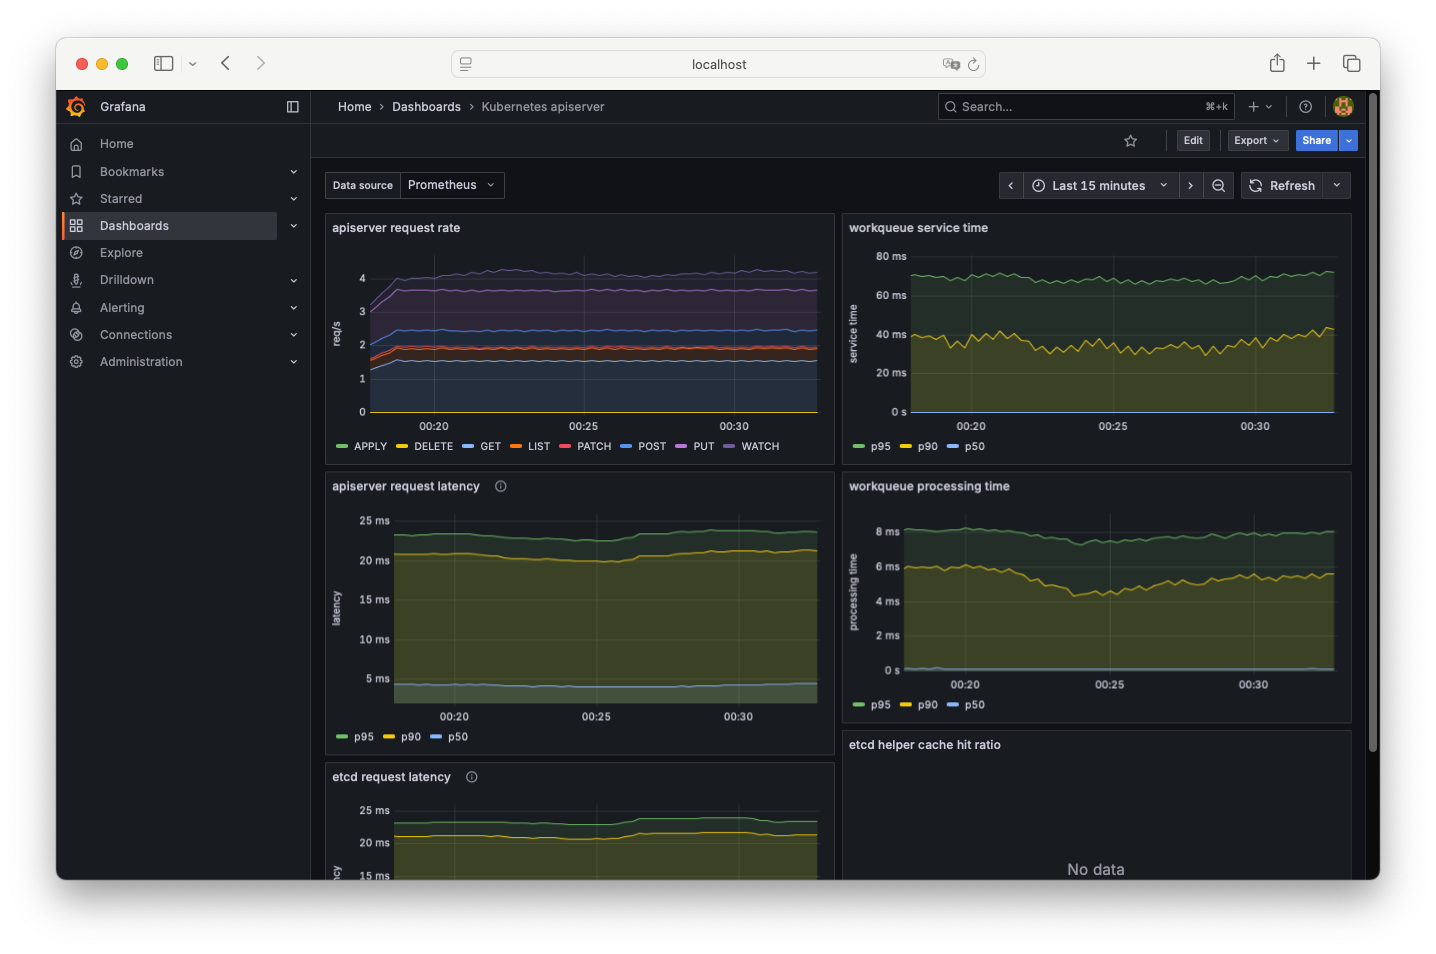
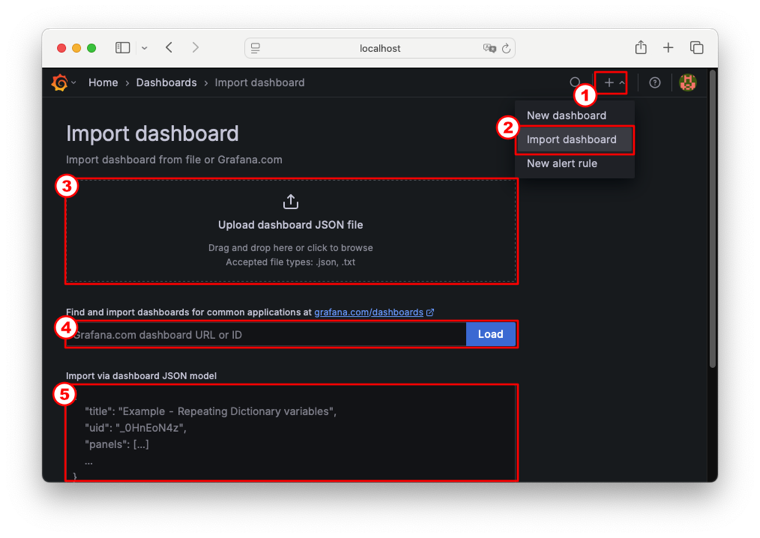
- grafana에 접속 후 대시보드를 추가 합니다.
Kube-burner
- 이번 실습에서는 Kube-burner(v1.17.3)를 사용하여 부하를 생성합니다. - Github , Home , examples
- Kube-burner는 공식 라이브러리인 client-go를 사용하여 작성된 Golang 기반의 바이너리 애플리케이션입니다.
- Kube-burner는 다음과 같은 기능을 제공합니다.
- 대량의 Kubernetes 리소스 생성 및 삭제, 읽기, 패치
- Prometheus 메트릭 수집 및 인덱싱
- 성능 측정
- 경고 알림
Kube-burner 설치
#
$ git clone https://github.com/kube-burner/kube-burner.git
$ cd kube-burner

# 바이너리 설치(추천) : mac M1
$ curl -LO https://github.com/kube-burner/kube-burner/releases/download/v1.17.3/kube-burner-V1.17.3-darwin-arm64.tar.gz # mac M
$ tar -xvf kube-burner-V1.17.3-darwin-arm64.tar.gz

$ curl -LO https://github.com/kube-burner/kube-burner/releases/download/v1.17.3/kube-burner-V1.17.3-linux-x86_64.tar.gz # Windows
$ tar -xvf kube-burner-V1.17.3-linux-x86_64.tar.gz

$ sudo cp kube-burner /usr/local/bin

$ kube-burner -h
# => Kube-burner 🔥
#
#    Tool aimed at stressing a kubernetes cluster by creating or deleting lots of objects.
#
#    Usage:
#      kube-burner [command]
#
#    Available Commands:
#      check-alerts Evaluate alerts for the given time range
#      completion   Generates completion scripts for bash shell
#      destroy      Destroy old namespaces labeled with the given UUID.
#      health-check Check for Health Status of the cluster
#      help         Help about any command
#      import       Import metrics tarball
#      index        Index kube-burner metrics
#      init         Launch benchmark
#      measure      Take measurements for a given set of resources without running workload
#      version      Print the version number of kube-burner
#
#    Flags:
#      -h, --help               help for kube-burner
#          --log-level string   Allowed values: debug, info, warn, error, fatal (default "info")
#
#    Use "kube-burner [command] --help" for more information about a command.

# 버전 확인 : 혹은 go run cmd/kube-burner/kube-burner.go -h
$ kube-burner version
# => Version: 1.17.3
시나리오 1 : 디플로이먼트 1개(파드 1개) 생성 → 삭제, jobIterations qps burst 의미 확인
#
$ cat << EOF > s1-config.yaml
global:
  measurements:
    - name: none

jobs:
  - name: create-deployments
    jobType: create
    jobIterations: 1  # How many times to execute the job , 해당 job을 5번 반복 실행
    qps: 1            # Limit object creation queries per second , 	초당 최대 요청 수 (평균 속도 제한) - qps: 10이면 초당 10개 요청
    burst: 1          # Maximum burst for throttle , 순간적으로 처리 가능한 요청 최대치 (버퍼) - burst: 20이면 한순간에 최대 20개까지 처리 가능
    namespace: kube-burner-test
    namespaceLabels: {kube-burner-job: delete-me}
    waitWhenFinished: true # false
    verifyObjects: false
    preLoadImages: true # false
    preLoadPeriod: 30s # default 1m
    objects:
      - objectTemplate: s1-deployment.yaml
        replicas: 1
EOF

#
$ cat << EOF > s1-deployment.yaml
apiVersion: apps/v1
kind: Deployment
metadata:
  name: deployment-{{ .Iteration}}-{{.Replica}}
  labels:
    app: test-{{ .Iteration }}-{{.Replica}}
    kube-burner-job: delete-me
spec:
  replicas: 1
  selector:
    matchLabels:
      app: test-{{ .Iteration}}-{{.Replica}}
  template:
    metadata:
      labels:
        app: test-{{ .Iteration}}-{{.Replica}}
    spec:
      containers:
        - name: nginx
          image: nginx:alpine
          ports:
            - containerPort: 80
EOF


# 모니터링 : 터미널, kube-ops-view
$ watch -d kubectl get ns,pod -A


# 부하 발생 실행 Launch benchmark
$ kube-burner init -h
$ kube-burner init -c s1-config.yaml --log-level debug
# <span style="color: green;">👉 s1-deployment.yaml을 1개 배포하여 초당 1번 호출합니다.</span>
# => time="2025-08-30 10:35:54" level=info msg="🔥 Starting kube-burner (1.17.3@917540ff45a89386bb25de45af9b96c9fc360e93) with UUID 8c6382d0-f8b2-4a9d-834b-878f9524a05d" file="job.go:91"
#    time="2025-08-30 10:35:54" level=warning msg="Measurement [none] is not supported" file="factory.go:101"
#    time="2025-08-30 10:35:54" level=debug msg="job.MaxWaitTimeout is zero in create-deployments, override by timeout: 4h0m0s" file="job.go:361"
#    time="2025-08-30 10:35:54" level=info msg="QPS: 1" file="job.go:371"
#    time="2025-08-30 10:35:54" level=info msg="Burst: 1" file="job.go:378"
#    time="2025-08-30 10:35:54" level=debug msg="Preparing create job: create-deployments" file="create.go:46"
#    time="2025-08-30 10:35:54" level=debug msg="Rendering template: s1-deployment.yaml" file="create.go:52"
#    time="2025-08-30 10:35:54" level=info msg="Job create-deployments: 1 iterations with 1 Deployment replicas" file="create.go:84"
#    time="2025-08-30 10:35:54" level=info msg="Pre-load: images from job create-deployments" file="pre_load.go:73"
#    time="2025-08-30 10:35:54" level=debug msg="Created namespace: preload-kube-burner" file="namespaces.go:55"
#    time="2025-08-30 10:35:54" level=info msg="Pre-load: Creating DaemonSet using images [nginx:alpine] in namespace preload-kube-burner" file="pre_load.go:195"
#    time="2025-08-30 10:35:54" level=info msg="Pre-load: Sleeping for 30s" file="pre_load.go:86"
#    time="2025-08-30 10:36:24" level=info msg="Deleting 1 namespaces with label: kube-burner-preload=true" file="namespaces.go:67"
#    time="2025-08-30 10:36:24" level=debug msg="Waiting for 1 namespaces labeled with kube-burner-preload=true to be deleted" file="namespaces.go:90"
#    time="2025-08-30 10:36:25" level=debug msg="Waiting for 1 namespaces labeled with kube-burner-preload=true to be deleted" file="namespaces.go:90"
#    time="2025-08-30 10:36:26" level=debug msg="Waiting for 1 namespaces labeled with kube-burner-preload=true to be deleted" file="namespaces.go:90"
#    time="2025-08-30 10:36:27" level=debug msg="Waiting for 1 namespaces labeled with kube-burner-preload=true to be deleted" file="namespaces.go:90"
#    time="2025-08-30 10:36:28" level=debug msg="Waiting for 1 namespaces labeled with kube-burner-preload=true to be deleted" file="namespaces.go:90"
#    time="2025-08-30 10:36:29" level=debug msg="Waiting for 1 namespaces labeled with kube-burner-preload=true to be deleted" file="namespaces.go:90"
#    time="2025-08-30 10:36:30" level=info msg="Triggering job: create-deployments" file="job.go:122"
#    time="2025-08-30 10:36:30" level=info msg="0/1 iterations completed" file="create.go:119"
#    time="2025-08-30 10:36:30" level=debug msg="Creating object replicas from iteration 0" file="create.go:122"
#    time="2025-08-30 10:36:31" level=info msg="Namespace kube-burner-test-0 already exists" file="namespaces.go:44"
#    time="2025-08-30 10:36:32" level=error msg="Deployment/deployment-0-1 in namespace kube-burner-test-0 already exists" file="create.go:269"
#    time="2025-08-30 10:36:32" level=info msg="Waiting up to 4h0m0s for actions to be completed" file="create.go:169"
#    time="2025-08-30 10:36:33" level=info msg="Actions in namespace kube-burner-test-0 completed" file="waiters.go:74"
#    time="2025-08-30 10:36:33" level=info msg="Job create-deployments took 3s" file="job.go:191"
#    time="2025-08-30 10:36:33" level=info msg="Finished execution with UUID: 8c6382d0-f8b2-4a9d-834b-878f9524a05d" file="job.go:264"
#    time="2025-08-30 10:36:33" level=info msg="👋 Exiting kube-burner 8c6382d0-f8b2-4a9d-834b-878f9524a05d" file="kube-burner.go:90"

#
$ kubectl get deploy -A -l kube-burner-job=delete-me
# => NAMESPACE            NAME             READY   UP-TO-DATE   AVAILABLE   AGE
#    kube-burner-test-0   deployment-0-1   1/1     1            1           4m16s
$ kubectl get pod -A -l kube-burner-job=delete-me
# => NAMESPACE            NAME                              READY   STATUS    RESTARTS   AGE
#    kube-burner-test-0   deployment-0-1-5f748ffd78-mlf64   1/1     Running   0          4m22s
$ kubectl get ns -l kube-burner-job=delete-me
# => NAME                 STATUS   AGE
#    kube-burner-test-0   Active   4m46s

#
$ ls kube-burner-*.log
# => kube-burner-8c6382d0-f8b2-4a9d-834b-878f9524a05d.log
$ cat kube-burner-*.log
# <span style="color: green;">👉 위의 실행시의 로그가 똑같이 나옴</span>

# 삭제!
## deployment 는 s1-deployment.yaml 에 metadata.labels 에 추가한 labels 로 지정
## namespace 는 config.yaml 에 job.name 값을 labels 로 지정
$ cat << EOF > s1-config-delete.yaml
# global:
#   measurements:
#     - name: none

jobs:
  - name: delete-deployments-namespace
    qps: 500
    burst: 500
    namespace: kube-burner-test
    jobType: delete
    waitWhenFinished: true
    objects:
    - kind: Deployment
      labelSelector: {kube-burner-job: delete-me}
      apiVersion: apps/v1
    - kind: Namespace
      labelSelector: {kube-burner-job: delete-me}
EOF

#
$ kube-burner init -c s1-config-delete.yaml --log-level debug
# <span style="color: green;">👉 kube-burner 성능 테스트관련 namespace, deployment 등이 삭제됩니다.</span>
kube-burner init -c s1-config.yaml --log-level debug-
kube-burner init -c s1-config-delete.yaml --log-level debug-
preLoadImages: false변경 후 실행 → 차이점 확인 후 리소스 삭제, 설정값은 유지- 결과 : 이미지를 로딩하는 시간을 30초 가지고 있어서 대기가 걸렸었는데, 바로 실행됩니다.
-
waitWhenFinished: false변경 후 실행 → 차이점 확인 후 리소스 삭제, 설정값은 유지- 결과 : 테스트 파드가 잘 배포 되었는지 확인하지 않고 바로 종료됩니다.
-
jobIterations: 5변경 후 실행 → 차이점 확인 후 리소스 삭제, 설정값은 유지 ⇒ s1-deployment.yaml 파일 확인-
결과 : 테스트 파드를 5개 배포합니다. 이때 objects.replicas가 1이므로 replicas는 1개로 고정되고, deployment가 5개 생성됩니다.
$ kubectl get deploy -A -l kube-burner-job=delete-me
# => NAMESPACE            NAME             READY   UP-TO-DATE   AVAILABLE   AGE
#    kube-burner-test-0   deployment-0-1   1/1     1            1           36s
#    kube-burner-test-1   deployment-1-1   1/1     1            1           35s
#    kube-burner-test-2   deployment-2-1   1/1     1            1           34s
#    kube-burner-test-3   deployment-3-1   1/1     1            1           33s
#    kube-burner-test-4   deployment-4-1   1/1     1            1           32s
-
결과 : 테스트 파드를 5개 배포합니다. 이때 objects.replicas가 1이므로 replicas는 1개로 고정되고, deployment가 5개 생성됩니다.
-
objects.replicas: 2변경 후 실행 → 차이점 확인 후 리소스 삭제, 설정값은 유지 ⇒ s1-deployment.yaml 파일 확인-
결과 : 테스트 파드를 5 x 2 = 10개 배포합니다. 이때 objects.replicas가 2이지만 s1-deployment.yaml에 replicas가 1로 고정되어 있어서 replicas는 1개로 고정되고, deployment가 10개 생성됩니다.
$ kubectl get deploy -A -l kube-burner-job=delete-me
# => NAMESPACE            NAME             READY   UP-TO-DATE   AVAILABLE   AGE
#    kube-burner-test-0   deployment-0-1   1/1     1            1           45s
#    kube-burner-test-0   deployment-0-2   1/1     1            1           46s
#    kube-burner-test-1   deployment-1-1   1/1     1            1           43s
#    kube-burner-test-1   deployment-1-2   1/1     1            1           44s
#    kube-burner-test-2   deployment-2-1   1/1     1            1           41s
#    kube-burner-test-2   deployment-2-2   1/1     1            1           42s
#    kube-burner-test-3   deployment-3-1   1/1     1            1           39s
#    kube-burner-test-3   deployment-3-2   1/1     1            1           40s
#    kube-burner-test-4   deployment-4-1   1/1     1            1           37s
#    kube-burner-test-4   deployment-4-2   1/1     1            1           38s
-
결과 : 테스트 파드를 5 x 2 = 10개 배포합니다. 이때 objects.replicas가 2이지만 s1-deployment.yaml에 replicas가 1로 고정되어 있어서 replicas는 1개로 고정되고, deployment가 10개 생성됩니다.
-
jobIterations: 10변경 후 실행 → 차이점 확인 후 리소스 삭제, 설정값은 유지 ⇒ qps: 1 의미 파악 해보기- 결과 : 테스트 파드를 10 x 2 = 20개 배포합니다. QPS가 1이므로 초당 1개씩 배포됩니다.
-
qps: 10, burst:10변경 후 실행 → 차이점 확인 후 리소스 삭제, 설정값은 유지 ⇒ qps: 10 의미 파악 해보기- 결과 : 테스트 파드를 10 x 2 = 20개 배포합니다. QPS가 10이므로 초당 10개씩 배포됩니다.
- 결과 : QPS는 초당 (생성) 쿼리로 10이면 초당 10개의 생성 요청을 보낼 수 있는것입니다. 20개이면 2초만에 배포가 완료됩니다.
-
- qps 와 burst 동작 파악해보기
-
jobIterations: 10, qps: 1, burst:10objects.replicas: 1변경 후 실행 → 동작 확인 후 리소스 삭제- 결과 : 테스트 파드를 10개 배포합니다. QPS가 1이지만 burst가 10이므로 순간적으로 10개까지 배포가 가능합니다.
-
jobIterations: 100, qps: 1, burst:100objects.replicas: 1변경 후 실행 → 동작 확인 후 리소스 삭제- 결과 : 테스트 파드를 100개 배포합니다. QPS가 1이지만 burst가 100이므로 순간적으로 100개까지 배포가 가능합니다.
-
jobIterations: 10, qps: 1, burst:20objects.replicas: 2변경 후 실행 → 동작 확인 후 리소스 삭제 -
jobIterations: 10, qps: 1, burst:10objects.replicas: 2변경 후 실행 → 차이점 확인 후 리소스 삭제- 결과 : 테스트 파드를 20개 배포합니다. QPS가 1이지만 burst가 10이므로 순간적으로 10개까지 배포가 가능합니다. 10개까지는 바로 배포되지만 11개 부터는 초당 1개씩 배포됩니다.
-
jobIterations: 20, qps: 2, burst:20objects.replicas: 2변경 후 실행 → 차이점 확인 후 리소스 삭제- 결과 : 테스트 파드를 40개 배포합니다. QPS가 2이지만 burst가 20이므로 순간적으로 20개까지 배포가 가능합니다. 20개까지는 바로 배포되지만 21개 부터는 초당 2개씩 배포됩니다.
- 👉 즉, qps는 초당 몇 회의 쿼리를 보내느냐, burst는 순간적으로 몇 회의 쿼리를 보낼 수 있느냐 입니다.
-
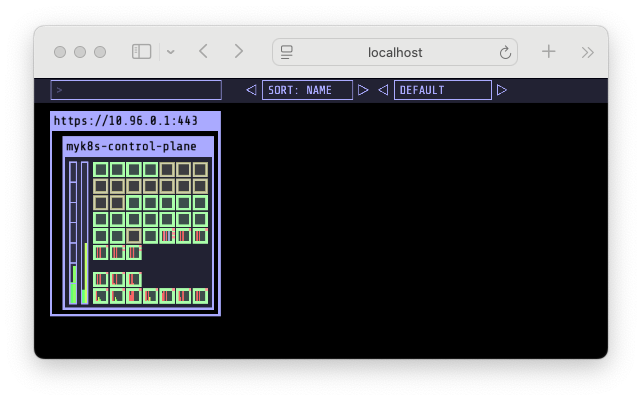 kube-burner로 pod 가 배포되는 화면
시나리오 2 : 노드 1대에 최대 파드(150개) 배포 시도 1
kube-burner init -c s1-config.yaml --log-level debug-
jobIterations: 100, qps: 300, burst: 300objects.replicas: 1변경 후 실행 → 모든 파드가 배포 되는지 확인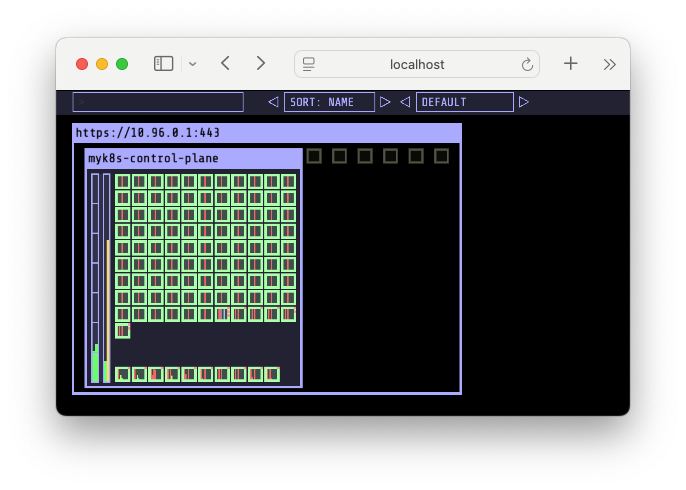 6개의 파드가 Pending 상태로 남아있는 화면
-
문제 원인 파악
 K8S NEW 대시보드 : Nodes with Pod 패널
# $ kubectl get pod -A | grep -v '1/1 Running' # => NAMESPACE NAME READY STATUS RESTARTS AGE # kube-burner-test-94 deployment-94-1-66c9bd7f46-llbsr 0/1 Pending 0 3m46s # kube-burner-test-95 deployment-95-1-6877f5c69b-kzdwj 0/1 Pending 0 3m46s # kube-burner-test-96 deployment-96-1-65468866f4-2lpcw 0/1 Pending 0 3m46s # kube-burner-test-97 deployment-97-1-58646bddc6-d5shq 0/1 Pending 0 3m46s # kube-burner-test-98 deployment-98-1-5c4c86c794-25fzm 0/1 Pending 0 3m46s # kube-burner-test-99 deployment-99-1-567ddbffb4-6qqwc 0/1 Pending 0 3m45s # monitoring kube-prometheus-stack-grafana-7d9c86798d-wcp44 3/3 Running 3 (121m ago) 11h # monitoring prometheus-kube-prometheus-stack-prometheus-0 2/2 Running 2 (121m ago) 11h $ kubectl describe pod -n kube-burner-test-99 | grep Events: -A5 # => Events: # Type Reason Age From Message # ---- ------ ---- ---- ------- # Warning FailedScheduling 4m23s default-scheduler 0/1 nodes are available: 1 <span style="color: green;">Too many pods</span>. preemption: 0/1 nodes are available: 1 No preemption victims found for incoming pod. # <span style="color: green;">👉 파드가 너무 많아서 스케줄링이 안된다는 메시지를 확인할 수 있습니다.</span> # $ kubectl describe node # => ... # Capacity: # cpu: 7 # ephemeral-storage: 61255492Ki # hugepages-1Gi: 0 # hugepages-2Mi: 0 # hugepages-32Mi: 0 # hugepages-64Ki: 0 # memory: 5035968Ki # pods: <span style="color: green;">110</span> # Allocatable: # cpu: 7 # ephemeral-storage: 61255492Ki # hugepages-1Gi: 0 # hugepages-2Mi: 0 # hugepages-32Mi: 0 # hugepages-64Ki: 0 # memory: 5035968Ki # pods: <span style="color: green;">110</span> # <span style="color: green;">👉 할당할 수 있는 파드 수가 110개 까지인데 현재 파드수가 116개로 초과되어 초과된 6개 만큼의 파드가 Pending 상태가 되었음을 알 수 있습니다.</span> -
해결
  # maxPods 항목 없으면 기본값 110개
  $ kubectl get cm -n kube-system kubelet-config -o yaml | grep maxPods
  # => (없음)

  #
  $ docker exec -it myk8s-control-plane bash
  ----------------------------------------
  $ cat /var/lib/kubelet/config.yaml

  $ apt update && apt install vim -y
  $ vim /var/lib/kubelet/config.yaml
  # maxPods: 150 추가

  $ systemctl restart kubelet
  $ systemctl status kubelet
  # => ● kubelet.service - kubelet: The Kubernetes Node Agent                                                                                                                                  Loaded: loaded (/etc/systemd/system/kubelet.service; enabled; preset: enabled)
  #        Drop-In: /etc/systemd/system/kubelet.service.d                                                                                                                                              └─10-kubeadm.conf, 11-kind.conf
  #         Active: active (running) since Sat 2025-08-30 02:28:12 UTC; 7s ago                                                                                                                   Docs: http://kubernetes.io/docs/
  $ exit
  ----------------------------------------

  #
  $ kubectl describe node
  # => ...
  #    Capacity:
  #      cpu:                7
  #      ephemeral-storage:  61255492Ki
  #      hugepages-1Gi:      0
  #      hugepages-2Mi:      0
  #      hugepages-32Mi:     0
  #      hugepages-64Ki:     0
  #      memory:             5035968Ki
  #      pods:               <span style="color: green;">150</span>
  #    Allocatable:
  #      cpu:                7
  #      ephemeral-storage:  61255492Ki
  #      hugepages-1Gi:      0
  #      hugepages-2Mi:      0
  #      hugepages-32Mi:     0
  #      hugepages-64Ki:     0
  #      memory:             5035968Ki
  #      pods:               <span style="color: green;">150</span>
- 파드 한도가 150개로 늘었고 모든 파드가 배포되었습니다.
-
kube-burner init -c s1-config-delete.yaml --log-level debug로 리소스 삭제
시나리오 3 : 노드 1대에 최대 파드(300개) 배포 시도 2
kube-burner init -c s1-config.yaml --log-level debug-
jobIterations: **300**, qps: 300, burst: 300objects.replicas: 1변경 후 실행 → 모든 파드가 배포 되는지 확인 -
문제 원인 파악
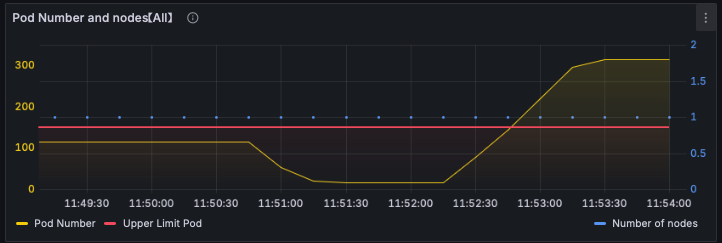 K8S NEW 대시보드 : Pod Number and nodes 패널
#
$ kubectl get pod -A | grep -v '1/1     Running'
# => NAMESPACE              NAME                                                        READY   STATUS    RESTARTS       AGE
#    kube-burner-test-134   deployment-134-1-7b94c5f676-z8ptw                           0/1     Pending   0              4m53s
#    kube-burner-test-135   deployment-135-1-57d5cd6644-xlt7r                           0/1     Pending   0              4m53s
#    kube-burner-test-136   deployment-136-1-7bd85d5684-vhdl6                           0/1     Pending   0              4m53s
#    kube-burner-test-137   deployment-137-1-5f5b964756-jc8tk                           0/1     Pending   0              4m53s
#    ...
# <span style="color: green;">👉 167개 가량의 파드가 pending 상태입니다.</span>

# maxPods: 400 상향
$ docker exec -it myk8s-control-plane bash
----------------------------------------
$ cat /var/lib/kubelet/config.yaml

$ apt update && apt install vim -y
$ vim /var/lib/kubelet/config.yaml
# maxPods: 400 추가

$ systemctl restart kubelet
$ systemctl status kubelet
$ exit
----------------------------------------

#
$ kubectl describe pod -n kube-burner-test-250 | grep Events: -A5
# => Events:
#      Type     Reason            Age    From               Message
#      ----     ------            ----   ----               -------
#      Warning  FailedScheduling  6m33s  default-scheduler  0/1 nodes are available: 1 Too many pods. preemption: 0/1 nodes are available: 1 No preemption victims found for incoming pod.
#      Warning  FailedScheduling  72s    default-scheduler  0/1 nodes are available: 1 Too many pods. preemption: 0/1 nodes are available: 1 No preemption victims found for incoming pod.
#      Normal   Scheduled         15s    default-scheduler  Successfully assigned kube-burner-test-250/deployment-250-1-6789d5b4bd-hmhjh to myk8s-control-plane
# <span style="color: green;">👉 배포가 잘 되었습니다.</span>

$ kubectl describe pod -n kube-burner-test-299 | grep Events: -A5
# => Events:
#      Type     Reason            Age   From               Message
#      ----     ------            ----  ----               -------
#      Warning  FailedScheduling  7m1s  default-scheduler  0/1 nodes are available: 1 Too many pods. preemption: 0/1 nodes are available: 1 No preemption victims found for incoming pod.
#      Warning  FailedScheduling  108s  default-scheduler  0/1 nodes are available: 1 Too many pods. preemption: 0/1 nodes are available: 1 No preemption victims found for incoming pod.
#      Normal   Scheduled         52s   default-scheduler  Successfully assigned kube-burner-test-299/deployment-299-1-b7c8c4d9b-g7gwc to myk8s-control-plane
# <span style="color: green;">👉 모든 파드가 배포가 잘 되었습니다.</span>
kube-burner init -c s1-config-delete.yaml --log-level debug
K8S Performance & Tuning
대규모 클러스터 고려사항
개요 (K8S 공식 문서)
-
최대 규모 (v1.33 기준)
- 노드: 최대 5,000개
- 노드당 파드: 110개 이하
- 파드: 최대 150,000개
- 컨테이너: 최대 300,000개
-
컨트롤 플레인 설계
- 장애 영역(failure zone)마다 분산 배치
- 로드밸런서를 통해 일부 장애에도 API 호출 정상 유지
https://kubernetes.io/docs/setup/production-environment/tools/kubeadm/ha-topology/
-
etcd 스토리지 분리
- 이벤트 객체 전용 etcd 사용 권장
- 메인 etcd 부하 완화 및 성능 향상
Control Plane 구성 요소와 특징
- 참고 : 쓰기만 했던 개발자가 궁금해서 찾아본 쿠버네티스 내부 1편 - Link, 2편* - Link
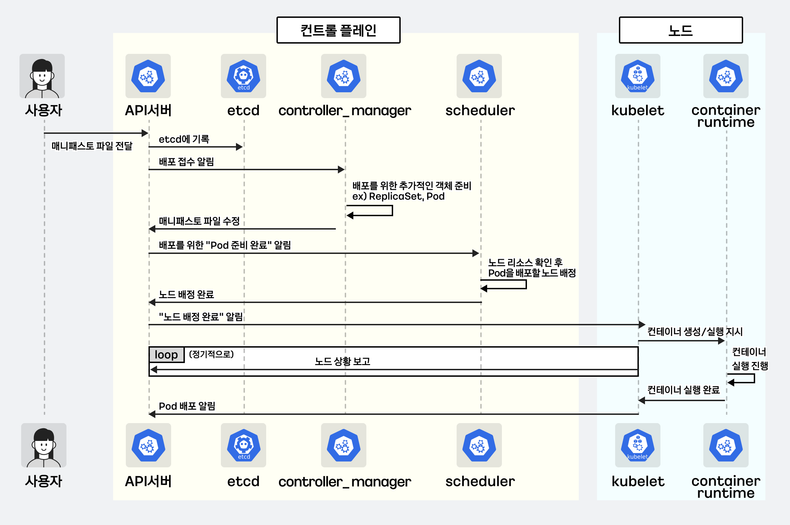 출처 : 쓰기만 했던 개발자가 궁금해서 찾아본 쿠버네티스 내부
- 참고 : K8S Controlplane 죽이기 👍🏻 - Blog
- K8S 핵심 구성요소
-
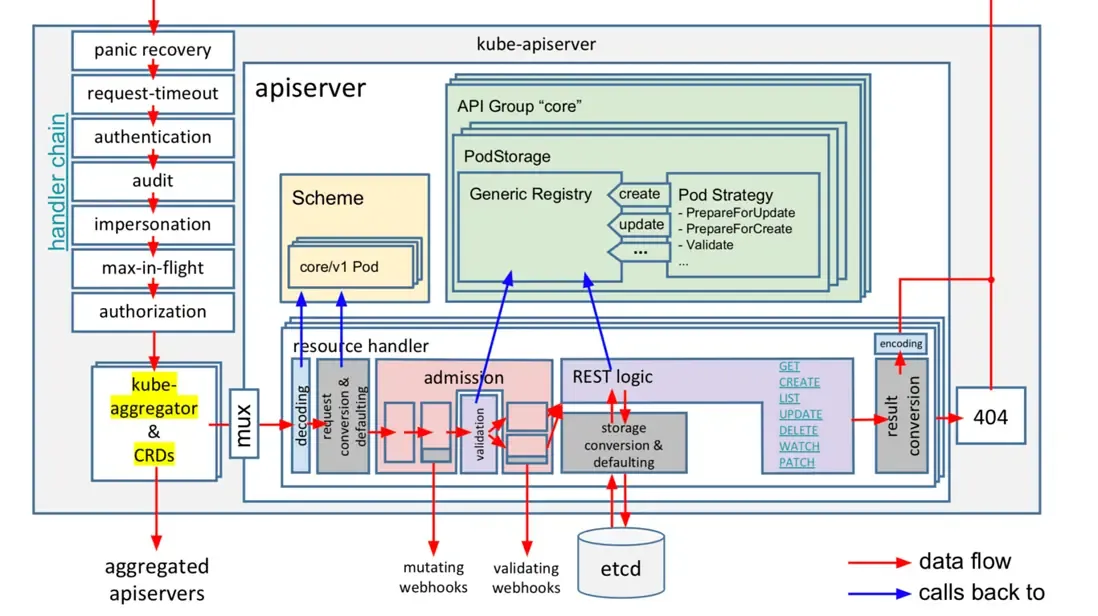
kube-apiserver
- RESTful API 서버
- 클라이언트와 통신 (
kubectl,kubelet등)
-
etcd
- 분산 Key-Value DB
- RAFT 합의 기반으로 안정적 동작
-
kube-apiserver
-
장점
- 데이터 손상/일관성 문제 거의 없음
- 안정성 우선 설계
-
단점
- 대규모 환경에서 성능 저하
- 파드가 100개일때 파드 조회시 0.031초, 파드가 10000개일때 2초 소요로 파드가 많아질 수록 급격히 성능이 저하됩니다.
- 요청시 받아지는 용량도 100개일때 0.45MB, 10000개일때 44.4MB로 급격히 증가합니다.
- 요청당 메모리 소비량이 큼
- 파드 수가 많을수록 응답 지연, 응답 크기 폭증
- 대규모 환경에서 성능 저하
문제 발생 예시
-
리소스 과다사용 사례
- Airflow, Kubeflow 등 → Pod가 자동 삭제되지 않고 누적
- 수천 개 이상 쌓이면 조회 요청 시 부하 급증
-
동시 요청 과다
- kubelet, kube-proxy, CNI 에이전트 등 노드 기반 컨트롤러
- 네트워크 끊김/재연결 시 대량의 List 요청 발생
-
spec.nodeName등에 인덱스 부재 → etcd 전체 스캔 발생
해결 방법
-
API 관점
-
limit/continue활용 → 한번에 최대 500개씩 조회 -
resourceVersion=0활용 → apiserver 캐시 활용, etcd 부하 완화 - API Priority and Fairness(APF) → 특정 요청만 Rate Limit 적용
-
-
운영 관점
- 불필요한 Pod, 이벤트 리소스 주기적 정리
- CronJob, Job 등 단발성 워크로드 Pod 자동 삭제 설정
- 이벤트 전용 etcd 사용하여 메인 클러스터 부하 분산
OpenAI 사례
-
2500 노드 (2018)
- 500노드 이후 kubectl timeout 발생
- etcd 네트워크 스토리지 → 로컬 SSD로 변경 → 지연 200µs 감소
- Fluentd, Datadog 기본 설정 → 과도한 API 호출 원인 → 수정 후 안정화
- 이벤트 저장소를 메인 etcd와 분리 → 성능 개선
-
7500 노드 (2021)
- API 서버, etcd 각각 전용 서버(dedicated)에서 실행
- API 서버 5대, etcd 5대 → 부하 분산 및 장애 대비
- 노드 변경 시 Endpoints Watch 트래픽 1GB/s 발생
-
EndpointSlice기능으로 부하 1/1000 수준으로 감소 - API 서버 메모리 사용량: 서버당 70GB 이상 힙 메모리
시나리오 4. api-intensive - 파드를 생성(configmap, secret) 후 삭제
- 이번에는 kube-apiserver가 파드를 생성할때 secret과 configmap을 마운트하고, 삭제하는 동작의 부하를 발생시켜보겠습니다.
- QPS/Burst를 클러스터 크기에 맞게 조절할 필요가 있습니다.
#
$ tree examples/workloads/api-intensive
# => examples/workloads/api-intensive
#    ├── api-intensive.yml
#    └── templates
#        ├── configmap.yaml
#        ├── deployment_patch_add_label.json
#        ├── deployment_patch_add_label.yaml
#        ├── deployment_patch_add_pod_2.yaml
#        ├── deployment.yaml
#        ├── secret.yaml
#        └── service.yaml

$ cd examples/workloads/api-intensive

#
$ cat << EOF > api-intensive-100.yml
jobs:
  - name: api-intensive
    jobIterations: 100
    qps: 100
    burst: 100
    namespacedIterations: true
    namespace: api-intensive
    podWait: false
    cleanup: true
    waitWhenFinished: true
    preLoadImages: false # true
    objects:
      - objectTemplate: templates/deployment.yaml
        replicas: 1
      - objectTemplate: templates/configmap.yaml
        replicas: 1
      - objectTemplate: templates/secret.yaml
        replicas: 1
      - objectTemplate: templates/service.yaml
        replicas: 1

  - name: api-intensive-patch
    jobType: patch
    jobIterations: 10
    qps: 100
    burst: 100
    objects:
      - kind: Deployment
        objectTemplate: templates/deployment_patch_add_label.json
        labelSelector: {kube-burner-job: api-intensive}
        patchType: "application/json-patch+json"
        apiVersion: apps/v1
      - kind: Deployment
        objectTemplate: templates/deployment_patch_add_pod_2.yaml
        labelSelector: {kube-burner-job: api-intensive}
        patchType: "application/apply-patch+yaml"
        apiVersion: apps/v1
      - kind: Deployment
        objectTemplate: templates/deployment_patch_add_label.yaml
        labelSelector: {kube-burner-job: api-intensive}
        patchType: "application/strategic-merge-patch+json"
        apiVersion: apps/v1

  - name: api-intensive-remove
    qps: 500
    burst: 500
    jobType: delete
    waitForDeletion: true
    objects:
      - kind: Deployment
        labelSelector: {kube-burner-job: api-intensive}
        apiVersion: apps/v1

  - name: ensure-pods-removal
    qps: 100
    burst: 100
    jobType: delete
    waitForDeletion: true
    objects:
      - kind: Pod
        labelSelector: {kube-burner-job: api-intensive}

  - name: remove-services
    qps: 100
    burst: 100
    jobType: delete
    waitForDeletion: true
    objects:
      - kind: Service
        labelSelector: {kube-burner-job: api-intensive}

  - name: remove-configmaps-secrets
    qps: 100
    burst: 100
    jobType: delete
    objects:
      - kind: ConfigMap
        labelSelector: {kube-burner-job: api-intensive}
      - kind: Secret
        labelSelector: {kube-burner-job: api-intensive}

  - name: remove-namespace
    qps: 100
    burst: 100
    jobType: delete
    waitForDeletion: true
    objects:
      - kind: Namespace
        labelSelector: {kube-burner-job: api-intensive}
EOF

# 수행
$ kube-burner init -c api-intensive-100.yml --log-level debug
# => ...
#    time="2025-08-30 12:29:33" level=debug msg="Removing Pod/api-intensive-1-7f8b8bf658-kbtsg from namespace api-intensive-76" file="delete.go:55"
#    time="2025-08-30 12:29:33" level=debug msg="Removing Pod/api-intensive-1-85bd5f8658-sfvmt from namespace api-intensive-76" file="delete.go:55"
#    time="2025-08-30 12:29:33" level=debug msg="Removing Pod/api-intensive-1-68c7855c5-b7qx9 from namespace api-intensive-66" file="delete.go:55"
#    time="2025-08-30 12:29:34" level=debug msg="Waiting for 206 pods labeled with kube-burner-job=api-intensive to be deleted" file="delete.go:79"
#    time="2025-08-30 12:29:36" level=debug msg="Waiting for 219 pods labeled with kube-burner-job=api-intensive to be deleted" file="delete.go:79"
#    time="2025-08-30 12:29:38" level=debug msg="Waiting for 233 pods labeled with kube-burner-job=api-intensive to be deleted" file="delete.go:79"
#    time="2025-08-30 12:29:40" level=debug msg="Waiting for 251 pods labeled with kube-burner-job=api-intensive to be deleted" file="delete.go:79"
#    ...
# <span style="color: green;">👉 kube-apiserver에 요청이 쌓이면서 굉장히 느려집니다.</span>
# <span style="color: green;">👉 웨이팅도 걸립니다.</span>
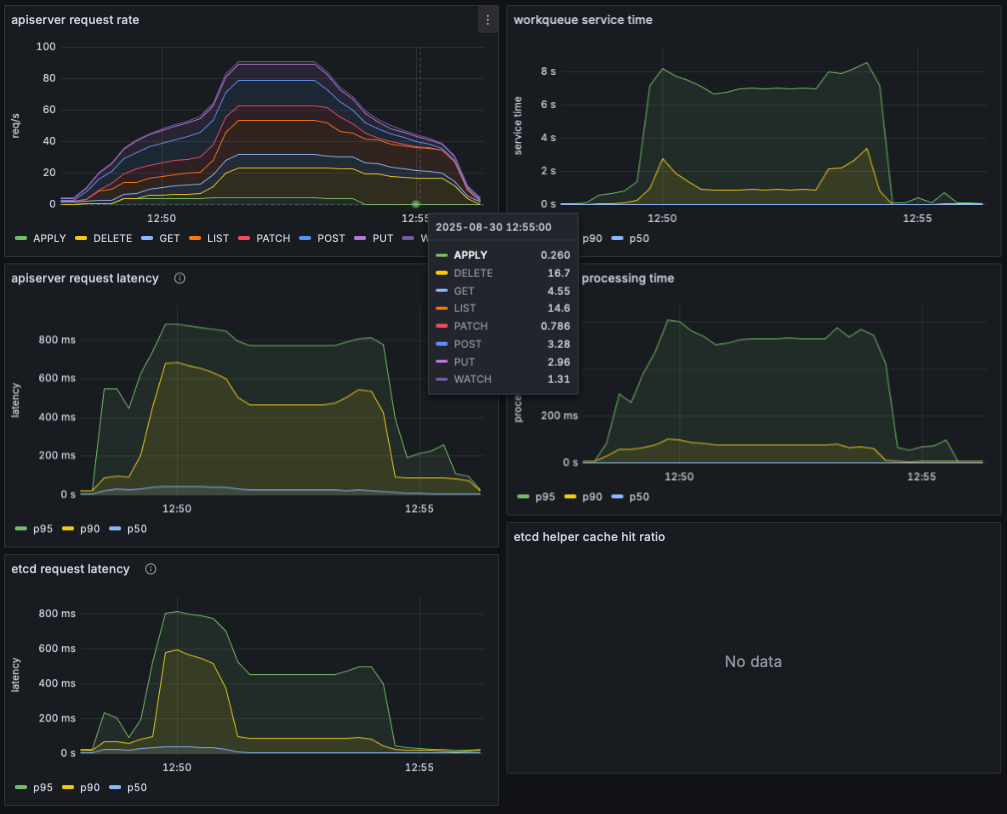 kube-burner로 apiserver 요청이 급증하면서 apiserver와 etcd 지연 급격히 증가
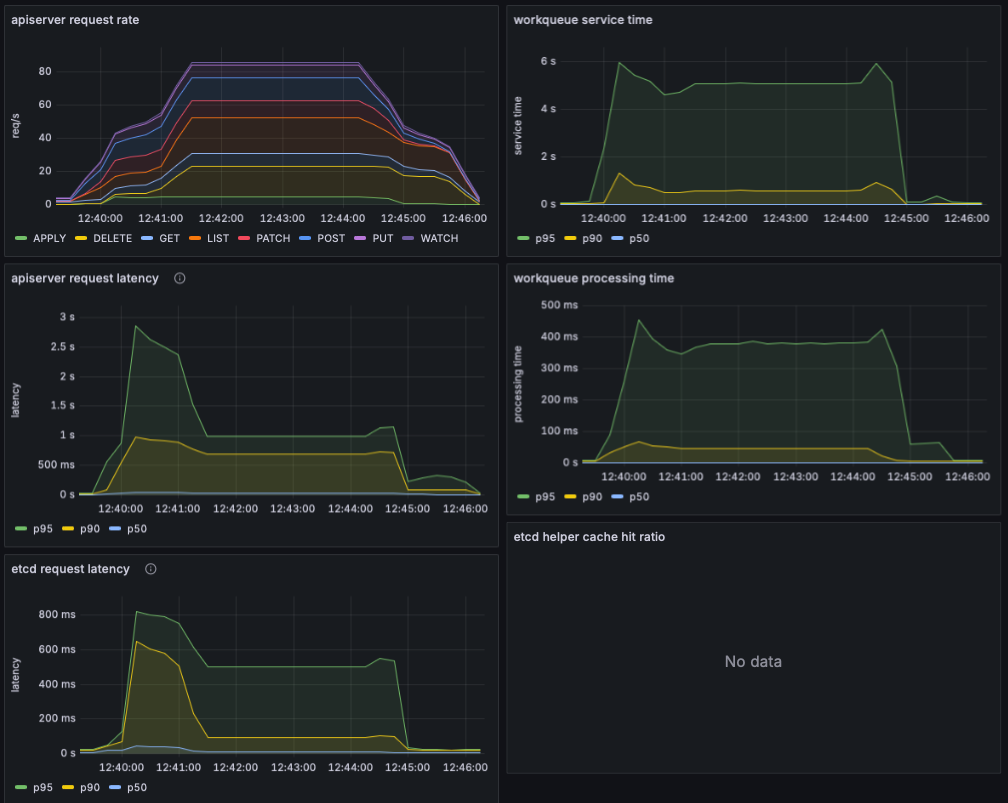
- 이번에는 QPS/Burst를 500으로 늘려서 다시 수행해보겠습니다.
$ cat << EOF > api-intensive-500.yml
jobs:
  - name: api-intensive
    jobIterations: 100
    qps: 500
    burst: 500
    namespacedIterations: true
    namespace: api-intensive
    podWait: false
    cleanup: true
    waitWhenFinished: true
    preLoadImages: false # true
    objects:
      - objectTemplate: templates/deployment.yaml
        replicas: 1
      - objectTemplate: templates/configmap.yaml
        replicas: 1
      - objectTemplate: templates/secret.yaml
        replicas: 1
      - objectTemplate: templates/service.yaml
        replicas: 1

  - name: api-intensive-patch
    jobType: patch
    jobIterations: 10
    qps: 500
    burst: 500
    objects:
      - kind: Deployment
        objectTemplate: templates/deployment_patch_add_label.json
        labelSelector: {kube-burner-job: api-intensive}
        patchType: "application/json-patch+json"
        apiVersion: apps/v1
      - kind: Deployment
        objectTemplate: templates/deployment_patch_add_pod_2.yaml
        labelSelector: {kube-burner-job: api-intensive}
        patchType: "application/apply-patch+yaml"
        apiVersion: apps/v1
      - kind: Deployment
        objectTemplate: templates/deployment_patch_add_label.yaml
        labelSelector: {kube-burner-job: api-intensive}
        patchType: "application/strategic-merge-patch+json"
        apiVersion: apps/v1

  - name: api-intensive-remove
    qps: 500
    burst: 500
    jobType: delete
    waitForDeletion: true
    objects:
      - kind: Deployment
        labelSelector: {kube-burner-job: api-intensive}
        apiVersion: apps/v1

  - name: ensure-pods-removal
    qps: 500
    burst: 500
    jobType: delete
    waitForDeletion: true
    objects:
      - kind: Pod
        labelSelector: {kube-burner-job: api-intensive}

  - name: remove-services
    qps: 500
    burst: 500
    jobType: delete
    waitForDeletion: true
    objects:
      - kind: Service
        labelSelector: {kube-burner-job: api-intensive}

  - name: remove-configmaps-secrets
    qps: 500
    burst: 500
    jobType: delete
    objects:
      - kind: ConfigMap
        labelSelector: {kube-burner-job: api-intensive}
      - kind: Secret
        labelSelector: {kube-burner-job: api-intensive}

  - name: remove-namespace
    qps: 500
    burst: 500
    jobType: delete
    waitForDeletion: true
    objects:
      - kind: Namespace
        labelSelector: {kube-burner-job: api-intensive}
EOF

# 수행
$ kube-burner init -c api-intensive-500.yml --log-level debug
Kubernetes API 성능 메트릭 : 예제와 Best Practice - Blog
- Kubernetes에서 일반적인 애플리케이션 워크로드 배포 과정
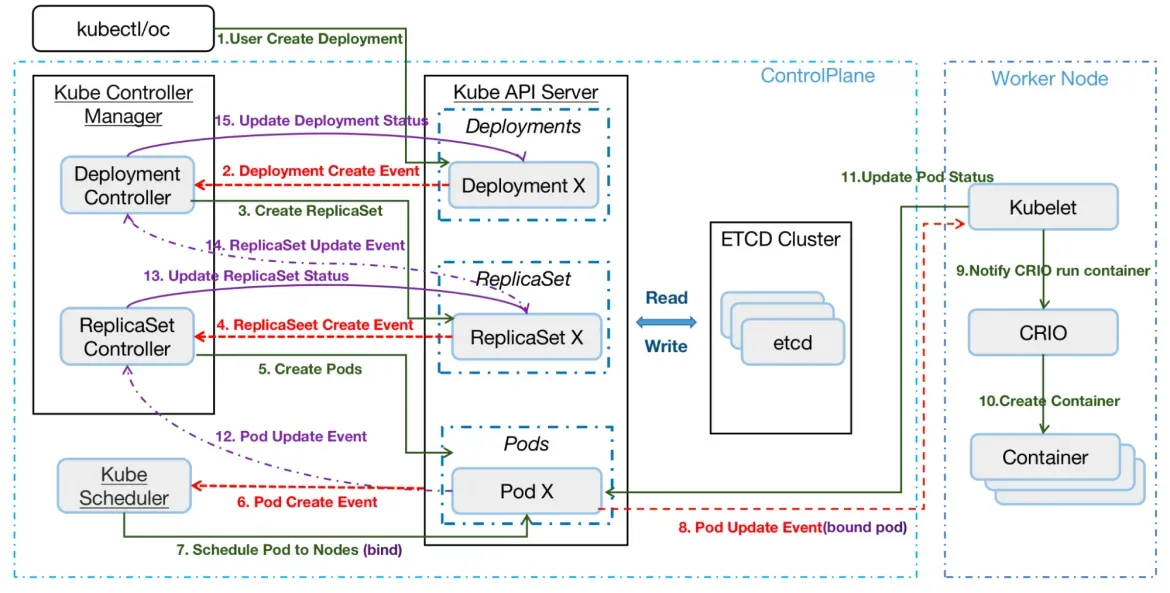
- 사용자는 REST API나 명령줄을 사용하여 배포를 생성합니다.
- API Server (kube-apiserver)가 Deployment 명세서를 etcd에 기록합니다.
- DeploymentController는 새로운 Deployments를 watches하여 이벤트를 생성하고 Deployment Spec에 맞춰 조정하고 ReplicaSet 매니페스트를 생성한 다음 이를 API 서버에 게시하고 ReplicaSet 사양을 etcd에 기록합니다.
- ReplicaSet 컨트롤러는 ReplicaSet 생성 이벤트를 감시하고 새 Pod 매니페스트를 생성합니다. 매니페스트를 API 서버에 게시하고 Pod 사양을 etcd에 기록합니다.
- 스케쥴러는 파드 생성 이벤트를 감시하고 바인딩되지 않은 파드를 감지합니다. 파드를 스케줄링하고 파드의 노드 바인딩을 업데이트합니다.
- 노드에서 실행되는 Kubelet은 새로운 Pod 스케줄링을 감지하고 컨테이너 런타임(예: cri-o)을 사용하여 이를 실행합니다.
- Kubelet은 컨테이너 런타임을 통해 Pod 상태를 검색하여 API 서버에 업데이트합니다.
- API 성능 관련 주요 메트릭
-
apiserver_request_total: API 서버에 대한 총 요청 수 -
rate(apiserver_request_total{job="apiserver"}[5m]): 지난 5분 동안의 API 서버 요청 초당 평균 증가율 -
irate(apiserver_request_total{job="apiserver"}[5m]): 지난 5분 동안의 API 서버 요청 초당 순간 증가율 - 실습 (Prometheus에서 실습)
# 연습1 : 라벨(label) 과 값(value) 확인
apiserver_request_total
rate(apiserver_request_total{job="apiserver"}[5m])
irate(apiserver_request_total{job="apiserver"}[5m])

# 연습2
sum by(code) (irate(apiserver_request_total{job="apiserver"}[5m])) # code로 grouping
sum by(verb) (irate(apiserver_request_total{job="apiserver"}[5m])) # verb로 grouping
sum by(resource) (irate(apiserver_request_total{job="apiserver"}[5m])) # resource로 grouping
sum by(resource, code, verb) (irate(apiserver_request_total{job="apiserver"}[5m])) # resource, code, verb로 grouping

# 연습3 : resource 값 없는 것 제외
topk(3, sum by(resource) (irate(apiserver_request_total{job="apiserver"}[5m])))
topk(3, sum by(resource) (irate(apiserver_request_total{resource=~".+"}[5m])))

# 연습3 : 4xx, 5xx 응답 코드만 필터링
sum by(code) (rate(apiserver_request_total{code=~"[45].."}[1m]))

# 최종
sum by(resource, code, verb) (rate(apiserver_request_total{resource=~".+"}[5m]))
or
sum by(resource, code, verb) (irate(apiserver_request_total{resource=~".+"}[5m]))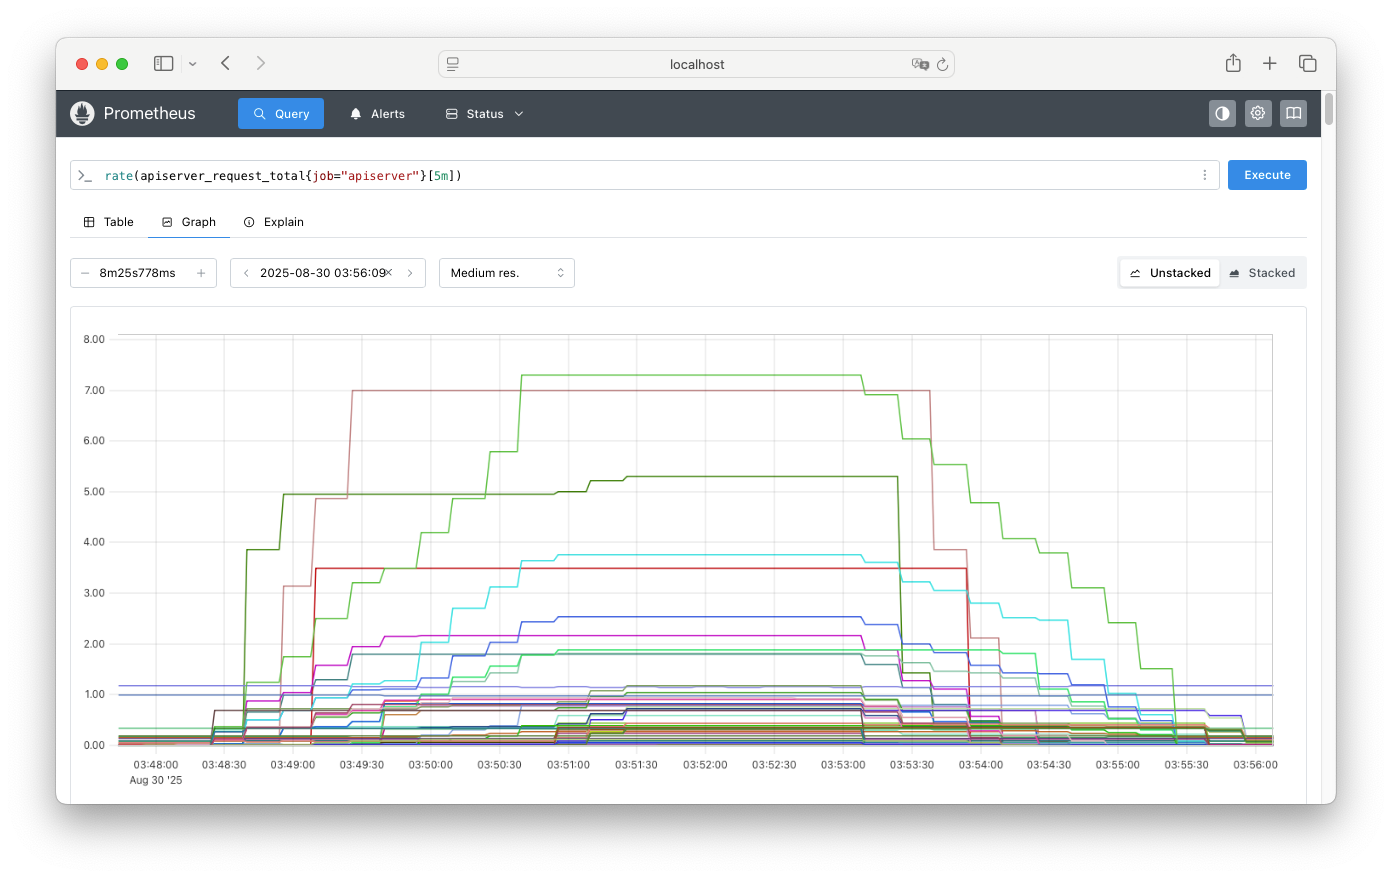
-
-
[Tuning] API 서버 flag : max-requests-inflight (기본값 400) , max-mutating-requests-inflight (기본값 200) - Docs, APF
- API 서버는
--max-requests-inflightquery-type(get,list,watch…)및--max-mutating-requests-inflightmutating-type(create,update,delete…) 플래그로 지정된 값을 합산하여 허용할 수 있는 총 진행 중인 요청 수를 구성합니다. - AWS EKS는 이러한 플래그에 대해 기본값인 400개 및 200개 요청을 사용하므로 주어진 시간에 총 600개의 요청을 전달할 수 있습니다.
- APF는 이러한 600개의 요청을 다양한 요청 유형으로 나누는 방법을 지정합니다.
- AWS EKS 컨트롤 플레인은 각 클러스터에 최소 2개의 API 서버가 등록되어 있어 가용성이 높습니다.
-
이렇게 하면 클러스터 전체의 총 진행 중인 요청 수가 1200개로 늘어납니다.
# $ kubectl exec -it -n kube-system kube-apiserver-myk8s-control-plane -- kube-apiserver -h # => ... # --max-mutating-requests-inflight int # This and --max-requests-inflight are summed to determine the server's total concurrency limit (which # must be positive) if --enable-priority-and-fairness is true. Otherwise, this flag limits the maximum # number of mutating requests in flight, or a zero value disables the limit completely. (default 200) # --max-requests-inflight int # This and --max-mutating-requests-inflight are summed to determine the server's total concurrency # limit (which must be positive) if --enable-priority-and-fairness is true. Otherwise, this flag # limits the maximum number of non-mutating requests in flight, or a zero value disables the limit # completely. (default 400) # --min-request-timeout int # An optional field indicating the minimum number of seconds a handler must keep a request open before # timing it out. Currently only honored by the watch request handler, which picks a randomized value # above this number as the connection timeout, to spread out load. (default 1800) # --request-timeout duration # An optional field indicating the duration a handler must keep a request open before timing it out. # This is the default request timeout for requests but may be overridden by flags such as # --min-request-timeout for specific types of requests. (default 1m0s) -
--max-requests-inflight클러스터 상태 조회- 설명 : API 서버가 동시에 처리할 수 있는 non-mutating 요청(GET, LIST, WATCH 등)의 최대 수를 제한합니다.
- 동작 : 요청이 들어오면 큐에 넣고, 현재 inflight 수가 최대값을 넘으면 429 Too Many Requests를 반환하게 됩니다.
-
--max-mutating-requests-inflight클러스터 상태 변경- 설명 : API 서버가 동시에 처리할 수 있는 mutating 요청(POST, PUT, PATCH, DELETE)의 최대 수를 제한합니다.
- 동작 : Mutating 요청은 클러스터 상태를 변경하기 때문에, 너무 많으면 etcd I/O와 API 서버 내부 lock에 부하 → 서버 전체 성능 저하 ⇒ 요청이 최대값을 넘어가면 역시 429 반환하게 됩니다.
-
PriorityAndFairness(P&F): API 서버가 요청을 PriorityLevel에 따라 큐잉하며, 각 PriorityLevel별 할당 큐 존재합니다.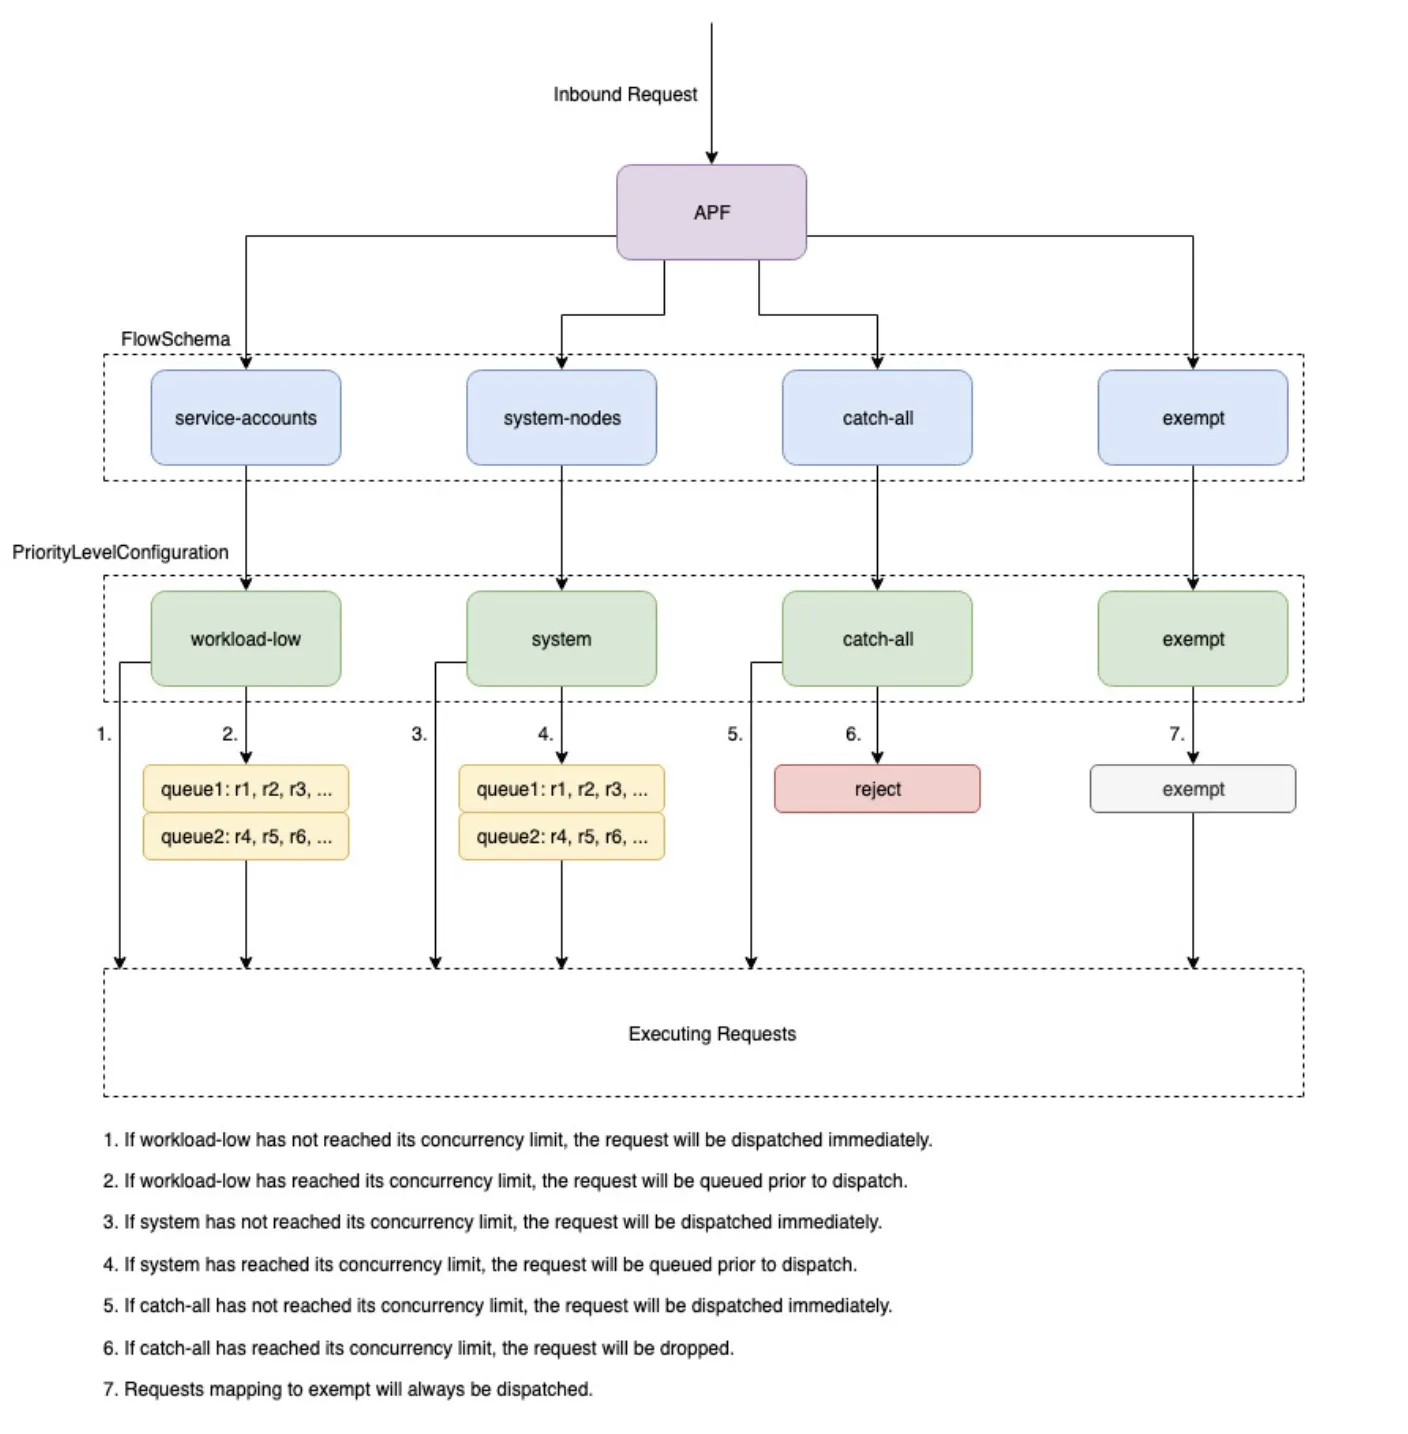
- API 서버는
-
[Tuning] CoreDNS : Multi Socket Plugin 소개 - Youtube
-
CoreDNS : DNS와 Service Discovery를 담당 - Docs
- Go 언어로 작성된 유연한 DNS 서버입니다.
- 경량화, 빠름, 확장성 좋으며 서비스 디스커버리에 중점두고 개발되었습니다.
- 플러그인 기반의 아키텍처로 쉽게 확장 가능합니다.
- Kubernetes의 기본 DNS 서버로 사용됩니다.
- DNS, DNS over TLS, DNS over gRPC를 지원합니다.
-
MultiSocket 👍🏻 : 수직 확장성을 향상시킵니다. - Docs
- MultiSocket을 사용하면 하나의 포트에서 여러 서버를 시작할 수 있습니다.
- SO_REUSEPORT 소켓 옵션을 사용하면 동일한 주소와 포트에서 여러 청취 소켓을 열 수 있습니다. 이 경우 커널은 소켓 간에 들어오는 연결을 분산합니다.
- 기존 CoreDNS 기본 설정 환경에서 CPU가 많아져도 QPS가 늘어나지 않습니다.. → 2 CPU 경우 40k qps
- 이 옵션을 활성화하면 여러 서버를 시작할 수 있어 CPU 코어가 많은 환경에서 CoreDNS의 처리량이 증가합니다.
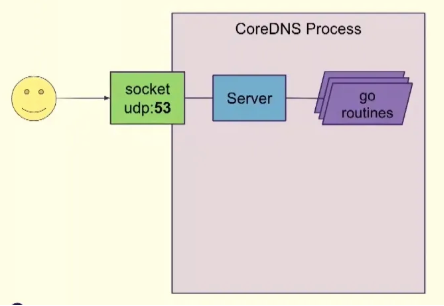 기존의 CoreDNS 처리 구조
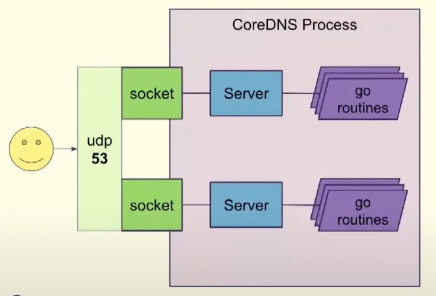 Multi Socket이 적용되어 여러 서버가 작동 중인 CoreDNS
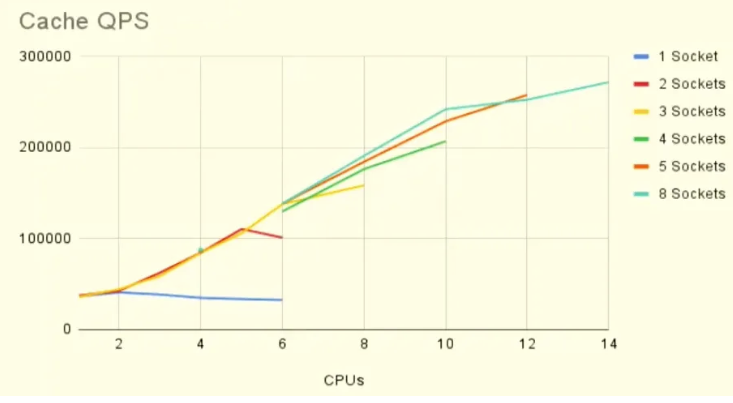 Multi Socket 적용 전후 비교 (1 Socket이 적용전임)
- 위의 그래프에서 보듯이 Multi Socket을 CPU 코어수에 맞게 설정하면 CPU 코어가 많아질수록 QPS가 증가하는 수직 확장성을 확인할 수 있습니다.
-
CoreDNS : DNS와 Service Discovery를 담당 - Docs
-
ETCD 재시작으로 인한 장애 분석 Case : net.ipv4.tcp_timestamps , net.ipv4.tcp_wan_timestamps - Link
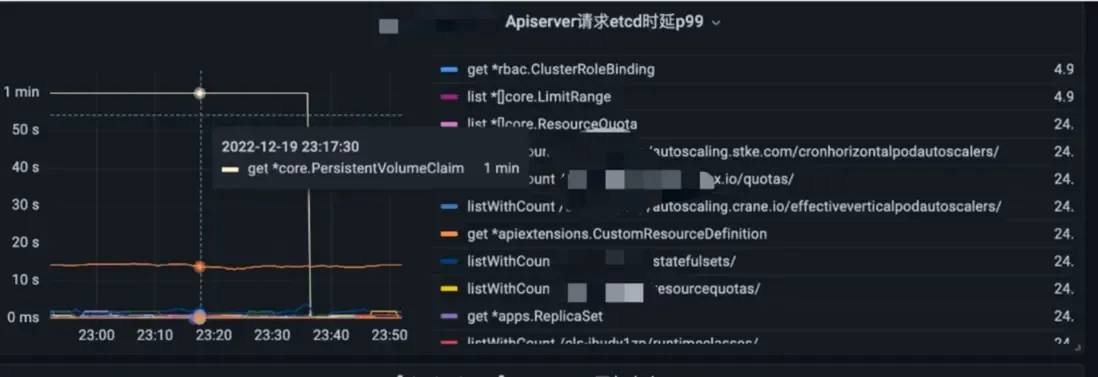
- 해당 블로그는 ETCD 재시작으로 인해 K8S 클러스터가 불안정해진 원인을 분석한 글입니다.
- 대규모 클러스터 운영 관련 유튜브 링크 모음입니다. 상당한 양으로 나중에 하나씩 살펴봐야 할것 같습니다.
- Building Armada – Running Batch Jobs at Massive Scale on Kubernetes - Jamie Poole, G-Research - Youtube
- Automated Multi-Cloud Large Scale K8s Cluster Lifecycle Management - Sourav Khandelwal, Databricks - Youtube
- An Alternative Metadata System for Large Kubernetes Clusters - Yingcai Xue & Yixiang Chen, ByteDance - Youtube
- Large Scale Automated Storage with Kubernetes - Celina Ward, Software Engineer & Matt Schallert, Site Reliability Engineer, Uber - Youtube
- Large-Scale Practice of Persistent Memory in Alibaba Cloud - Junbao Kan & Qingcan Wang, Alibaba - Youtube
- Managing Large-Scale Kubernetes Clusters Effectively and Reliably - Yong Zhang & Zhixian Lin - Youtube
- How to Stabilize a GenAI-First, Modern Data LakeHouse: Provision 20,000 Ephemeral Data Lakes/Year - Youtube
- Scaling Kubernetes Networking to 1k, 5k, … 100k Nodes!? - Marcel Zięba, Isovalent & Dorde Lapcevic, Google - Youtube
- Collecting Operational Metrics for a Cluster with 5,000 Namespaces - Rob Szumski & Chance Zibolski, Red Hat - Youtube
- Scaling Kubernetes Networking Beyond 100k Endpoints - Rob Scott & Minhan Xia, Google - Youtube
- Per-Node Api-Server Proxy: Expand the Cluster’s Scale and Stability - Weizhou Lan & Iceber Gu - Youtube
- Build a High Performance Remote Storage for Prometheus with Unlimited Time Series - Yang Xiang - Youtube
- BGP Peering Patterns for Kubernetes Networking at Preferred Networks - Sho Shimizu & Yutaro Hayakawa - Youtube
- Kubernetes Performance Tuning Workshop - Anton Weiss - Youtube
Kind 클러스터 삭제
- 다음 실습을 위해 클러스터를 삭제합니다.
$ kind delete cluster --name myk8s
Cilium Performance
실습환경 준비
- Kind와 Cilium CNI를 사용하여 실습환경을 준비합니다.
# Prometheus Target connection refused bind-address 설정 : kube-controller-manager , kube-scheduler , etcd , kube-proxy
$ kind create cluster --name myk8s --image kindest/node:v1.33.2 --config - <<EOF
kind: Cluster
apiVersion: kind.x-k8s.io/v1alpha4
nodes:
- role: control-plane
  extraPortMappings:
  - containerPort: 30000
    hostPort: 30000
  - containerPort: 30001
    hostPort: 30001
  - containerPort: 30002
    hostPort: 30002
  - containerPort: 30003
    hostPort: 30003
  kubeadmConfigPatches: # Prometheus Target connection refused bind-address 설정
  - |
    kind: ClusterConfiguration
    controllerManager:
      extraArgs:
        bind-address: 0.0.0.0
    etcd:
      local:
        extraArgs:
          listen-metrics-urls: http://0.0.0.0:2381
    scheduler:
      extraArgs:
        bind-address: 0.0.0.0
  - |
    kind: KubeProxyConfiguration
    metricsBindAddress: 0.0.0.0
networking:
  disableDefaultCNI: true
  kubeProxyMode: none
  podSubnet: "10.244.0.0/16"   # cluster-cidr
kubeadmConfigPatches:
- |
  kind: ClusterConfiguration
  controllerManager:
    extraArgs:
      allocate-node-cidrs: "true"
      cluster-cidr: "10.244.0.0/16"
      node-cidr-mask-size: "22"
EOF
# => Creating cluster "myk8s" ...
#     ✓ Ensuring node image (kindest/node:v1.33.2) 🖼
#     ✓ Preparing nodes 📦
#     ✓ Writing configuration 📜
#     ✓ Starting control-plane 🕹️
#     ✓ Installing StorageClass 💾
#    Set kubectl context to "kind-myk8s"
#    You can now use your cluster with:
#
#    kubectl cluster-info --context kind-myk8s

# node 별 PodCIDR 확인
$ kubectl get nodes -o jsonpath='{.items[*].spec.podCIDR}'
# => 10.244.0.0/22

# cilium cni 설치
$ cilium install --version 1.18.1 --set ipam.mode=kubernetes --set ipv4NativeRoutingCIDR=172.20.0.0/16 \
  --set routingMode=native --set autoDirectNodeRoutes=true --set endpointRoutes.enabled=true --set directRoutingSkipUnreachable=true \
  --set kubeProxyReplacement=true --set bpf.masquerade=true \
  --set endpointHealthChecking.enabled=false --set healthChecking=false \
  --set hubble.enabled=true --set hubble.relay.enabled=true --set hubble.ui.enabled=true \
  --set hubble.ui.service.type=NodePort --set hubble.ui.service.nodePort=30003 \
  --set prometheus.enabled=true --set operator.prometheus.enabled=true --set envoy.prometheus.enabled=true --set hubble.metrics.enableOpenMetrics=true \
  --set hubble.metrics.enabled="{dns,drop,tcp,flow,port-distribution,icmp,httpV2:exemplars=true;labelsContext=source_ip\,source_namespace\,source_workload\,destination_ip\,destination_namespace\,destination_workload\,traffic_direction}" \
  --set debug.enabled=true  # --dry-run-helm-values
# => 🔮 Auto-detected Kubernetes kind: kind
#    ℹ️   Using Cilium version 1.18.1
#    🔮 Auto-detected cluster name: kind-myk8s
#    ℹ️   Detecting real Kubernetes API server addr and port on Kind
#    🔮 Auto-detected kube-proxy has not been installed
#    ℹ️   Cilium will fully replace all functionalities of kube-proxy

# hubble ui
$ open http://127.0.0.1:30003

# metrics-server
$ helm repo add metrics-server https://kubernetes-sigs.github.io/metrics-server/
$ helm upgrade --install metrics-server metrics-server/metrics-server --set 'args[0]=--kubelet-insecure-tls' -n kube-system
# => Release "metrics-server" does not exist. Installing it now.
#    NAME: metrics-server
#    LAST DEPLOYED: Sat Aug 30 17:13:42 2025
#    NAMESPACE: kube-system
#    STATUS: deployed
#    REVISION: 1
#    TEST SUITE: None
#    NOTES:
#    ***********************************************************************
#    * Metrics Server                                                      *
#    ***********************************************************************
#      Chart version: 3.13.0
#      App version:   0.8.0
#      Image tag:     registry.k8s.io/metrics-server/metrics-server:v0.8.0
#    ***********************************************************************

# 확인
$ kubectl top node
# => NAME                  CPU(cores)   CPU(%)   MEMORY(bytes)   MEMORY(%)
#    myk8s-control-plane   496m         7%       1132Mi          23%
$ kubectl top pod -A --sort-by='cpu'
$ kubectl top pod -A --sort-by='memory'
Prometheus & Grafana 설치 - Docs
#
$ kubectl apply -f https://raw.githubusercontent.com/cilium/cilium/1.18.1/examples/kubernetes/addons/prometheus/monitoring-example.yaml

#
$ kubectl get deploy,pod,svc,ep -n cilium-monitoring
$ kubectl get cm -n cilium-monitoring
$ kc describe cm -n cilium-monitoring prometheus
$ kc describe cm -n cilium-monitoring grafana-config
$ kubectl get svc -n cilium-monitoring

# NodePort 설정
$ kubectl patch svc -n cilium-monitoring prometheus -p '{"spec": {"type": "NodePort", "ports": [{"port": 9090, "targetPort": 9090, "nodePort": 30001}]}}'
# => service/prometheus patched
$ kubectl patch svc -n cilium-monitoring grafana -p '{"spec": {"type": "NodePort", "ports": [{"port": 3000, "targetPort": 3000, "nodePort": 30002}]}}'
# => service/grafana patched

$ kubectl get svc -n cilium-monitoring
# => NAME         TYPE       CLUSTER-IP     EXTERNAL-IP   PORT(S)          AGE
#    grafana      NodePort   10.96.85.141   <none>        3000:30002/TCP   37s
#    prometheus   NodePort   10.96.59.105   <none>        9090:30001/TCP   37s

# 접속 주소 확인
$ open "http://127.0.0.1:30001"  # prometheus
$ open "http://127.0.0.1:30002"  # grafana
쿠버네티스 환경에서 속도 측정 테스트
- 일반적으로 성능 측정시 많이 쓰이는
iperf3를 사용하여 TCP/UDP 속도를 측정해보겠습니다. - 배포 및 확인
# 배포
$ cat <<EOF | kubectl apply -f -
apiVersion: apps/v1
kind: Deployment
metadata:
  name: iperf3-server
spec:
  selector:
    matchLabels:
      app: iperf3-server
  replicas: 1
  template:
    metadata:
      labels:
        app: iperf3-server
    spec:
      containers:
      - name: iperf3-server
        image: networkstatic/iperf3
        args: ["-s"]
        ports:
        - containerPort: 5201
---
apiVersion: v1
kind: Service
metadata:
  name: iperf3-server
spec:
  selector:
    app: iperf3-server
  ports:
    - name: tcp-service
      protocol: TCP
      port: 5201
      targetPort: 5201
    - name: udp-service
      protocol: UDP
      port: 5201
      targetPort: 5201
  type: ClusterIP
---
apiVersion: apps/v1
kind: Deployment
metadata:
  name: iperf3-client
spec:
  selector:
    matchLabels:
      app: iperf3-client
  replicas: 1
  template:
    metadata:
      labels:
        app: iperf3-client
    spec:
      containers:
      - name: iperf3-client
        image: networkstatic/iperf3
        command: ["sleep"]
        args: ["infinity"]
EOF
# => deployment.apps/iperf3-server created
#    service/iperf3-server created
#    deployment.apps/iperf3-client created

# 확인 : 서버와 클라이언트가 어떤 노드에 배포되었는지 확인
$ kubectl get deploy,svc,pod -owide
# => NAME                            READY   UP-TO-DATE   AVAILABLE   AGE   CONTAINERS      IMAGES                 SELECTOR
#    deployment.apps/iperf3-client   1/1     1            1           28s   iperf3-client   networkstatic/iperf3   app=iperf3-client
#    deployment.apps/iperf3-server   1/1     1            1           28s   iperf3-server   networkstatic/iperf3   app=iperf3-server
#
#    NAME                    TYPE        CLUSTER-IP    EXTERNAL-IP   PORT(S)             AGE   SELECTOR
#    service/iperf3-server   ClusterIP   10.96.7.124   <none>        5201/TCP,5201/UDP   28s   app=iperf3-server
#    service/kubernetes      ClusterIP   10.96.0.1     <none>        443/TCP             14m   <none>
#
#    NAME                                 READY   STATUS    RESTARTS   AGE   IP             NODE                  NOMINATED NODE   READINESS GATES
#    pod/iperf3-client-688ff6565d-267sh   1/1     Running   0          28s   10.244.2.248   myk8s-control-plane   <none>           <none>
#    pod/iperf3-server-5d54b669cc-k8gzf   1/1     Running   0          28s   10.244.2.101   myk8s-control-plane   <none>           <none>

# 서버 파드 로그 확인 : 기본 5201 포트 Listen
$ kubectl logs -l app=iperf3-server -f
- 실습 1. TCP 5201, 측정시간 5초
# 클라이언트 파드에서 아래 명령 실행
$ kubectl exec -it deploy/iperf3-client -- iperf3 -c iperf3-server -t 5
# => Connecting to host iperf3-server, port 5201
#    [  5] local 10.244.2.248 port 42338 connected to 10.96.7.124 port 5201
#    [ ID] Interval           Transfer     Bitrate         Retr  Cwnd
#    [  5]   0.00-1.00   sec  8.86 GBytes  76.1 Gbits/sec  2581    346 KBytes
#    [  5]   1.00-2.00   sec  8.38 GBytes  72.0 Gbits/sec  264    380 KBytes
#    [  5]   2.00-3.00   sec  9.39 GBytes  80.7 Gbits/sec  1054    461 KBytes
#    [  5]   3.00-4.00   sec  8.82 GBytes  75.7 Gbits/sec  533    769 KBytes
#    [  5]   4.00-5.00   sec  8.80 GBytes  75.6 Gbits/sec  199    827 KBytes
#    - - - - - - - - - - - - - - - - - - - - - - - - -
#    [ ID] Interval           Transfer     Bitrate         Retr
#    [  5]   0.00-5.00   sec  44.2 GBytes  76.0 Gbits/sec  4631             sender
#    [  5]   0.00-5.00   sec  44.2 GBytes  76.0 Gbits/sec                  receiver

# 서버 파드 로그 확인 : 기본 5201 포트 Listen
$ kubectl logs -l app=iperf3-server -f
# => -----------------------------------------------------------
#    Server listening on 5201 (test #1)
#    -----------------------------------------------------------
#    Accepted connection from 10.244.2.248, port 42336
#    [  5] local 10.244.2.101 port 5201 connected to 10.244.2.248 port 42338
#    [ ID] Interval           Transfer     Bitrate
#    [  5]   0.00-1.00   sec  8.86 GBytes  76.1 Gbits/sec
#    [  5]   1.00-2.00   sec  8.37 GBytes  71.9 Gbits/sec
#    [  5]   2.00-3.00   sec  9.40 GBytes  80.8 Gbits/sec
#    [  5]   3.00-4.00   sec  8.81 GBytes  75.7 Gbits/sec
#    [  5]   4.00-5.00   sec  8.81 GBytes  75.6 Gbits/sec
#    - - - - - - - - - - - - - - - - - - - - - - - - -
#    [ ID] Interval           Transfer     Bitrate
#    [  5]   0.00-5.00   sec  44.2 GBytes  76.0 Gbits/sec                  receiver
# <span style="color: green;">👉 기본적으로 클라이언트측 로그와 서버측 로그가 동일하게 나옵니다.</span>
- 실습 2. UDP 사용 (-u)
# 클라이언트 파드에서 아래 명령 실행
$ kubectl exec -it deploy/iperf3-client -- iperf3 -c iperf3-server -u -b 20G
# => Connecting to host iperf3-server, port 5201
#    [  5] local 10.244.2.248 port 39637 connected to 10.96.7.124 port 5201
#    [ ID] Interval           Transfer     Bitrate         Total Datagrams
#    [  5]   0.00-1.00   sec   335 MBytes  2.81 Gbits/sec  242388
#    [  5]   1.00-2.00   sec   338 MBytes  2.83 Gbits/sec  244711
#    [  5]   2.00-3.00   sec   325 MBytes  2.73 Gbits/sec  235629
#    [  5]   3.00-4.00   sec   327 MBytes  2.74 Gbits/sec  236618
#    [  5]   4.00-5.00   sec   317 MBytes  2.66 Gbits/sec  229570
#    [  5]   5.00-6.00   sec   330 MBytes  2.77 Gbits/sec  238981
#    [  5]   6.00-7.00   sec   337 MBytes  2.83 Gbits/sec  244238
#    [  5]   7.00-8.00   sec   334 MBytes  2.80 Gbits/sec  241738
#    [  5]   8.00-9.00   sec   336 MBytes  2.82 Gbits/sec  243323
#    [  5]   9.00-10.00  sec   331 MBytes  2.78 Gbits/sec  239984
#    - - - - - - - - - - - - - - - - - - - - - - - - -
#    [ ID] Interval           Transfer     Bitrate         Jitter    Lost/Total Datagrams
#    [  5]   0.00-10.00  sec  3.23 GBytes  2.78 Gbits/sec  0.000 ms  0/2397180 (0%)  sender
#    [  5]   0.00-10.00  sec  3.22 GBytes  2.77 Gbits/sec  0.003 ms  6167/2397180 (0.26%)  receiver

# 서버 파드 로그 확인 : 기본 5201 포트 Listen
$ kubectl logs -l app=iperf3-server -f
- 실습 3. TCP, 쌍방향 모드(-bidir)
- 송신(TX), 수신(RX) 모두 측정합니다.
# 클라이언트 파드에서 아래 명령 실행
$ kubectl exec -it deploy/iperf3-client -- iperf3 -c iperf3-server -t 5 --bidir
# => Connecting to host iperf3-server, port 5201
#    [  5] local 10.244.2.248 port 49212 connected to 10.96.7.124 port 5201
#    [  7] local 10.244.2.248 port 49214 connected to 10.96.7.124 port 5201
#    [ ID][Role] Interval           Transfer     Bitrate         Retr  Cwnd
#    [  5][TX-C]   0.00-1.00   sec  8.04 GBytes  69.0 Gbits/sec    1   1.25 MBytes
#    [  7][RX-C]   0.00-1.00   sec  1.69 GBytes  14.5 Gbits/sec
#    [  5][TX-C]   1.00-2.00   sec  4.76 GBytes  40.9 Gbits/sec    0   1.25 MBytes
#    [  7][RX-C]   1.00-2.00   sec  5.13 GBytes  44.1 Gbits/sec
#    [  5][TX-C]   2.00-3.00   sec  4.73 GBytes  40.6 Gbits/sec    0   1.25 MBytes
#    [  7][RX-C]   2.00-3.00   sec  4.95 GBytes  42.5 Gbits/sec
#    [  5][TX-C]   3.00-4.00   sec  4.77 GBytes  41.0 Gbits/sec    0   1.25 MBytes
#    [  7][RX-C]   3.00-4.00   sec  5.04 GBytes  43.3 Gbits/sec
#    [  5][TX-C]   4.00-5.00   sec  4.73 GBytes  40.6 Gbits/sec    0   1.25 MBytes
#    [  7][RX-C]   4.00-5.00   sec  4.97 GBytes  42.7 Gbits/sec
#    - - - - - - - - - - - - - - - - - - - - - - - - -
#    [ ID][Role] Interval           Transfer     Bitrate         Retr
#    [  5][TX-C]   0.00-5.00   sec  27.0 GBytes  46.4 Gbits/sec    1             sender
#    [  5][TX-C]   0.00-5.00   sec  27.0 GBytes  46.4 Gbits/sec                  receiver
#    [  7][RX-C]   0.00-5.00   sec  21.8 GBytes  37.4 Gbits/sec    0             sender
#    [  7][RX-C]   0.00-5.00   sec  21.8 GBytes  37.4 Gbits/sec                  receiver
# >> Client→Server (TX): 46.4 Gbps
# >> Server→Client (RX): 37.4 Gbps
# >> Retransmit : TX=1, RX=0 → 일부 패킷 손실로 인한 재전송이 있었음
# >> 전체적으로는 37~46Gbps 수준의 대역폭이 측정됨

# 서버 파드 로그 확인 : 기본 5201 포트 Listen
$ kubectl logs -l app=iperf3-server -f
- 실습 4. TCP 다중 스트림(30개), -P(number of parallel client streams to run)
# 클라이언트 파드에서 아래 명령 실행
$ kubectl exec -it deploy/iperf3-client -- iperf3 -c iperf3-server -t 10 -P 2
# => ...
#    - - - - - - - - - - - - - - - - - - - - - - - - -
#    [ ID] Interval           Transfer     Bitrate         Retr
#    [  5]   0.00-10.00  sec  58.8 GBytes  50.5 Gbits/sec  444             sender
#    [  5]   0.00-10.00  sec  58.8 GBytes  50.5 Gbits/sec                  receiver
#    [  7]   0.00-10.00  sec  58.8 GBytes  50.5 Gbits/sec  1039             sender
#    [  7]   0.00-10.00  sec  58.8 GBytes  50.5 Gbits/sec                  receiver
#    [SUM]   0.00-10.00  sec   118 GBytes   101 Gbits/sec  1483             sender
#    [SUM]   0.00-10.00  sec   118 GBytes   101 Gbits/sec                  receiver

# 서버 파드 로그 확인 : 기본 5201 포트 Listen
$ kubectl logs -l app=iperf3-server -f
- 삭제:
kubectl delete deploy iperf3-server iperf3-client && kubectl delete svc iperf3-server
Cilium 접속 및 성능 테스트
- 관련문서
- Cilium은 cilium-cli connectivity tests를 통해 API 레벨에서 데이터 경로 까지 end-to-end 테스트를 수행할 수 있습니다.
-
cilium connectivity test- 기능 검증 및 기능별 시나리오 테스트 (Pass, Fail)
#
$ cilium connectivity -h
# => Connectivity troubleshooting
#
#    Usage:
#      cilium connectivity [command]
#
#    Available Commands:
#      perf        Test network performance
#      test        Validate connectivity in cluster

# 아래 test 실행 후 cilium-test-1 네임스페이스 접속
$ open http://127.0.0.1:30003/?namespace=cilium-test-1

# test : 테스트 항목 122개 2:59~
$ cilium connectivity test --debug
# => ✨ [kind-myk8s] Creating namespace cilium-test-1 for connectivity check...
#    ✨ [kind-myk8s] Deploying echo-same-node service...
#    ✨ [kind-myk8s] Deploying DNS test server configmap...
#    ✨ [kind-myk8s] Deploying same-node deployment...
#    ...테스트 환경 배포 (생략)...
#    🐛 [cilium-test-1] Registered connectivity tests
#    🐛   <Test no-policies, 8 scenarios, 0 resources, expectFunc <nil>>
#    🐛   <Test no-policies-from-outside, 1 scenarios, 0 resources, expectFunc <nil>>
#    🐛   <Test no-policies-extra, 2 scenarios, 0 resources, expectFunc <nil>>
#    🐛   <Test allow-all-except-world, 4 scenarios, 1 resources, expectFunc <nil>>
#    🐛   <Test client-ingress, 1 scenarios, 1 resources, expectFunc 0x104e81740>
#    ...

# 실습 리소스 삭제
$ kubectl delete ns cilium-test-1
-
cilium connectivity perf: 성능 측정(Gbsp, Latency) - Throughput, Retransmit, Latency$ cilium connectivity perf -h # => Usage: # cilium connectivity perf [flags] # # Flags: # --bandwidth Test pod network bandwidth manage # --crr Run CRR test # -d, --debug Show debug messages # --duration duration Duration for the Performance test to run (default 10s) # -h, --help help for perf # --host-net Test host network (default true) # --host-to-pod Test host-to-pod traffic # --msg-size int Size of message to use in UDP test (default 1024) # --namespace-labels map Add labels to the connectivity test namespace # --net-qos Test pod network Quality of Service # --node-selector-client map Node selector for the other-node client pod # --node-selector-server map Node selector for the server pod (and client same-node) # --other-node Run tests in which the client and the server are hosted on difference nodes (default true) # --performance-image string Image path to use for performance (default "quay.io/cilium/network-perf:1751527436-c2462ae@sha256:0c491ed7ca63e6c526593b3a2d478f856410a50fbbce7fe2b64283c3015d752f") # --pod-net Test pod network (default true) # --pod-to-host Test pod-to-host traffic # --print-image-artifacts Prints the used image artifacts # --report-dir string Directory to save perf results in json format # --rr Run RR test (default true) # --same-node Run tests in which the client and the server are hosted on the same node (default true) # --samples int Number of Performance samples to capture (how many times to run each test) (default 1) # --setup-delay duration Extra delay before starting the performance tests # --streams uint The parallelism of tests with multiple streams (default 4) # --test-namespace string Namespace to perform the connectivity in (always suffixed with a sequence number to be compliant with test-concurrency param, e.g.: cilium-test-1) (default "cilium-test") # --throughput Run throughput test (default true) # --throughput-multi Run throughput test with multiple streams (default true) # --tolerations strings Extra NoSchedule tolerations added to test pods # --udp Run UDP tests # --unsafe-capture-kernel-profiles Capture kernel profiles during test execution. Warning: run on disposable nodes only, as it installs additional software and modifies their configuration # # Global Flags: # --as string Username to impersonate for the operation. User could be a regular user or a service account in a namespace. # --as-group stringArray Group to impersonate for the operation, this flag can be repeated to specify multiple groups. # --context string Kubernetes configuration context # --helm-release-name string Helm release name (default "cilium") # --kubeconfig string Path to the kubeconfig file # -n, --namespace string Namespace Cilium is running in (default "kube-system")
Cilium Performance & Tuning
- 다음의 Youtube 영상을 참고하여 Cilium의 성능과 튜닝에 대해서 알아봅니다.
- Deep Dive Into Cilium Resilient Architecture : Map Size - Jussi Mäki & Martynas Pumputis, Isovalent - Youtube
- 어느날 패킷 Drop이 발생하며 Service Backend가 안 보이는 현상이 발견 되었습니다.
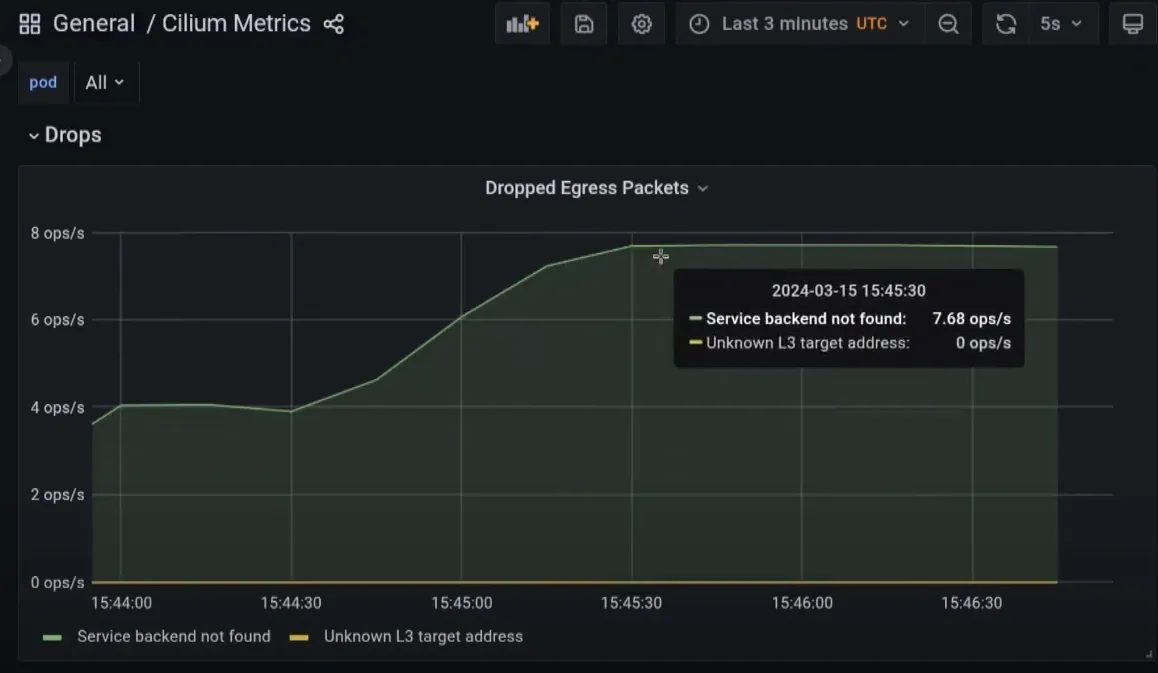 Egress Packet이 Drop되는 현상 발생시의 Cilium Drop Metric
- 또한 일부 Cilium-agent가 상태저하 (Degraded) 상태가 되는 현상도 발견 되었습니다.
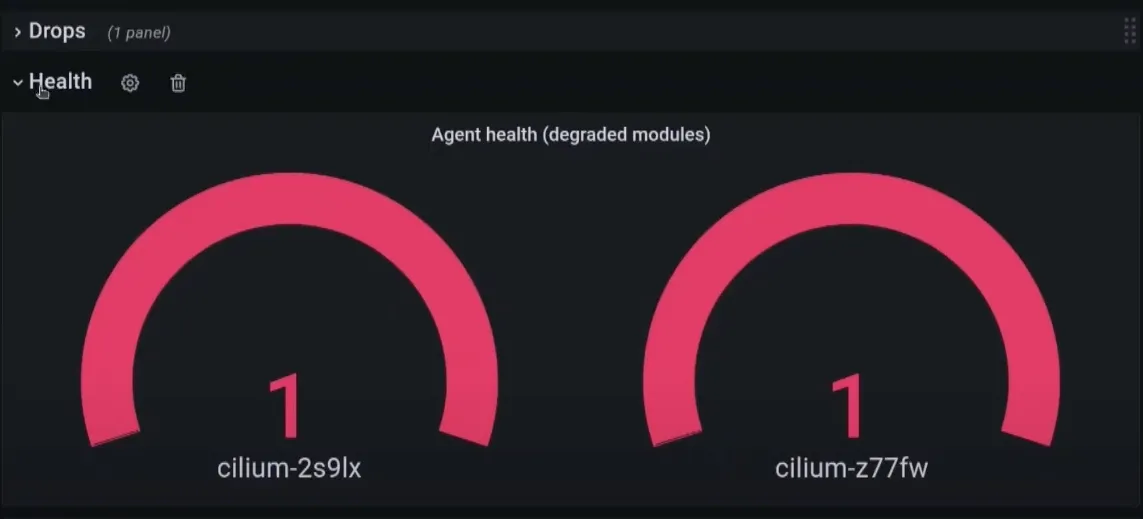 상태 저하된 Cilium Agent
- BPF Map Pressure 메트릭을 확인해보니 원인이 발견되었습니다. BPF Map Pressure가 144%나 된 것입니다!

- 또한 아래의 명령을 실행하니 lb4_service_v2 Map 업데이트를 담당하는 조정자(reconciler)가 실패하고 있음을 알 수 있었습니다.
$ kubectl exec -it -n kube-system ds/cilium -- cilium status --verbose
- Service Map 상태정보를 확인하니
Error: map is full에러를 확인 할 수 있습니다.# 현재는 명령 입력 방식이 변경됨 # $ k exec -it -n kube-system ds/cilium -- cilium statedb service4 # 현재는 아래의 명령으로 확인할 수 있다고 하는데 확인이 필요합니다. $ kubectl exec -n kube-system ds/cilium -c cilium-agent -- cilium-dbg service list # => ID Frontend Service Type Backend # 1 10.96.88.253:443/TCP ClusterIP 1 => 172.20.0.2:4244/TCP (active) # 2 10.96.205.94:80/TCP ClusterIP 1 => 10.244.1.194:4245/TCP (active) # 3 0.0.0.0:30003/TCP NodePort 1 => 10.244.1.179:8081/TCP (active) # 5 10.96.167.52:80/TCP ClusterIP 1 => 10.244.1.179:8081/TCP (active) # 6 10.96.0.10:53/TCP ClusterIP 1 => 10.244.1.48:53/TCP (active) # 2 => 10.244.2.250:53/TCP (active) # 7 10.96.0.10:53/UDP ClusterIP 1 => 10.244.1.48:53/UDP (active) # 2 => 10.244.2.250:53/UDP (active) # 8 10.96.0.10:9153/TCP ClusterIP 1 => 10.244.1.48:9153/TCP (active) # 2 => 10.244.2.250:9153/TCP (active) # 9 10.96.0.1:443/TCP ClusterIP 1 => 172.20.0.2:6443/TCP (active) # 10 10.96.193.155:443/TCP ClusterIP 1 => 10.244.3.24:10250/TCP (active) # 11 10.96.85.141:3000/TCP ClusterIP 1 => 10.244.2.71:3000/TCP (active) # 12 10.96.59.105:9090/TCP ClusterIP 1 => 10.244.1.36:9090/TCP (active) # 13 0.0.0.0:30001/TCP NodePort 1 => 10.244.1.36:9090/TCP (active) # 15 0.0.0.0:30002/TCP NodePort 1 => 10.244.2.71:3000/TCP (active)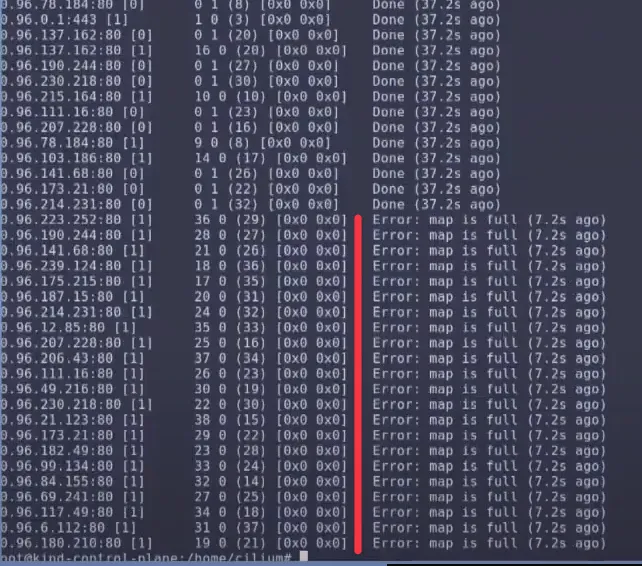
- 해결 방안은 serivce map의 크기를 늘리거나 문제가 되는 기존 service를 삭제하는 것입니다.
- 해당 영상에서는 service를 삭제해서 문제를 해결 하였습니다.
- 이렇듯 메트릭을 잘 모니터링하고 있다면 문제를 빠르게 발견하고 해결할 수 있습니다.
Deep Dive Into Cilium Resilient Architecture : API(Event) 와 Cilium-Agent(StateDB) 와 BPF 동작
- Cilium의 장애나 성능 저하 문제를 해결하기 위해서는 Cilium의 아키텍처를 이해하는 것이 중요합니다.
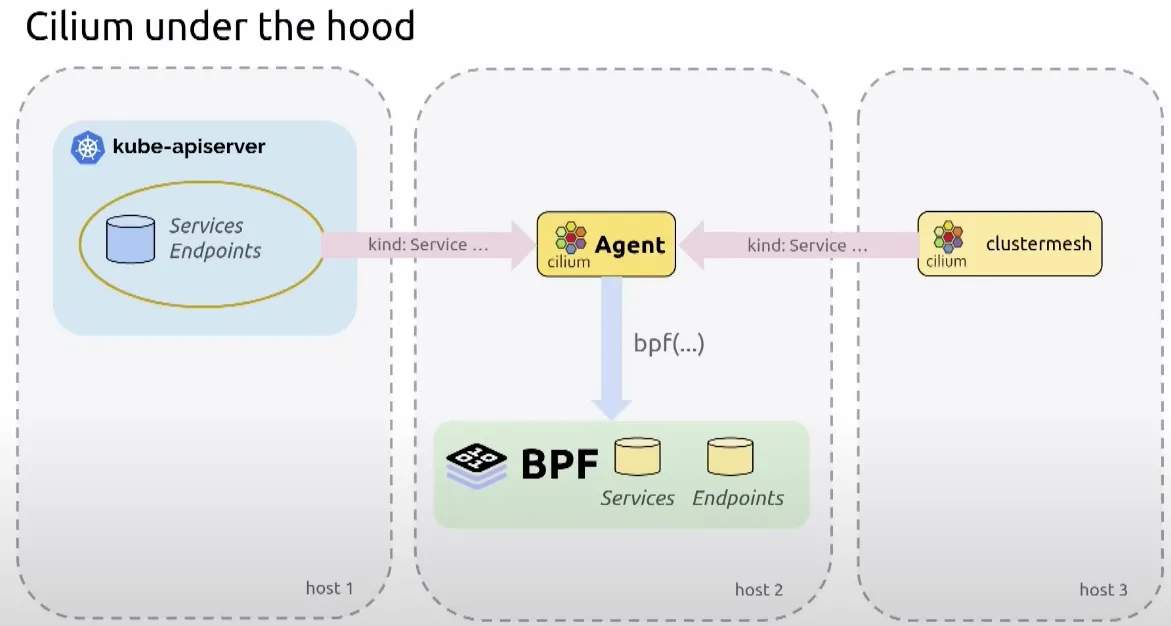
- Cilium은 쿠버네티스 API 서버로부터 Service Endpoint에 대한 이벤트를 받아서 Cilium-Agent가 상태를 관리하고, 이를 BPF로 반영하는 구조로 되어 있습니다.
- 이를 service map으로 관리하는데 service map의 크기가 부족하면 문제가 발생할 수 있습니다. 그래서 저장소(StateDB)와 BPF Map의 크기를 적절히 설정하는 것이 중요합니다.
-
StateDB란?
- In-memory Transactional 데이터 베이스로, 불가변의 데이터 구조(Immutable Data Structure)를 사용하여 동시성 문제를 해결합니다.
- 채널 기반 변경 알림 메커니즘을 사용하여 이벤트 기반 아키텍처를 구현합니다.
- Cilium-Agent는 StateDB를 사용하여 쿠버네티스 API 서버로 부터 받은 이벤트를 처리하고, 상태를 관리합니다.
 StateDB의 자료 구조
-
eBPF Maps 소개 - mapDynamicSizeRatio - Docs, Maps-Limits
- 모든 eBPF Map들은 최대 크기가 정해져 있습니다. 최대 크기 이상의 데이터를 저장하려고 하면
map is full에러가 발생하거나 datapath의 성능 저하가 발생할 수 있습니다. - Cilium은 시스템 전체 메모리의 일정 비율을 eBPF Map에 할당합니다.
- 하지만 Cilium agent에 의해 사용되는 최대 용량은 고급 설정을 통해 조정할 수 있습니다. eBPF Maps Guide 를 참조하세요.
- 모든 eBPF Map들은 최대 크기가 정해져 있습니다. 최대 크기 이상의 데이터를 저장하려고 하면
# 현재 BPF Maps 크기 확인
$ kubectl exec -it -n kube-system ds/cilium -- cilium status --verbose
# => ...
#    BPF Maps:   dynamic sizing: on (ratio: 0.002500)
#      Name                          Size
#      Auth                          524288
#      Non-TCP connection tracking   65536
#      TCP connection tracking       131072
#      Endpoints                     65535
#      IP cache                      512000
#      IPv4 masquerading agent       16384
#      IPv6 masquerading agent       16384
#      IPv4 fragmentation            8192
#      IPv4 service                  65536
#      IPv6 service                  65536
#      IPv4 service backend          65536
#      IPv6 service backend          65536
#      IPv4 service reverse NAT      65536
#      IPv6 service reverse NAT      65536
#      Metrics                       1024
#      Ratelimit metrics             64
#      NAT                           131072
#      Neighbor table                131072
#      Endpoint policy               16384
#      Policy stats                  65534
#      Session affinity              65536
#      Sock reverse NAT              65536

# BPF Maps 크기의 비중 조정 (0.0025 -> 0.01)
$ helm upgrade cilium cilium/cilium --version 1.18.1 --namespace kube-system --reuse-values \
  --set bpf.distributedLRU.enabled=true --set bpf.mapDynamicSizeRatio=0.01

# Cilium DaemonSet 재시작
$ kubectl -n kube-system rollout restart ds/cilium

# BPF Maps 에 많은 값들이 노드 총 메모리 비중별로 반영
$ kubectl exec -it -n kube-system ds/cilium -- cilium status --verbose
# => ...
#    BPF Maps:   dynamic sizing: on (ratio: <span style="color: green;">0.010000)</span>
#      Name                          Size
#      Auth                          524288
#      Non-TCP connection tracking   <span style="color: green;">90475</span>
#      TCP connection tracking       <span style="color: green;">180943</span>
#      Endpoints                     65535
#      ...
#      Ratelimit metrics             64
#      NAT                           <span style="color: green;">180943</span>
#      Neighbor table                <span style="color: green;">180943</span>
#      Endpoint policy               16384
#      Policy stats                  65534
#      Session affinity              65536
#      Sock reverse NAT              <span style="color: green;">90475</span>
Kubernetes API server improvements : v1.18 부터 Cilium_client 가 K8S API 서버 부하분산/HA 연결 가능 - Blog
- Cilium v1.18 부터는 Cilium-agent가 쿠버네티스 API 서버에 HA로 연결할 수 있습니다. (
--set k8s.apiServerURLs="https://172.21.0.4:6443 https://172.21.0.5:6443 https://172.21.0.6:6443"를 통해 지정가능합니다.) - v1.18 이전에는 단일 API 서버에만 연결할 수 있었습니다.
- Cilium은 동작 중인 API 서버의 목록을 초기화 시점에 가져오고, 이후에는 주기적으로 API 서버의 상태를 확인하여, Heartbeat를 통해 연결 상태를 체크하고, 체크가 실패할 경우 다른 API 서버로 연결을 시도합니다.
- 일부 시나리오에서는 Kubernetes API 서버에서 정보를 검색하면 과부하가 걸리거나 API 서버의 가용성에 해로울 수 있습니다(특히 LIST 요청).
- API 서버에 요청 시 exponential back-off 설정 가능.
k8sClientExponentialBackoff:
    enabled: true
    backoffBaseSeconds: 1
    backoffMaxDurationSeconds: 120
Kubernetes perf-tests
- 이번에는 perf-tests를 사용하여 쿠버네티스 클러스터의 성능을 측정해봅니다.
- Kube-burner와 거의 비슷합니다. 차이점은 perf-tests는 쿠버네티스의 공식 성능 테스트 도구라는 것입니다. GitHub
- perf-tests에는 CL2, DNS 등 다양한 성능 테스트가 포함되어 있습니다.
-
ClusterLoader2 (CL2) : Kubernetes 부하 테스트 도구이자 공식 K8s 확장성 및 성능 테스트 프레임워크입니다. - Link
- 테스트는 클러스터의 원하는 상태 집합(예: 10,000개의 포드, 2,000개의 클러스터 IP 서비스 또는 5개의 데몬 세트를 실행)을 정의하고 각 상태에 도달하는 속도(포드 처리량)를 지정합니다.
- CL2는 또한 측정할 성능 특성을 정의합니다. ( 자세한 내용은 측정 목록 참조 ).
- CL2는 Prometheus를 사용한 테스트 중에 클러스터에 대한 추가적인 관측성을 제공합니다.
-
사용 가능한 측정값
측정 항목 설명 APIAvailabilityMeasurement /readyzAPI 호출로 클러스터/호스트 가용성 측정, exec 서비스 필요APIResponsivenessPrometheusSimple Prometheus 기반, API 호출 지연/횟수 백분위수, SLO 충족 여부 확인, Prometheus 없으면 생략 APIResponsivenessPrometheus Prometheus 기반, API 호출 지연/개수 요약, SLO 충족 여부 확인, Prometheus 없으면 생략 CPUProfile pprof로 특정 컴포넌트의 CPU 사용 프로필 수집 EtcdMetrics etcd 메트릭 및 DB 크기 수집 MemoryProfile pprof로 특정 컴포넌트의 메모리 프로필 수집 MetricsForE2E kube-apiserver, 컨트롤러, 스케줄러, kubelet 메트릭 수집 PodPeriodicCommand 지정 포드에서 주기적으로 명령 실행, 출력 수집 PodStartupLatency Pod 시작 SLO 충족 여부 확인 ResourceUsageSummary 컴포넌트별 리소스 사용량 요약, 제약 조건 위반 시 오류 SchedulingMetrics 스케줄러 메트릭 세트 수집 SchedulingThroughput 스케줄링 처리량 수집 Timer 테스트 특정 부분 대기 시간 측정 WaitForControlledPodsRunning 제어 객체의 모든 포드 실행까지 대기, 시간 초과 시 오류 기록 WaitForRunningPods 필요한 수의 Pod 실행까지 대기, 시간 초과 시 오류 기록 Sleep 지정 시간만큼 대기 WaitForGenericK8sObjects K8s 객체가 조건 충족할 때까지 대기, 시간 초과 시 오류 기록 - kind 에서 1대 노드에서 간단 테스트 가이드 소개 - Guide
- 100노드 규모 테스트 실행 - Guide , LoadCode
- 테스트 단계 : 객체 생성 → 원래 크기의 50%, 150% 사이로 개체 크기 조정 → 객체 삭제
- 100개 노드부터 최대 5,000개 노드까지 클러스터를 테스트하는 데 사용할 수 있습니다.
- 부하 테스트는 약 30개의 노드로 구성된 포드 객체를 생성합니다. 다음과 같은 객체가 생성됩니다.
- deployments
- jobs
- statefulsets
- services
- secrets
- configmaps
- 프로메테우스 측정 기준에 따라 다양한 측정이 가능합니다. 예를 들어,
- API 응답성 - kube-apiserver에 대한 요청 지연 시간을 측정합니다.
- 스케줄링 처리량
- NodeLocalDNS 대기 시간
-
DNS (CoreDNS, nodeLocal DNSCache) : DNS 성능 테스트를 실행하는 데 사용되는 스크립트 - Link
- 단일 DNS 서버 인스턴스의 성능을 지정된 쿼리 워크로드로 벤치마킹합니다.
- Benchmarking the cluster DNS : coredns 성능 측정 - 결과
- Comparing cluster DNS and NodeLocal DNSCache : NodeLocal DNSCache 활성화 시 성능 비교 - 결과
- CoreDNS and kube-dns v1.5+ (image
registry.k8s.io/kubedns-amd64:1.9) can export Prometheus metrics.
-
Benchmarking Kubernetes Networking Performance : Kubernetes 네트워킹 성능을 측정하는 표준화된 벤치마크 - Link
- 벤치마크는 단일 Go 바이너리 호출을 통해 실행할 수 있으며, 아래에서 볼 수 있듯이 오케스트레이터 및 워커 포드에 있는 모든 자동화 테스트를 트리거합니다.
- 테스트는 go 바이너리와 iperf3 및 기타 도구가 내장된 사용자 지정 도커 컨테이너를 사용합니다.
- 오케스트레이터 포드는 아래 설명된 5가지 시나리오에 대해 MTU(TCP의 경우 MSS 튜닝, UDP의 경우 직접 패킷 크기 튜닝)를 사용하여 직렬 순서로 테스트를 실행하도록 워커 포드를 조정합니다.
- 노드 레이블을 사용하여 워커 포드 1과 2는 동일한 쿠버네티스 노드에 배치되고, 워커 포드 3은 다른 노드에 배치됩니다.
- 모든 노드는 간단한 golang rpcs를 사용하여 오케스트레이터 포드 서비스와 통신하고 작업 항목을 요청합니다.
- 이 테스트에는 최소 두 개의 쿠버네티스 워커 노드가 필요합니다.
- 오케스트레이터와 워커 파드는 이니시에이터 스크립트와 독립적으로 실행되며, 오케스트레이터 파드는 테스트 케이스 일정이 완료될 때까지 워커들에게 작업 항목을 전송합니다.
- 모든 워커 노드의 iperf 출력(TCP 및 UDP 모드 모두)과 netperf TCP 출력은 오케스트레이터 파드에 업로드되어 필터링되고 그 결과는 netperf.csv에 기록됩니다.
- 그런 다음 실행 스크립트는 netperf.csv 파일을 추출하여 로컬 디스크에 기록합니다. csv 파일의 모든 단위는 Mbit/초입니다.
- 모든 쿠버네티스 엔티티는 “netperf” 네임스페이스 아래에 생성됩니다.
-
CSV 데이터 출력
MSS , Maximum, 96, 352, 608, 864, 1120, 1376, 1 iperf TCP. Same VM using Pod IP ,35507.000000,33835,33430,35372,35220,35373,35507, 2 iperf TCP. Same VM using Virtual IP ,32997.000000,32689,32997,32256,31995,31904,31830, 3 iperf TCP. Remote VM using Pod IP ,10652.000000,8793,9836,10602,9959,9941,10652, 4 iperf TCP. Remote VM using Virtual IP ,11046.000000,10429,11046,10064,10622,10528,10246, 5 iperf TCP. Hairpin Pod to own Virtual IP ,32400.000000,31473,30253,32075,32058,32400,31734, 6 iperf UDP. Same VM using Pod IP ,10642.000000,10642, 7 iperf UDP. Same VM using Virtual IP ,8983.000000,8983, 8 iperf UDP. Remote VM using Pod IP ,11143.000000,11143, 9 iperf UDP. Remote VM using Virtual IP ,10836.000000,10836, 10 netperf. Same VM using Pod IP ,11675.380000,11675.38, 11 netperf. Same VM using Virtual IP ,0.000000,0.00, 12 netperf. Remote VM using Pod IP ,6646.820000,6646.82, 13 netperf. Remote VM using Virtual IP ,0.000000,0.00, - CSV 데이터 그래프화
-
matplotlib을 사용하여 csv 데이터(및 호환성을 위해 PNG 및 JPG 파일)에서 그래프 SVG 파일을 생성합니다.
- 파이썬 Matplotlib 라인 차트
- 막대 차트
- MSS를 무시하고 최대 대역폭 수치를 사용하면 막대형 차트가 성능을 비교하는 데 더 나은 도구가 될 수 있습니다.
- CSV 데이터를 Google 시트로 가져와서 그래프로 표현하는 것도 가능합니다.
-
matplotlib을 사용하여 csv 데이터(및 호환성을 위해 PNG 및 JPG 파일)에서 그래프 SVG 파일을 생성합니다.
- Network policy enforcement latency : Pod 및 네트워크 정책 변경에 대한 네트워크 정책 적용 지연 시간을 측정 - Link
-
Kubernetes Perfdash : 성능 지표를 수집하고 표시하는 웹 UI - Link , Demo
- 성능 지표는 다양한 노드 수, 플랫폼 유형 및 플랫폼 버전에 대한 성능 테스트 결과를 기반으로 생성됩니다.
- 지원되는 메트릭
- Responsiveness
- Resources
- PodStartup
- TestPhaseTimer
- RequestCount
- RequestCountByClient
-
Kubernetes Performance SLO monitor : api 서버로 수집할 수 없는 성능 SLO()s 를 모니터링 및 메트릭 노출 - Link
- SLO 모니터는 간단한 Pod로, Pod들 및 이벤트를 읽을 수 있어야 합니다.
- SLO 모니터는 다음과 같은 SLO를 측정합니다.
- Pod startup latency
- Pod scheduling latency
- API server availability
- Event processing latency
SLO(서비스 수준 목표, Service Level Objectives)는 고객에가 가용성을 보장하는 SLA를 만족하기 위해 내부적으로 설정하는 목표치를 의미합니다.
Cilium Tuning Guide
Cilium Endpoint Slices (CES) beta - Youtube
- Cilium이 Endpoint가 많은 경우 watch update를 하면 엄청나게 많은 이벤트가 발생하기 때문에 성능 저하가 발생할 수 있습니다.
- CES는 K8S의 EndpointSlice 처럼 Endpoint들을 Slice 단위로 묶어서 관리하여, Slice 단위로 watch update를 할 수 있도록 하여 성능을 개선합니다.
 이전 방식과 Cilium Endpoint Slice 도입 후 비교
- 위의 그림과 같이 이전에는 모든 엔드포인트가 한꺼번에 관리되고 업데이트 되었지만, CES를 사용하면 엔드포인트가 여러 슬라이스로 나누어져 각 슬라이스가 독립적으로 관리되고 업데이트됩니다.
-
사전조건
- CEP가 활성화 되어야 합니다. (
-disable-endpoint-crd가true가 아니어야 합니다.) - Egress Gateway는 CES와 호환되지 않기 때문에 사용되지 않아야 합니다.
- CEP가 활성화 되어야 합니다. (
- CES 설정
# CiliumEndpoint (CEP) per pod : All agents watch for all CEPs, Maps IP to Identity for policy.
$ kubectl get ciliumendpoints.cilium.io -A
# => NAMESPACE            NAME                                      SECURITY IDENTITY   ENDPOINT STATE   IPV4           IPV6
#    cilium-monitoring    grafana-5c69859d9-x2r9v                   48524               ready            10.244.2.71
#    cilium-monitoring    prometheus-6fc896bc5d-zwlkf               46171               ready            10.244.1.36
#    kube-system          coredns-674b8bbfcf-dt7dv                  32751               ready            10.244.2.250
#    kube-system          coredns-674b8bbfcf-khb4w                  32751               ready            10.244.1.48
#    kube-system          hubble-relay-fdd49b976-8mcq9              32342               ready            10.244.1.194
#    kube-system          hubble-ui-655f947f96-ccbxk                7784                ready            10.244.1.179
#    kube-system          metrics-server-5dd7b49d79-gx8jd           24994               ready            10.244.3.24
#    local-path-storage   local-path-provisioner-7dc846544d-phnjz   31623               ready            10.244.2.23
$ kubectl get ciliumendpoints.cilium.io -A | wc -l
# =>        9
$ kubectl get crd
# => ciliumcidrgroups.cilium.io                   2025-08-30T08:12:26Z
#    ciliumclusterwidenetworkpolicies.cilium.io   2025-08-30T08:12:25Z
#    ciliumendpoints.cilium.io                    2025-08-30T08:12:22Z
#    ciliumidentities.cilium.io                   2025-08-30T08:12:20Z
#    ...

#
$ helm upgrade cilium cilium/cilium --version 1.18.1 --namespace kube-system --reuse-values \
  --set ciliumEndpointSlice.enabled=true

$ kubectl rollout restart -n kube-system deployment cilium-operator
# => deployment.apps/cilium-operator restarted
$ kubectl rollout restart -n kube-system ds/cilium
# => daemonset.apps/cilium restarted

# Bactches CEPs into CiliumEndpointSlice CRDs : Significantly fewer watch events.
$ kubectl get crd
# => NAME                                         CREATED AT
#    ciliumcidrgroups.cilium.io                   2025-08-30T08:12:26Z
#    ciliumclusterwidenetworkpolicies.cilium.io   2025-08-30T08:12:25Z
#    ciliumendpoints.cilium.io                    2025-08-30T08:12:22Z
#    <span style="color: green;">ciliumendpointslices.cilium.io               2025-08-30T15:03:31Z</span> # 추가됨
#    ciliumidentities.cilium.io                   2025-08-30T08:12:20Z
#    ...
$ kubectl get ciliumendpointslices.cilium.io -A | wc -l
# => 4
$ kubectl get ciliumendpointslices.cilium.io -A
# => NAME                  AGE
#    ces-5vfjvlfnz-kt5mm   70s
#    ces-ltcdg4zdx-zmfrl   70s
#    ces-nzbjpdccd-bryjt   70s
- 적용 후 효과 : 1000개 노드 등이 있을때 API Latency가 87% 감소하였습니다.
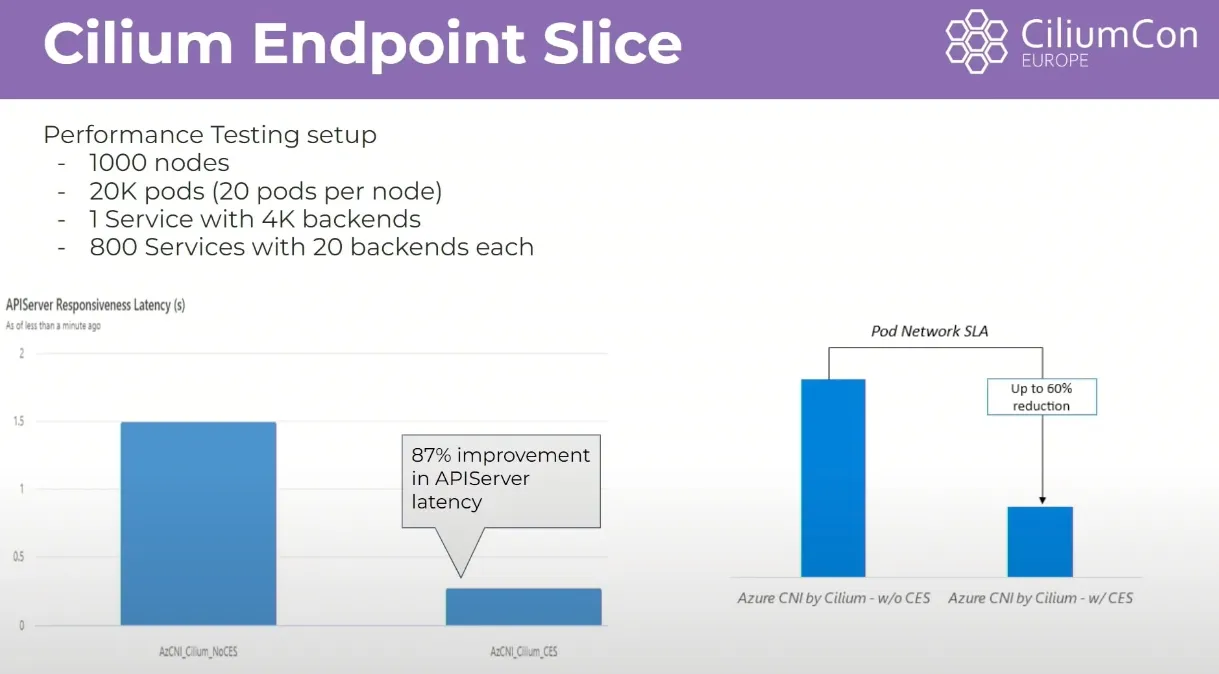
eBPF Host Routing , Netkit - Youtube , Youtube2
- 기존에 네트워크 트래픽이 파드의 네트워크 네임스페이스에서 호스트 네트워크 네임스페이스로 이동할 때 IP, netfilter, routing 등의 IP 스택을 걸쳐서 veth 페어를 통해 전달되었습니다. 이 과정에서 ingress와 egress 큐에 패킷이 대기하게 되어 지연이 발생할 수 있습니다.
-
eBPF Host Routing : bpf_redirect_peer 함수를 통해 호스트 NET NS 도착 시 → 바로 파드의 NET NS 로 전달하여 불필요한 IP 스택을 거치지 않도록 하고 성능을 향상시킵니다. 또한 CPU 큐잉 과정을 거치지 않습니다.
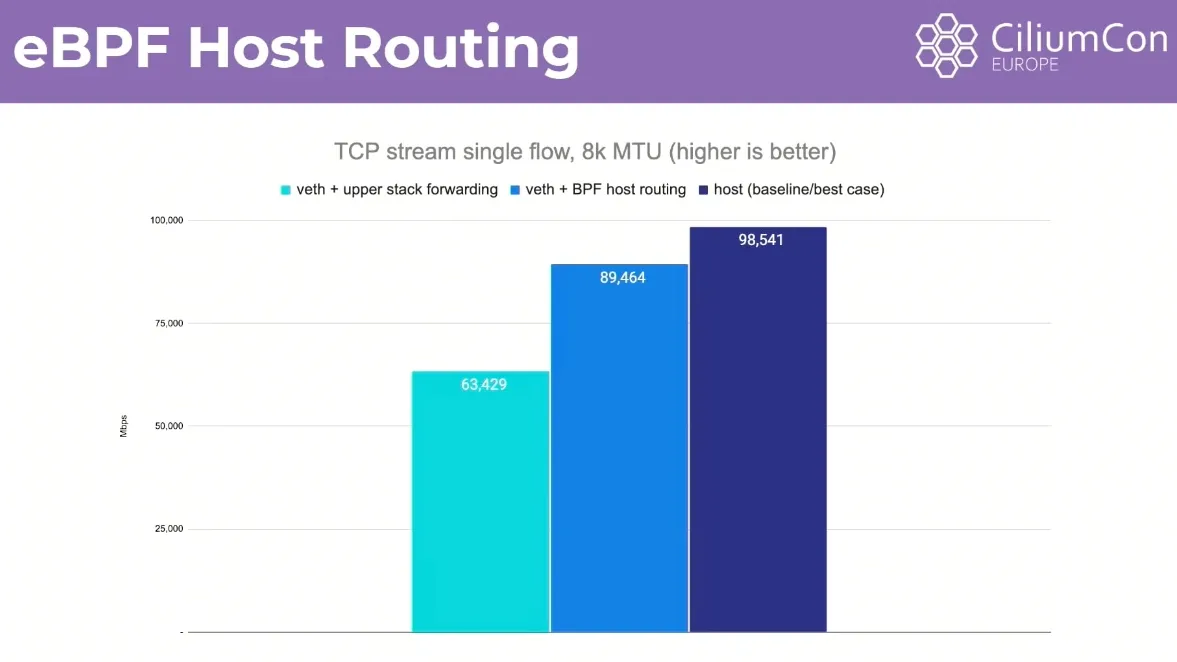 기존 파드 네트워크 vs veth + BPF host routing vs host (base)
# $ kubectl exec -it -n kube-system ds/cilium -- cilium status | grep Routing # => KubeProxyReplacement: True [eth0 172.20.0.2 fc00:f853:ccd:e793::2 fe80::42:acff:fe14:2 (Direct Routing)] # Routing: Network: Native Host: BPF- eBPF Host Routing 만으로는 egress시 호스트 네트워크 스택을 거치기 때문에 완전한 성능 향상을 기대하기 어렵습니다. 그래서 아래의 Netkit 방식을 사용하면 더 좋은 성능을 기대할 수 있습니다.
-
Netkit devices : veth 와 유사(쌍), ingress + egress 큐(CPU) 대기 없이 모두 빠르게 전달 가능.
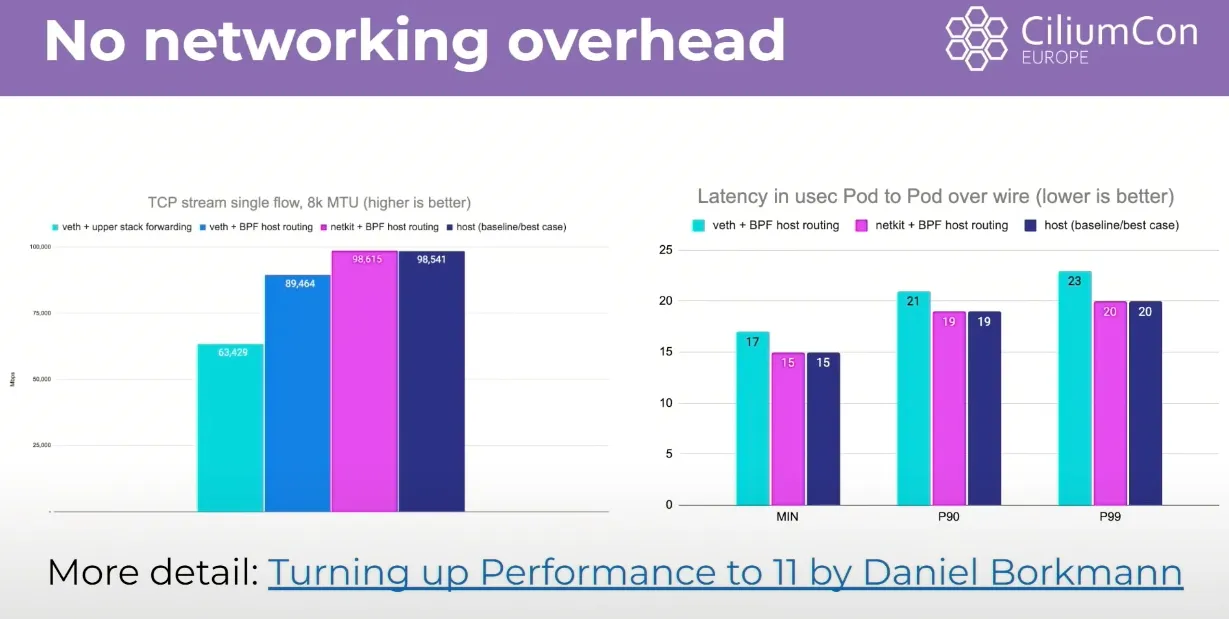 eBPF Host Routing에 Netkit까지 사용하면 host와 거의 동일한 성능을 발휘
- netkit 설정 시도 : 커널 6.8 이상 , eBPF host-routing이 필요합니다.
  #
  $ docker exec -it myk8s-control-plane uname -r
  # => 6.10.14-linuxkit

  #
  $ helm upgrade cilium cilium/cilium --version 1.18.1 --namespace kube-system --reuse-values \
    --set bpf.datapathMode=netkit

  $ kubectl rollout restart -n kube-system deployment cilium-operator
  $ kubectl rollout restart -n kube-system ds/cilium

  #
  $ kubectl logs -n kube-system cilium-k84hl
  # => time=2025-08-24T09:33:36.486143842Z level=fatal source=/go/src/github.com/cilium/cilium/pkg/logging/slog.go:159
  #    .. msg="netkit devices need kernel 6.7.0 or newer and CONFIG_NETKIT"

  #
  $ helm upgrade cilium cilium/cilium --version 1.18.1 --namespace kube-system --reuse-values \
    --set bpf.datapathMode=veth

  $ kubectl exec -it -n kube-system ds/cilium -- cilium status | grep 'Device Mode'
  # => Device Mode:             veth
- netkit 설정 시도 : 커널 6.8 이상 , eBPF host-routing이 필요합니다.
Kubeshark
- Kubernetes 내부/외부의 API 호출, 이동중인 데이터 등 모든 통신을 모니터링하고 분석할 수 있는 도구입니다. - Home, Docs, Blog, demo
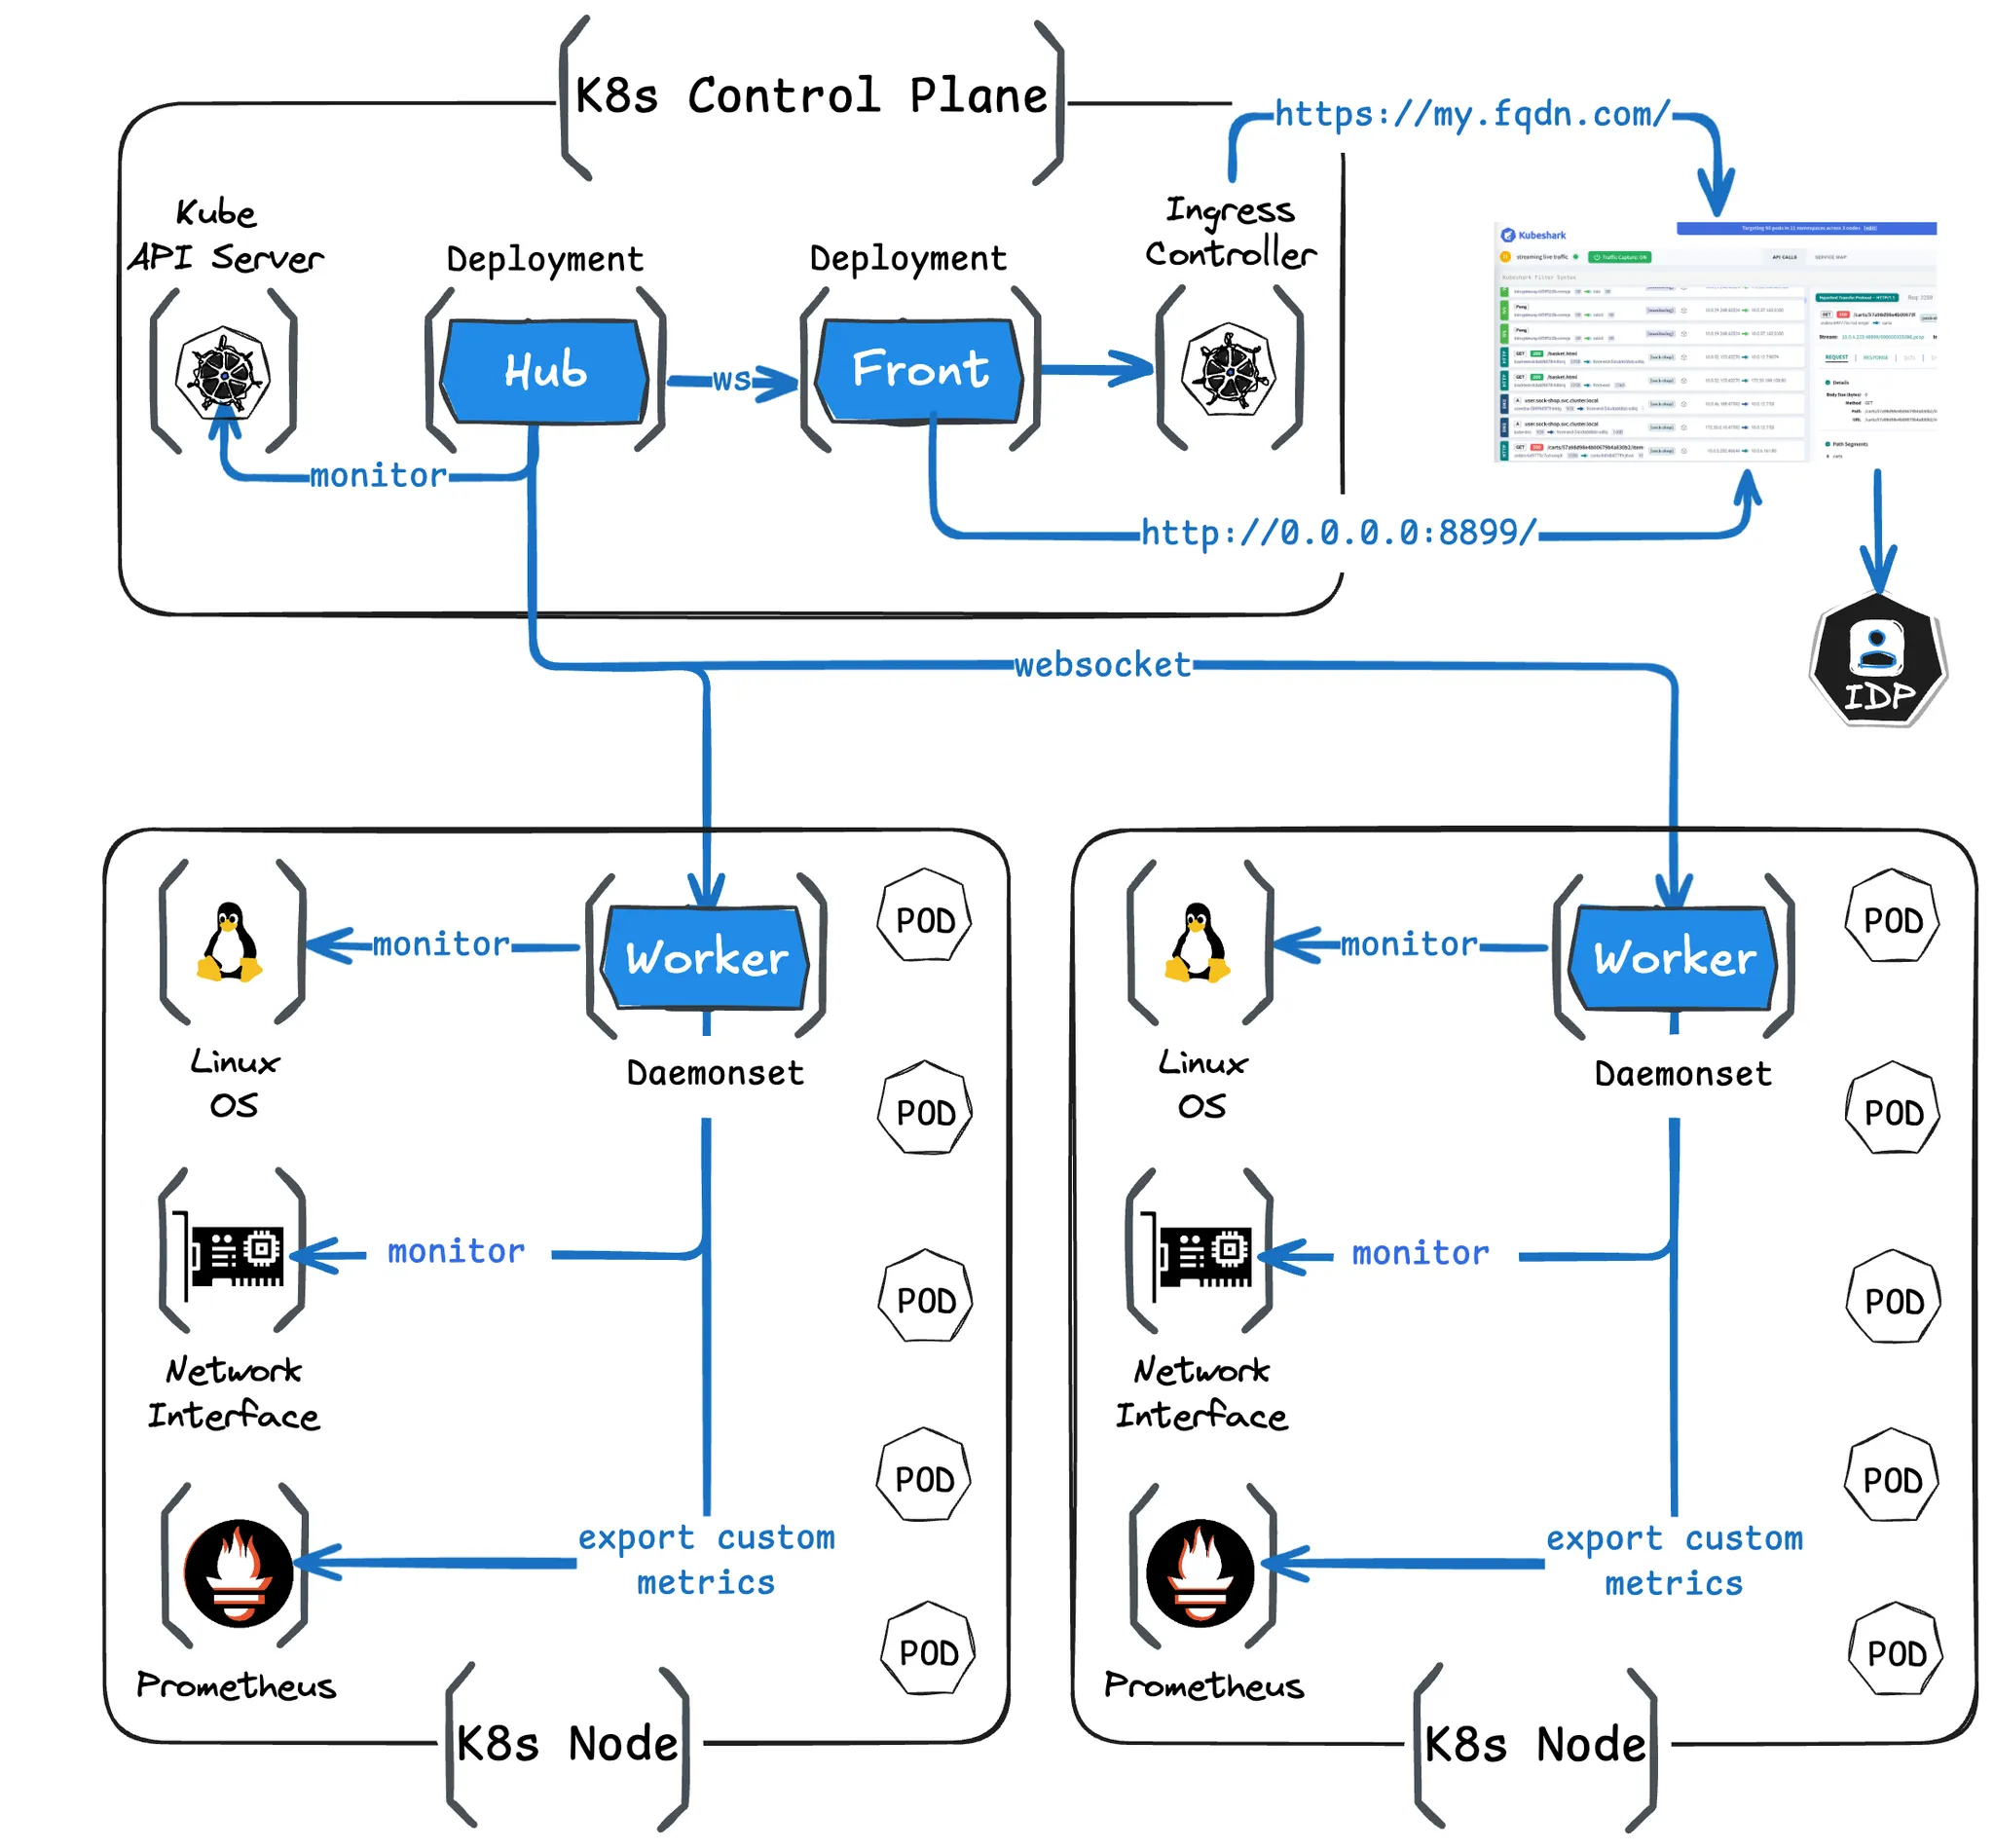
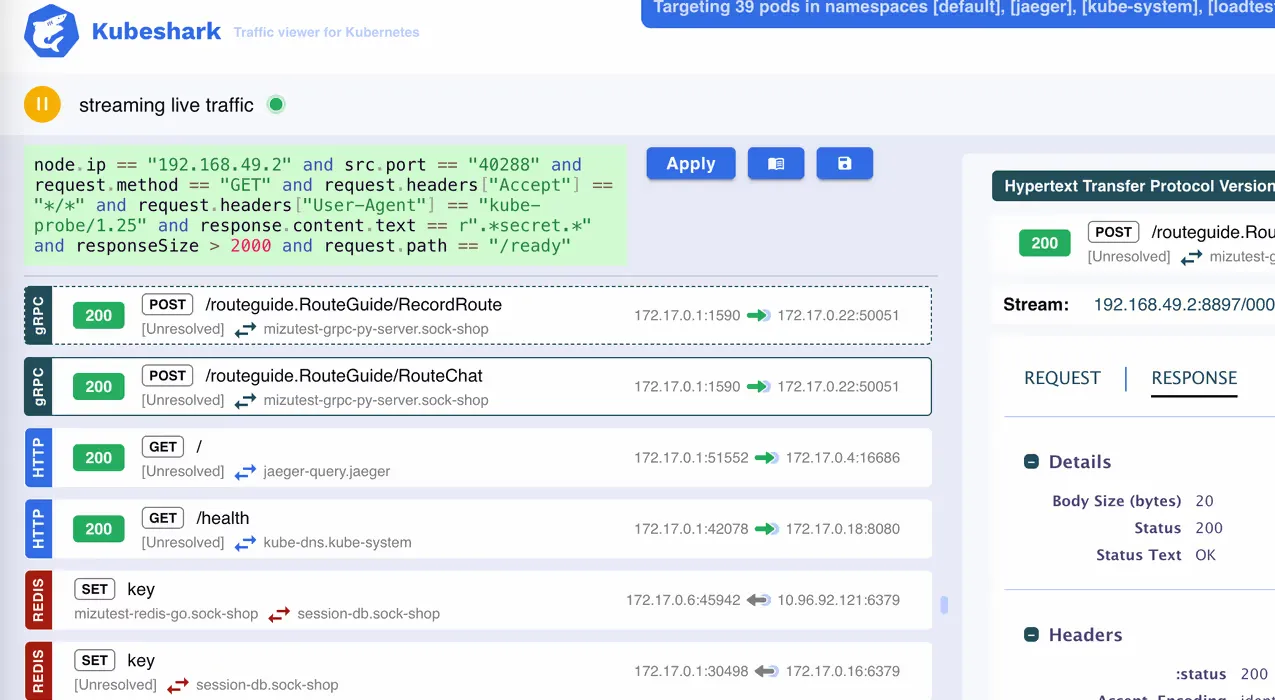
- 설치 - Docs
# mac
$ brew install kubeshark
# => ==> Fetching downloads for: kubeshark
#    ==> Downloading https://ghcr.io/v2/homebrew/core/kubeshark/manifests/52.8.1
#    ############################################################################################################################################################################ 100.0%
#    ==> Fetching kubeshark
#    ==> Downloading https://ghcr.io/v2/homebrew/core/kubeshark/blobs/sha256:d65e38045ff18f7fc6fc83df77cc9da945ec7e99033d43f91994f0768c2c2e99
#    ############################################################################################################################################################################ 100.0%
#    ==> Pouring kubeshark--52.8.1.arm64_sequoia.bottle.tar.gz
#    🍺  /opt/homebrew/Cellar/kubeshark/52.8.1: 9 files, 65MB
#    ==> Running `brew cleanup kubeshark`...

# 확인
$ kubeshark version
# => v52.8.1

$ kubeshark -h
# => Available Commands:
#      clean       Removes all Kubeshark resources
#      completion  Generate the autocompletion script for the specified shell
#      config      Generate Kubeshark config with default values
#      console     Stream the scripting console logs into shell
#      help        Help about any command
#      license     Print the license loaded string
#      logs        Create a ZIP file with logs for GitHub issues or troubleshooting
#      pcapdump    Store all captured traffic (including decrypted TLS) in a PCAP file.
#      pprof       Select a Kubeshark container and open the pprof web UI in the browser
#      proxy       Open the web UI (front-end) in the browser via proxy/port-forward
#      scripts     Watch the `scripting.source` and/or `scripting.sources` folders for changes and update the scripts
#      tap         Capture the network traffic in your Kubernetes cluster
#      version     Print version info

# Capture the network traffic in your Kubernetes cluster
$ kubeshark tap
# => 2025-08-31T00:37:22+09:00 INF tapRunner.go:47 > Using Docker: registry=docker.io/kubeshark tag=
#    2025-08-31T00:37:22+09:00 INF tapRunner.go:51 > Kubeshark will store the traffic up to a limit (per node). Oldest TCP/UDP streams will be removed once the limit is reached. limit=5Gi
#    2025-08-31T00:37:22+09:00 INF versionCheck.go:23 > Checking for a newer version...
#    2025-08-31T00:37:22+09:00 INF common.go:69 > Using kubeconfig: path=/Users/anonym/.kube/config
#    2025-08-31T00:37:22+09:00 INF tapRunner.go:67 > Telemetry enabled=true notice="Telemetry can be disabled by setting the flag: --telemetry-enabled=false"
#    2025-08-31T00:37:22+09:00 INF tapRunner.go:69 > Targeting pods in: namespaces=["cilium-monitoring","cilium-secrets","default","kube-node-lease","kube-public","kube-system","local-path-storage"]
#    2025-08-31T00:37:22+09:00 INF tapRunner.go:136 > Targeted pod: grafana-5c69859d9-x2r9v
#    2025-08-31T00:37:22+09:00 INF tapRunner.go:136 > Targeted pod: prometheus-6fc896bc5d-zwlkf
#    2025-08-31T00:37:22+09:00 INF tapRunner.go:136 > Targeted pod: cilium-9qfx8
#    2025-08-31T00:37:22+09:00 INF tapRunner.go:136 > Targeted pod: cilium-envoy-bwd6b
#    2025-08-31T00:37:22+09:00 INF tapRunner.go:136 > Targeted pod: cilium-operator-6d667fff-krg69
#    2025-08-31T00:37:22+09:00 INF tapRunner.go:136 > Targeted pod: coredns-674b8bbfcf-dt7dv
#    2025-08-31T00:37:22+09:00 INF tapRunner.go:136 > Targeted pod: coredns-674b8bbfcf-khb4w
#    2025-08-31T00:37:22+09:00 INF tapRunner.go:136 > Targeted pod: etcd-myk8s-control-plane
#    2025-08-31T00:37:22+09:00 INF tapRunner.go:136 > Targeted pod: hubble-relay-fdd49b976-8mcq9
#    2025-08-31T00:37:22+09:00 INF tapRunner.go:136 > Targeted pod: hubble-ui-655f947f96-ccbxk
#    2025-08-31T00:37:22+09:00 INF tapRunner.go:136 > Targeted pod: kube-apiserver-myk8s-control-plane
#    2025-08-31T00:37:22+09:00 INF tapRunner.go:136 > Targeted pod: kube-controller-manager-myk8s-control-plane
#    2025-08-31T00:37:22+09:00 INF tapRunner.go:136 > Targeted pod: kube-scheduler-myk8s-control-plane
#    2025-08-31T00:37:22+09:00 INF tapRunner.go:136 > Targeted pod: metrics-server-5dd7b49d79-gx8jd
#    2025-08-31T00:37:22+09:00 INF tapRunner.go:136 > Targeted pod: local-path-provisioner-7dc846544d-phnjz
#    2025-08-31T00:37:22+09:00 INF tapRunner.go:79 > Waiting for the creation of Kubeshark resources...
#    2025-08-31T00:37:24+09:00 INF helm.go:128 > Downloading Helm chart: repo-path=/Users/anonym/Library/Caches/helm/repository url=https://github.com/kubeshark/kubeshark.github.io/releases/download/kubeshark-52.8.1/kubeshark-52.8.1.tgz
#    2025-08-31T00:37:25+09:00 INF helm.go:147 > Installing using Helm: kube-version=">= 1.16.0-0" release=kubeshark source=["https://github.com/kubeshark/kubeshark/tree/master/helm-chart"] version=52.8.1
#    2025-08-31T00:37:25+09:00 INF helm.go:61 > creating 21 resource(s)
#    2025-08-31T00:37:26+09:00 INF tapRunner.go:96 > Installed the Helm release: kubeshark
#    2025-08-31T00:37:26+09:00 INF tapRunner.go:258 > Added: pod=kubeshark-front
#    2025-08-31T00:37:26+09:00 INF tapRunner.go:167 > Added: pod=kubeshark-hub
#    2025-08-31T00:37:52+09:00 INF tapRunner.go:192 > Ready. pod=kubeshark-hub
#    2025-08-31T00:38:08+09:00 INF tapRunner.go:282 > Ready. pod=kubeshark-front
#    2025-08-31T00:38:08+09:00 INF proxy.go:31 > Starting proxy... namespace=default proxy-host=127.0.0.1 service=kubeshark-front src-port=8899
#    2025-08-31T00:38:13+09:00 INF tapRunner.go:417 > Kubeshark is available at: url=<span style="color: green;">http://127.0.0.1:8899</span> # 👈 Web UI
#    2025-08-31T00:38:13+09:00 INF console.go:45 > Starting scripting console ...
#    E0831 00:38:15.481130    2419 proxy_server.go:147] Error while proxying request: error dialing backend: context canceled
#    2025-08-31T00:38:18+09:00 INF console.go:61 > Connecting to: host=127.0.0.1 url=http://127.0.0.1:8899/api
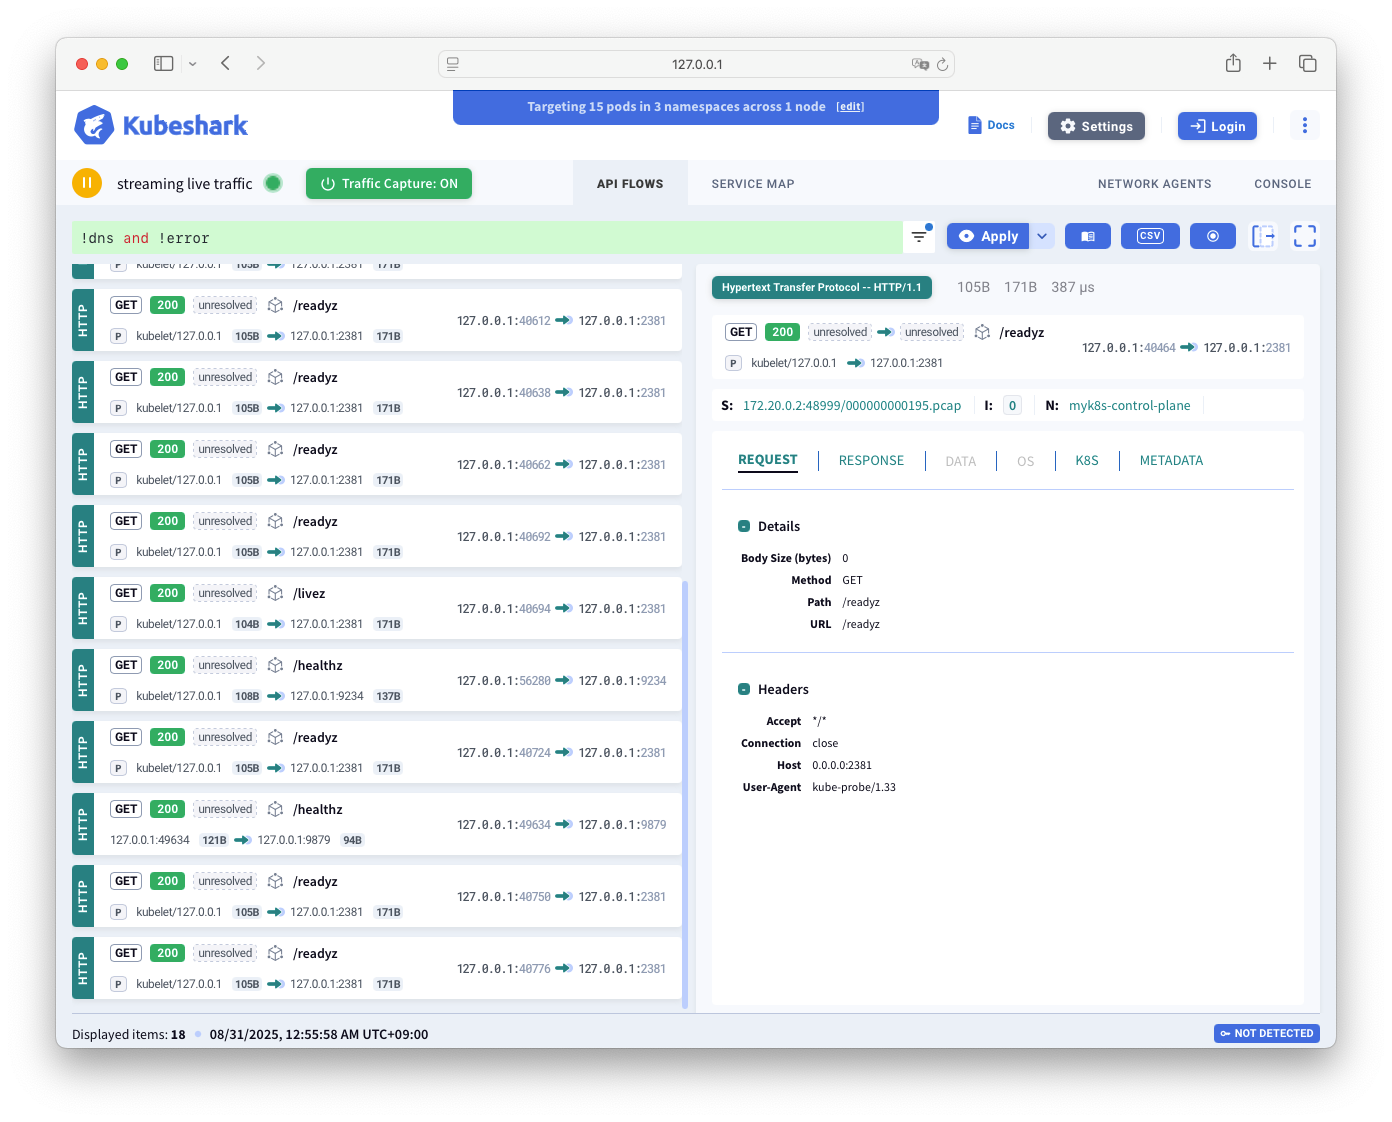 API Flow 뷰
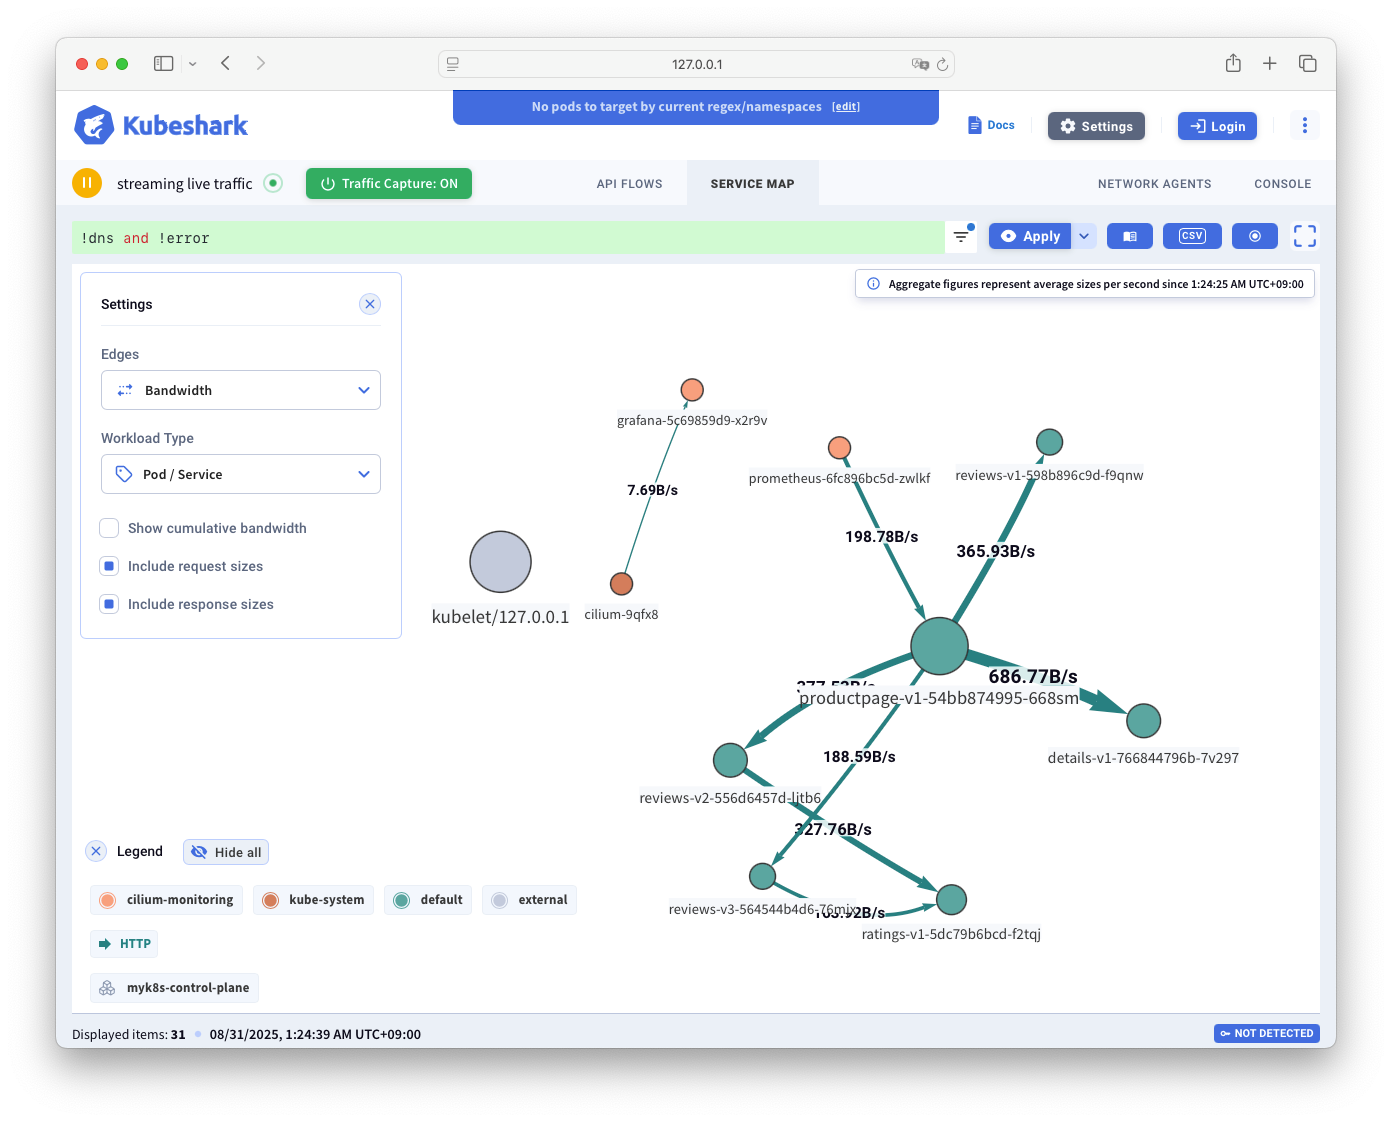 Service Map 뷰
- 무료 버전에서는 3개 노드, 60개 파드의 제한이 있어서 간단한 테스트만 가능합니다.
- (옵션) 폐쇄망 Air-Gapped 환경 : Enterprise Tier(Plan)에서만 가능 - Docs
# Make sure to disable internet connectivity: $ internetConnectivity: false - (참고) 삭제
# cleanup
$ kubeshark clean
마치며
이번 포스트에서는 Kubernetes의 성능 측정 및 모니터링 방법과 튜닝방법, Cilium의 성능 측정 및 튜닝 방법에 대해서 알아보았습니다.
작은 규모의 클러스터만 사용해서 간과하고 있었는데, 규모가 커지면 다양한 문제가 발생할 수 있음을 알게 되어 유익한 시간이었습니다.
정말 배우고 익혀야 하는것이 끝이 없다는 생각이 듭니다. ![]()
모든것을 다 알 수는 없지만, 스터디를 통해 많은 것을 알게되고 경험하게 되어 너무 좋습니다.
기존 스터디도 블로그로 정리한 글을 실무에서 잘 활용하고 있는데,
이번 스터디도 큰 도움이 될것 같습니다.
스터디를 진행해주시는 가시다 님께 다시 한번 감사드립니다. ![]()
